
ETABS BIM link for steel connection design (AISC)
1 How to activate the link
- Install the latest version of IDEA StatiCa
- Make sure you are using a supported version of ETABS – updates are published in the BIM section of the main website
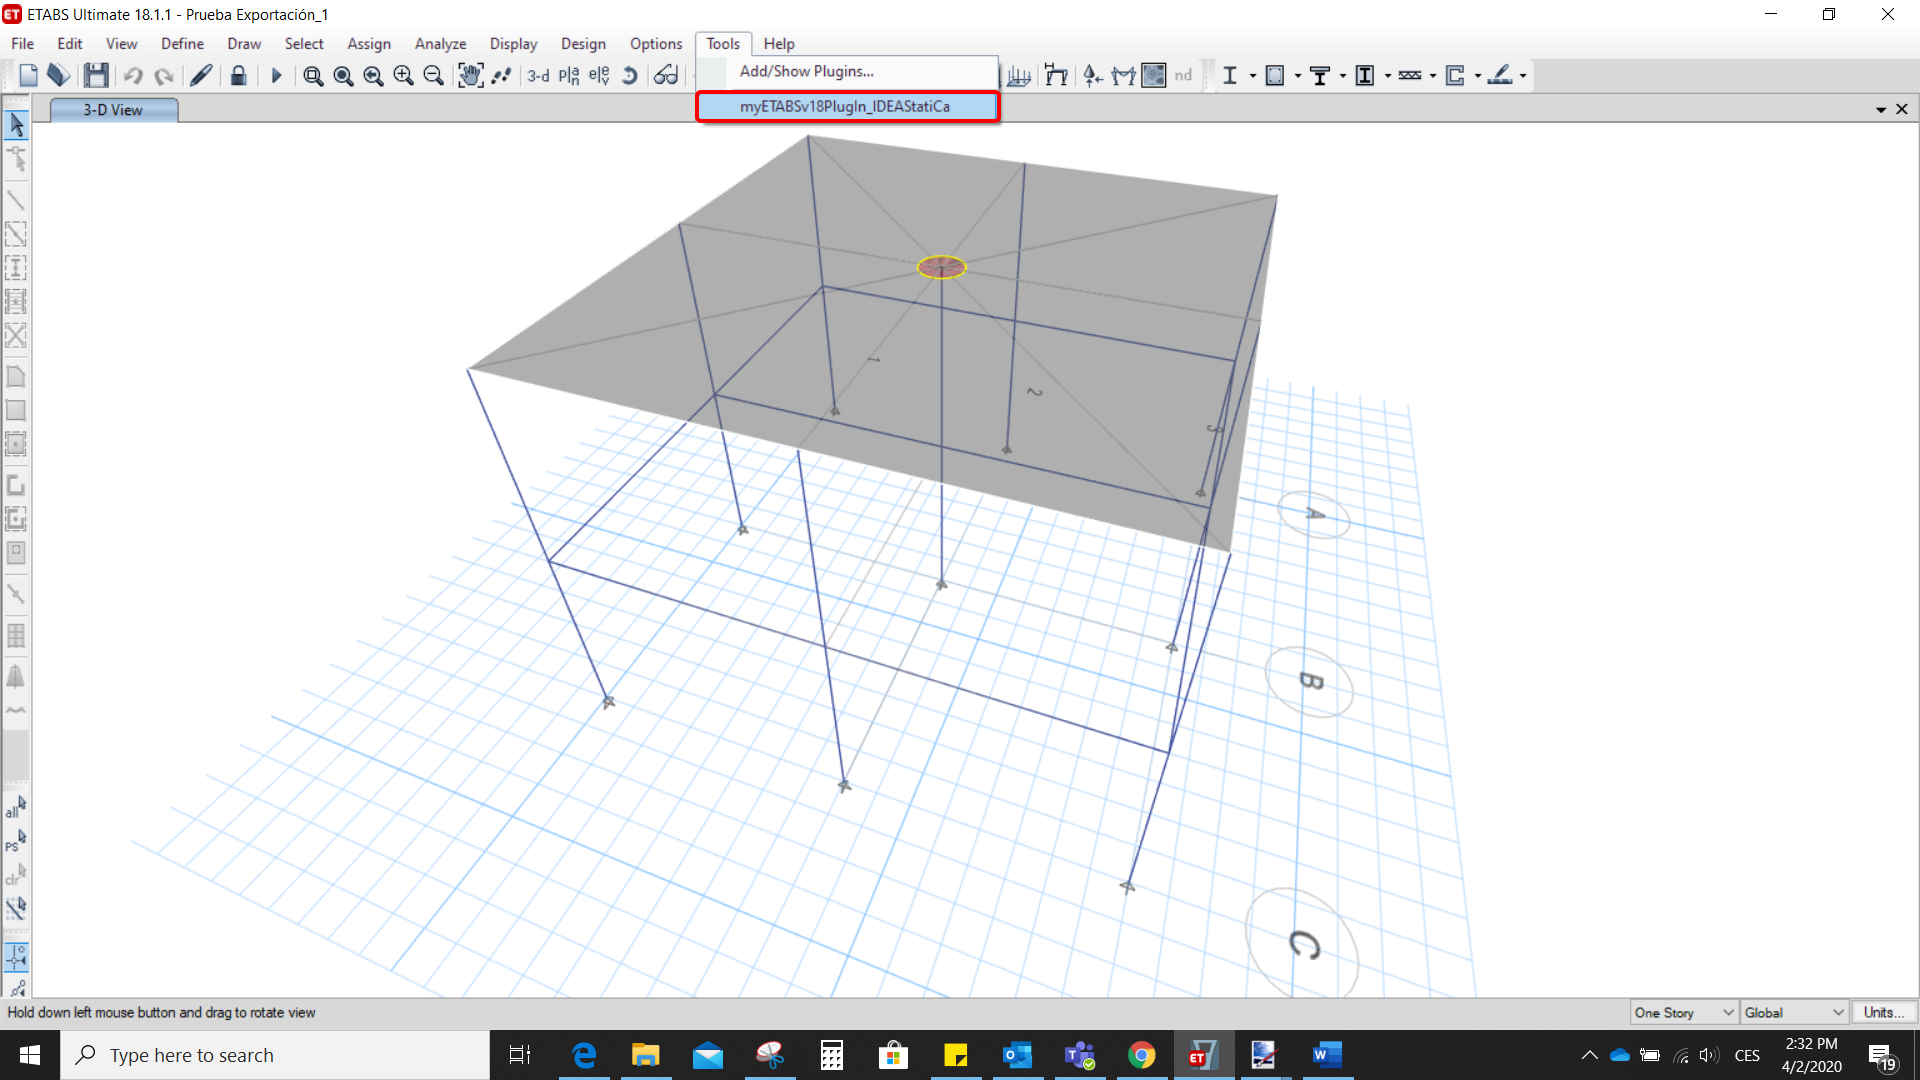
After installation of both programs, start ETABS and Click Tools > Add/Show Plugins to open the Plugin Manager dialog. This option lets you install and add add-ins (programs) to the appropriate places in the ETABS menu.
Browse for
C:\Program Files\IDEA StatiCa\StatiCa 20.0\ETABSv18PlugIn_IDEAStatiCa.dll
and click Add

2 How to use the link
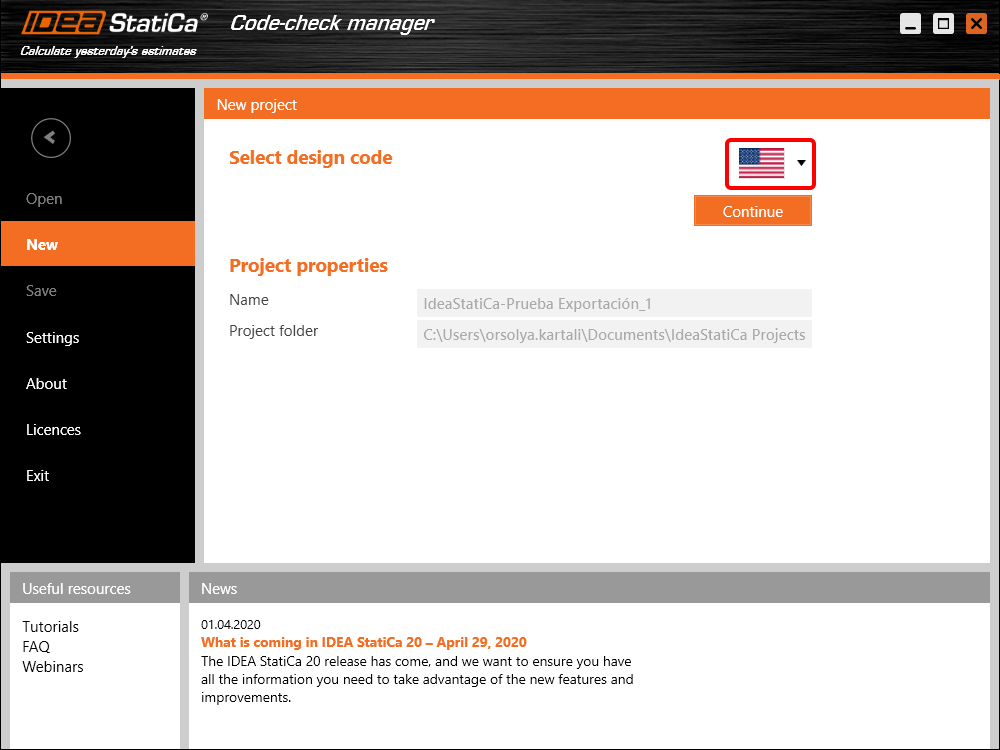
Open the attached project in ETABS and run the analysis.
Go to the menu item Tools and run the export command you have just defined.
The Code-check manager opens and at first, you need to choose the code.
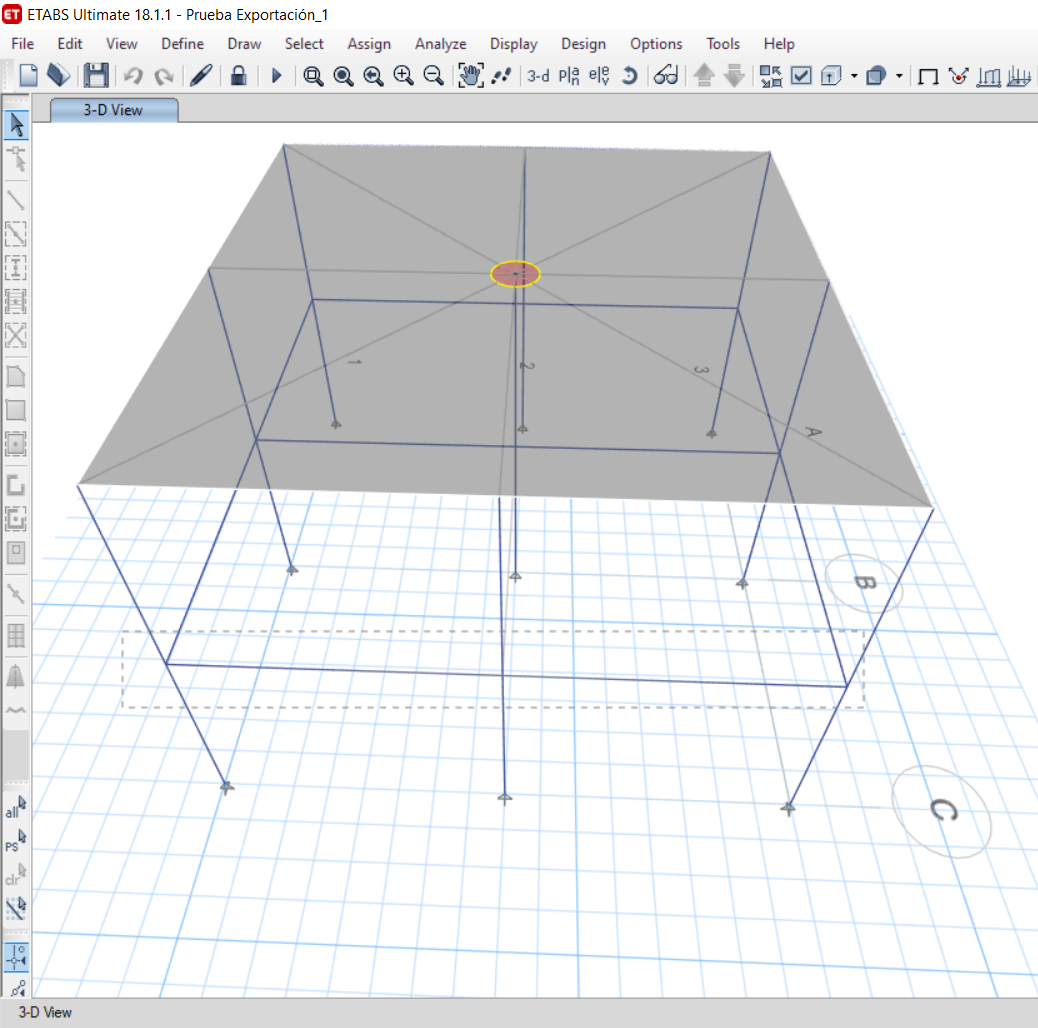
Then you can make a rectangular selection in the ETABS project to choose which joints you want to export. You can export more joints at once using the multiple selections.
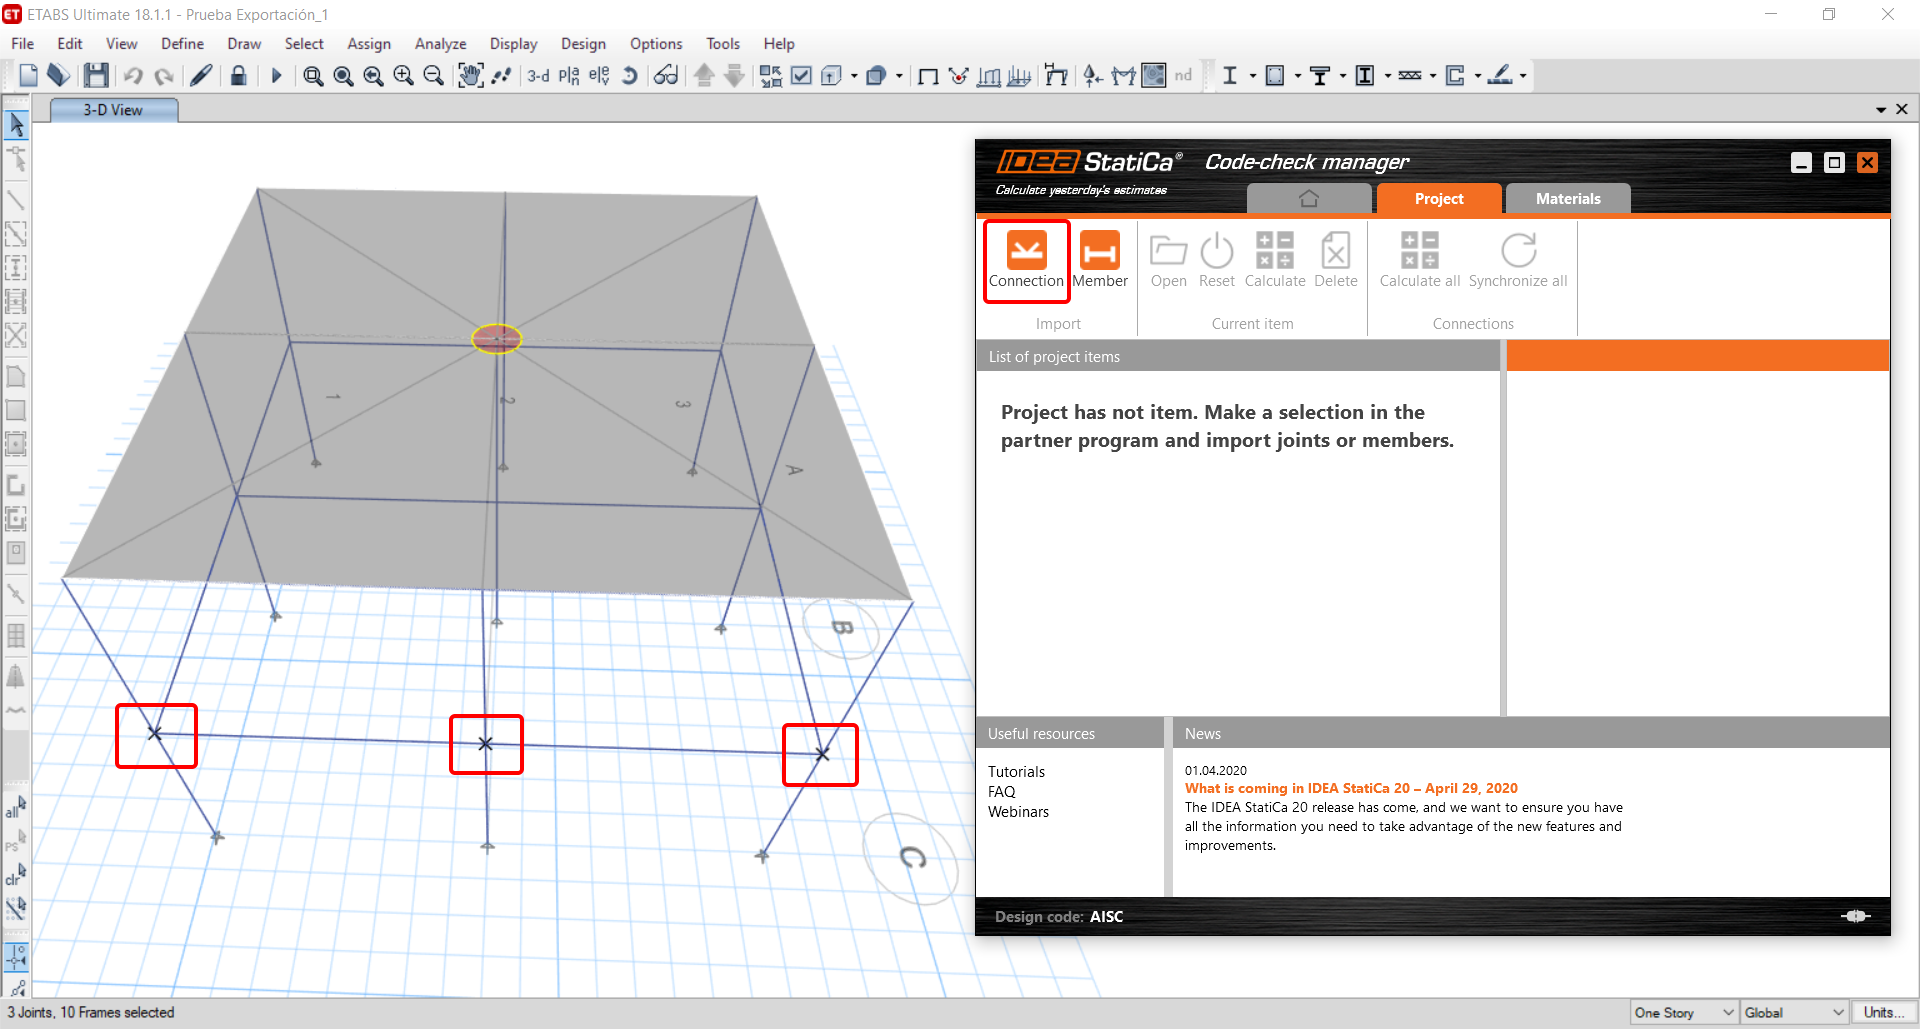
If the joints are selected, you can click on the Connection button in the Code-check manager. With this, all the selected joints from ETABS will be imported into the Code-check manager.
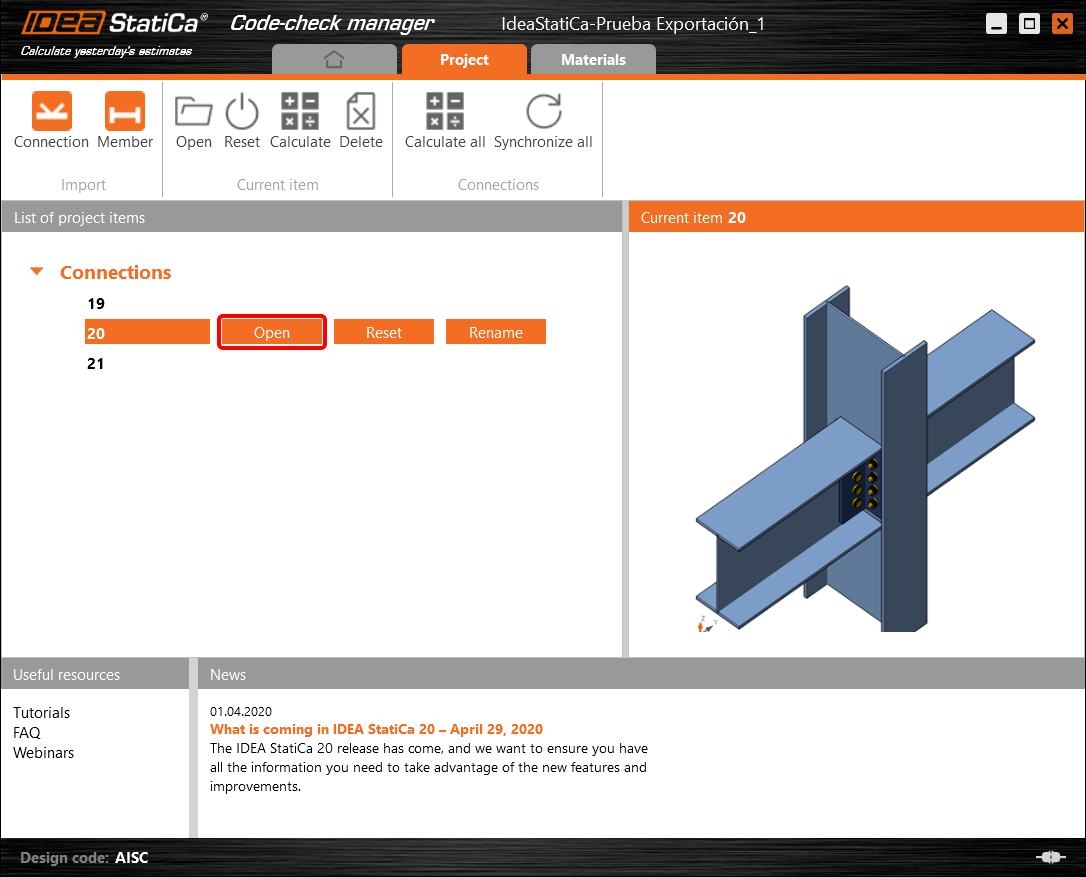
The next thing you need to do is to configure the joints in the Code-check manager. In this tutorial, you will only focus on one of the three imported joints, but the process would be the same for all of them.
You click on the joint on the left side (joint 20). On the right side, you can see the scheme of the joint, you can set the bearing member and merge the continuous members. After that, click on the Finish button to complete the configuration of the joint.
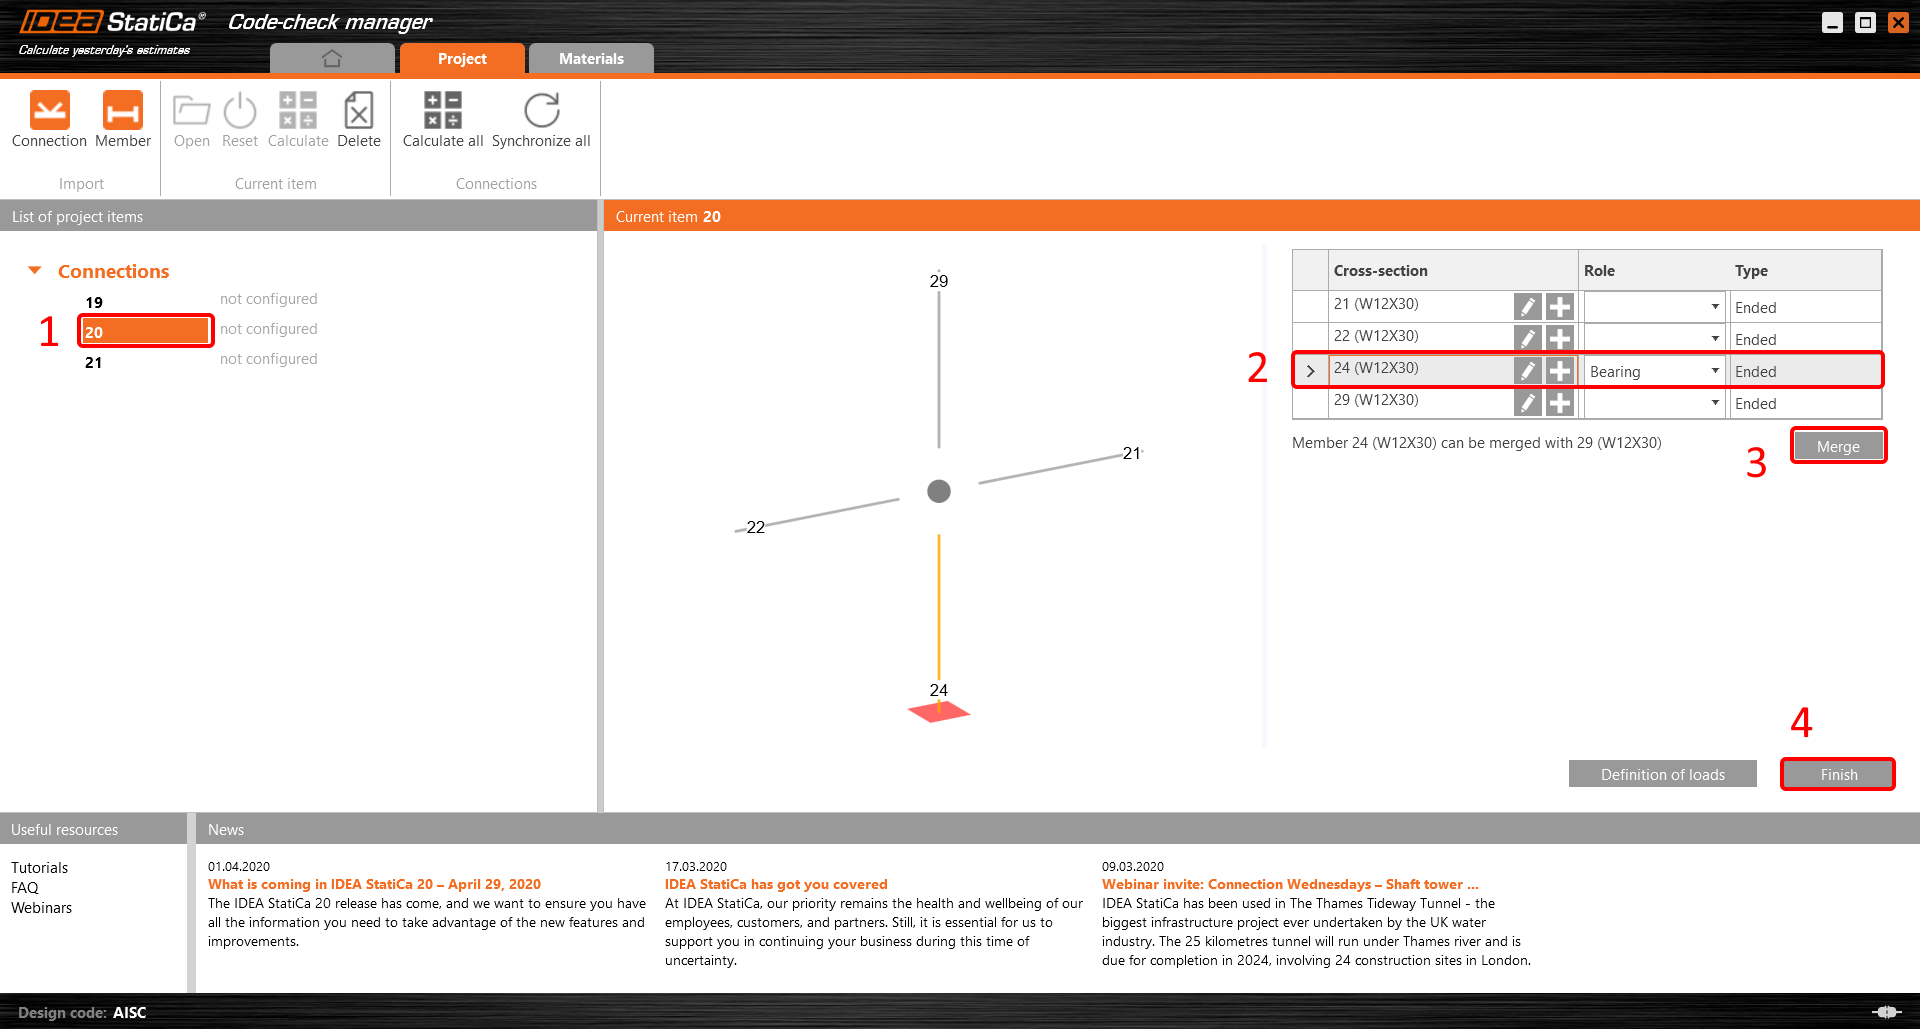
The joint is now ready to be opened in IDEA StatiCa Connection for the CBFEM analysis.

3 Design
Automatic data transfer is started and IDEA StatiCa Connection with a generated project is launched. All members and load effects were added automatically.
This tutorial works with imperial units. If you use metric units, you can switch them to imperial by clicking on the unit in the bottom part of the window.

Now you will define a set of manufacturing operations to model the connection between members. In the items tree, you right-click on Operations and select the option New operation.
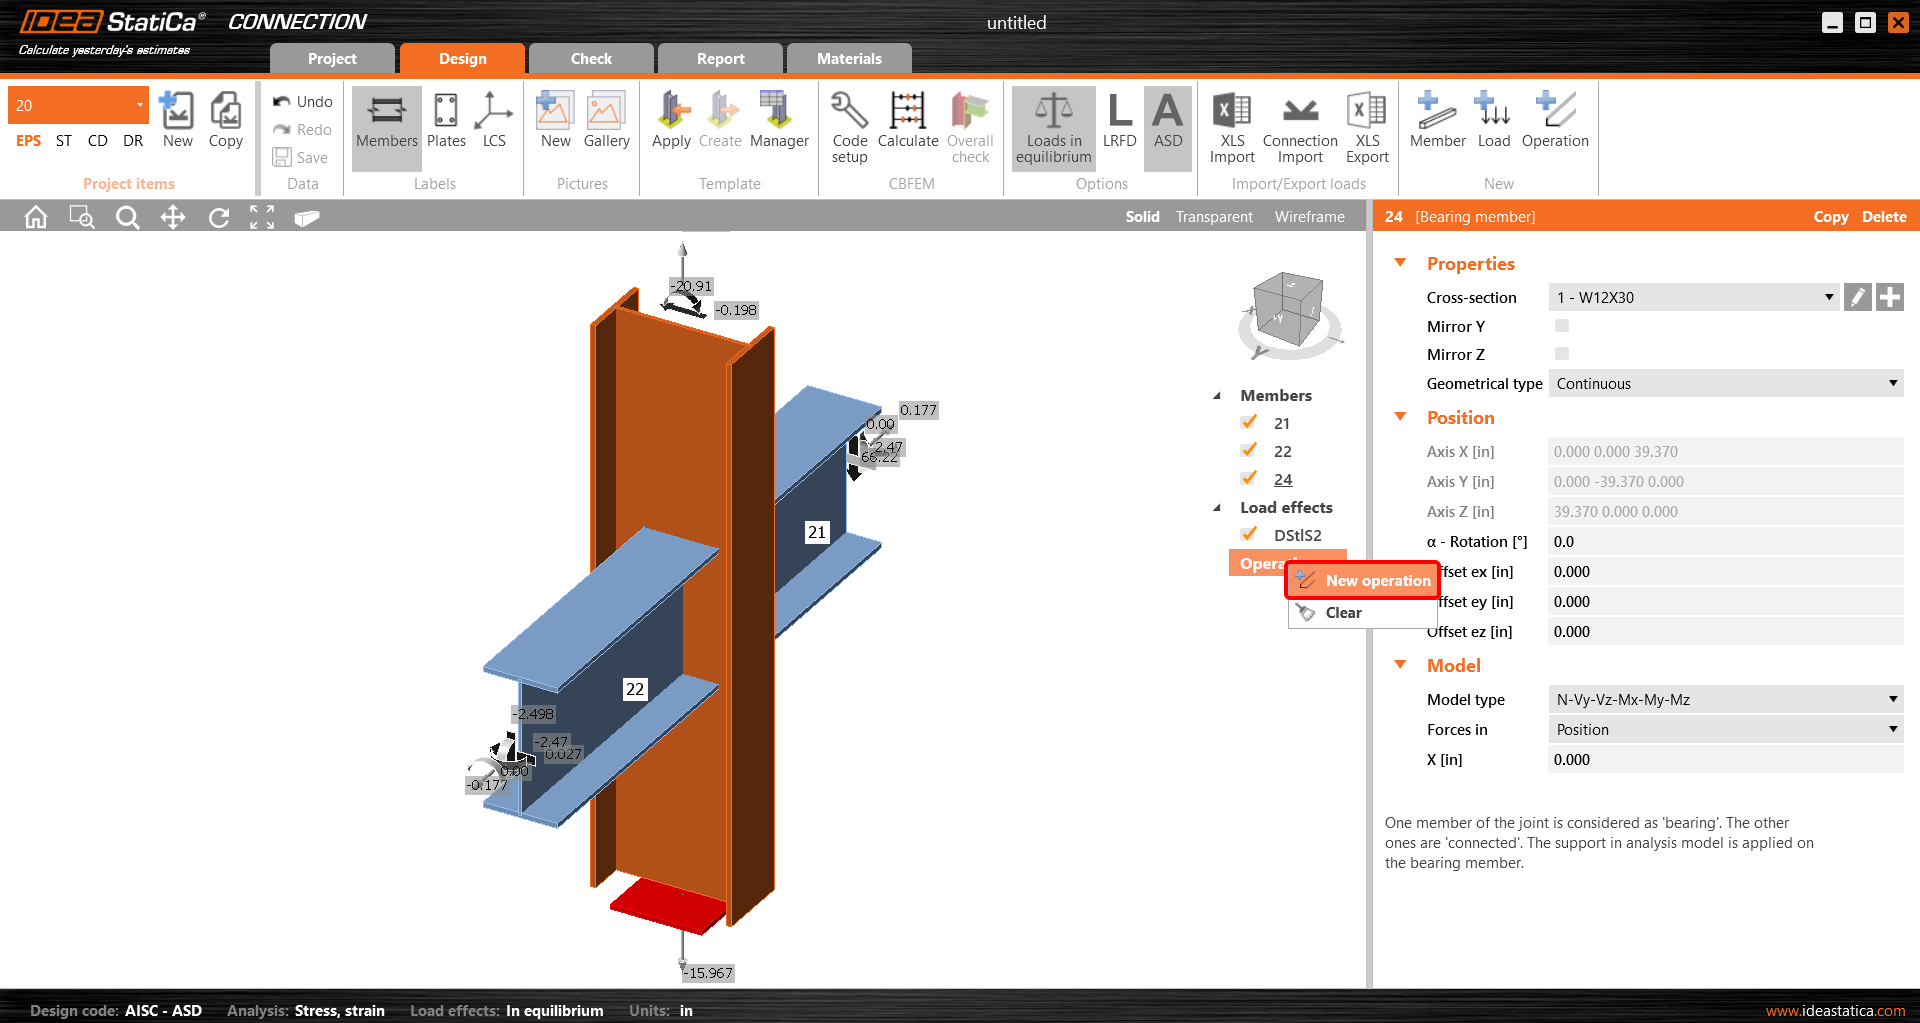
And you add the operation Cleat.


And set the properties of CLEAT1 as follows:

You can check the design of this simple joint.

4 Check
The analysis based on CBFEM is started by the icon Calculate from the top ribbon. The analysis model is automatically generated, the calculation is performed, and you can check the results.
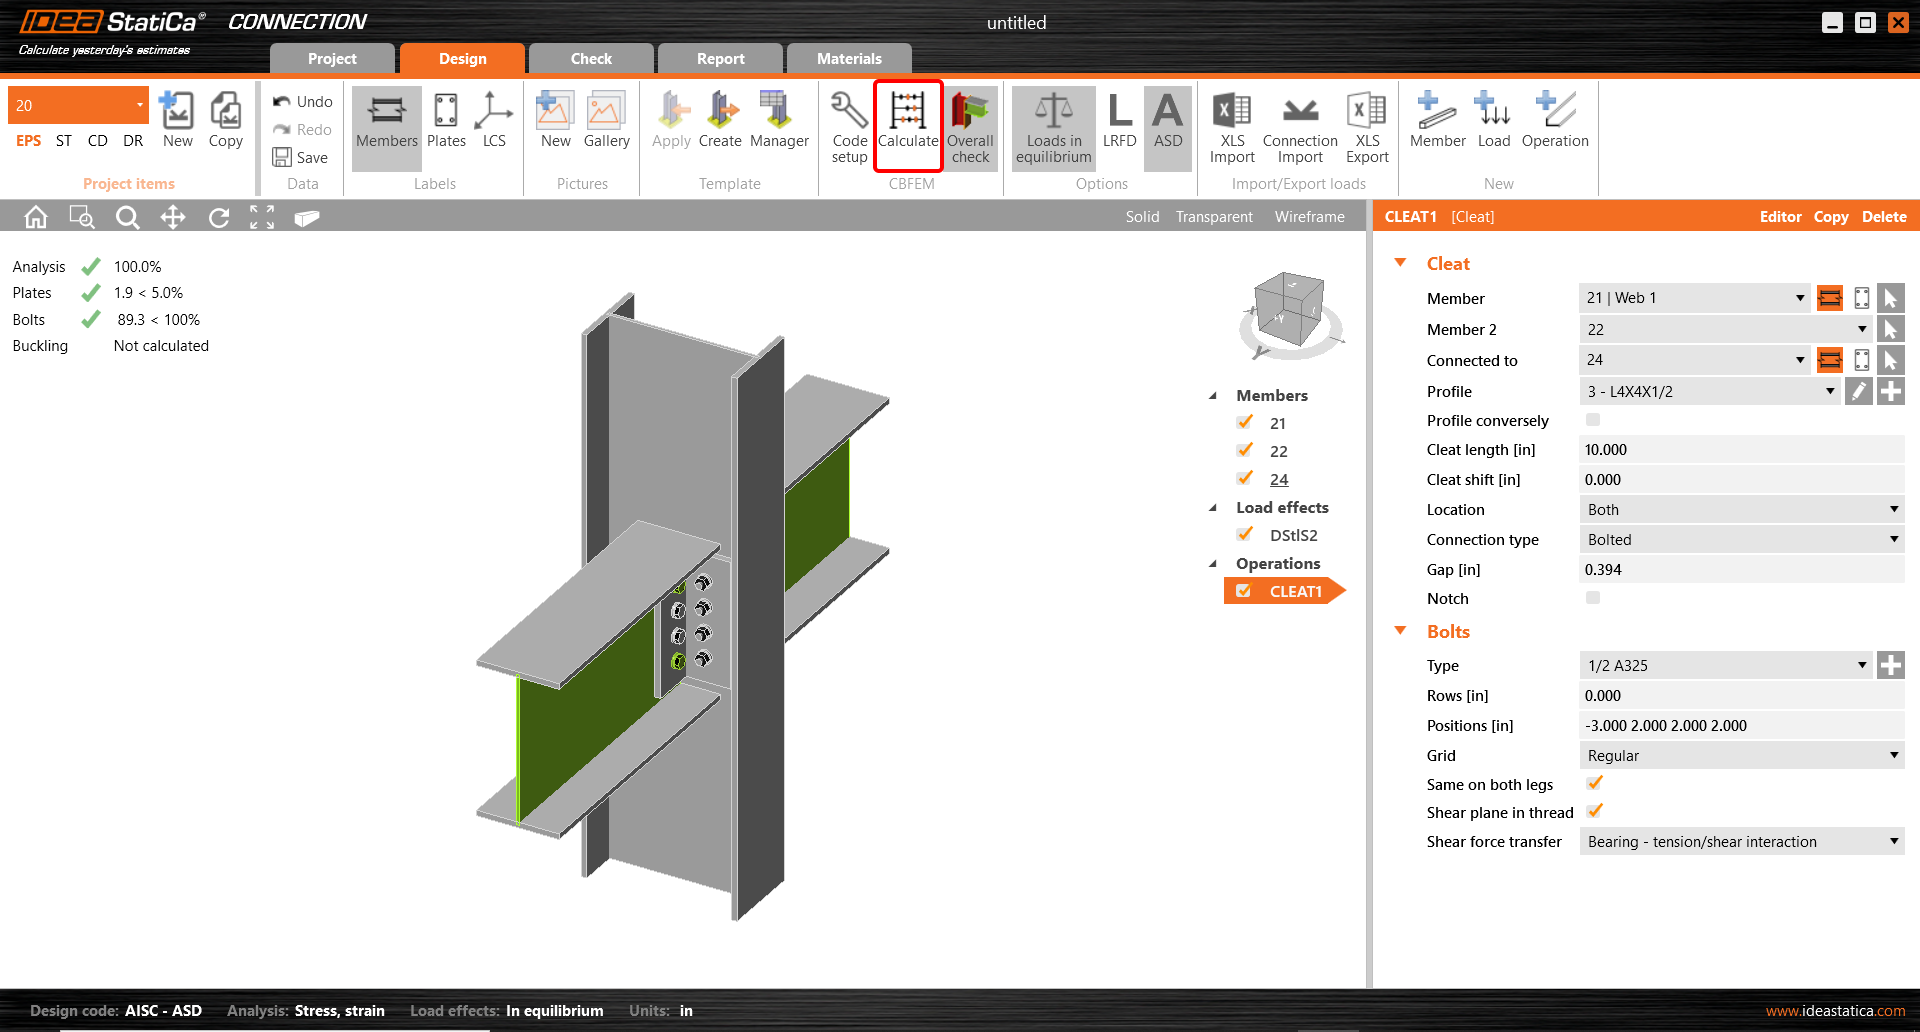
Activate Overall check, Equivalent stress, Mesh and Deformed from the ribbon to get a full picture of what is happening in the joint. Everything is displayed in the 3D window.

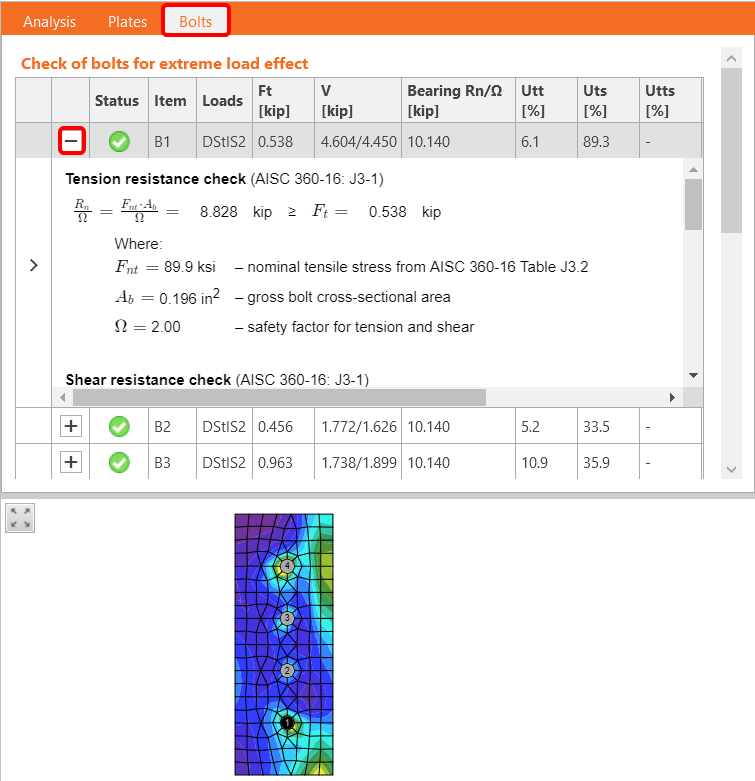
All values can be reviewed in detail in the tables and 2D windows. For example, to display the check of bolts, select the Bolts tab.
5 Report
At last, go to the tab Report. IDEA StatiCa offers a fully customizable report to print out or save in an editable format.

You have imported, designed, and code-checked a steel joint according to AISC.
6 Synchronize models
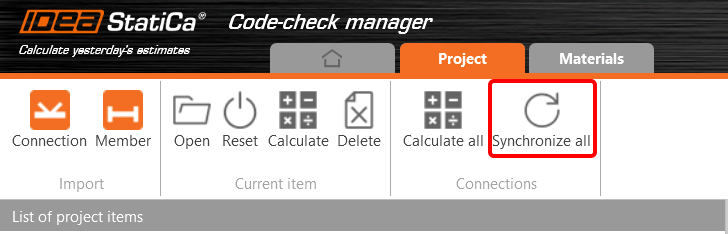
The Code-check manager is a BIM tool to export and synchronize connections from other programs. It is launched directly in the 3rd party applications via a command/icon.
Synchronize all - IDEA StatiCa detects changes in all already imported entities (changes in thickness, changes in cross-section, modification of properties of welds, bolts, etc.) and updates the project in IDEA StatiCa Connection.
Calculate - Synchronize and calculate the current item and provide a new set of results.
Calculate all - Synchronize and calculate all items and provide a new set of results.
Note
Kindly be aware that IDEA StatiCa syncs with a model of the 3rd party application, not the other way around.
Save the project in IDEA StatiCa and close the application Connection. All joints exported from the ETABS project to IDEA StatiCa are kept on the list inside ETABS.
Unlock the model and change the cross-section of member 22 from W12x30 to W12x26.

Run the analysis, select the export command in the upper ribbon, and in the Code-check manager, click on Synchronize.

In the next step, you can Open the joint in IDEA StatiCa Connection to explore the changes.
As you can see, the cross-section of the Member 22 has been changed, but all previous operations remained.

You have imported, designed, and code-checked a steel joint according to AISC.
Limitações conhecidas para ETABS e SAP2000
Limitações da ligação BIM para betão
O seguinte descreve as atuais limitações e considerações ao utilizar a ligação BIM ETABS/SAP2000 com o IDEA StatiCa Checkbot e o Detail 2D, destacando potenciais restrições, problemas comuns e práticas recomendadas para garantir uma análise e dimensionamento precisos.
Limitação: Importação
Se um caso de carga do ETABS contiver passos de análise, o IDEA StatiCa Checkbot não conseguirá considerar todos eles.
- Recomenda-se separar os casos de carga por passos em casos de carga individuais antes da importação.
Limitação: Funcionalidade de sincronização
Ao sincronizar o modelo, os tipos de combinação de carga são reiniciados.
- O utilizador deve reatribuir os tipos de combinação de carga corretos após cada sincronização.
Limitação: Criação de elementos Detail
As seguintes limitações aplicam-se ao criar um Detail no Checkbot:
- Os Details só podem ser criados para elementos de parede que se encontrem no mesmo plano.
- Se os elementos selecionados não forem coplanares, ocorrerá um erro e deverá ser selecionado um conjunto diferente de elementos.
Limitação: Exportação de Detail
Ao exportar um Detail, aplicam-se as seguintes limitações (será apresentado um aviso no Checkbot quando relevante):
- Cargas uniformes fora do plano aplicadas a elementos 2D não são transferidas para o Detail 2D.
- Elementos 2D não serão fundidos se tiverem espessuras diferentes, materiais diferentes ou valores de carga no plano diferentes.
- Cargas fora do plano não podem ser exportadas. Será apresentado um aviso se a carga total na aresta para um caso de carga exceder ±1 kN.
- Elementos 2D não verticais não devem ser transferidos para o Detail 2D; a aplicação não é adequada para tais elementos.
Problemas comuns no fluxo de trabalho
- Cargas pontuais concentradas podem causar falha na análise não linear. Adicione um dispositivo de transferência (por exemplo, placa de apoio) para distribuir a carga.
- Uma malha grosseira do ETABS ou SAP2000 (típica de modelos globais) pode causar picos de tensão e produzir forças concentradas irrealistas tanto em valor como em posição para o dimensionamento da armadura.
- Recomendação: Modificar a malha para 100 mm x 100 mm dos elementos de parede importados.
- Uma malha grosseira pode também causar momentos no plano significativos que não podem ser capturados com precisão no IDEA StatiCa.
- Recomendação: Definir a rigidez fora do plano dos elementos de parede importados para um valor baixo, de modo a que os elementos estruturais envolventes no modelo global possam adequadamente absorver e transferir as forças fora do plano.
- Se uma carga pontual na aresta criar tração na aresta (por exemplo, devido a carga lateral), a análise não linear pode falhar.
- Recomendação: Mover a carga pontual ligeiramente para dentro para garantir o correto envolvimento do betão.

Limitações da ligação BIM para aço
A ligação funciona agora para uma grande variedade de ligações/juntas. No entanto, tenha em conta a funcionalidade ainda não suportada:
Limitação: Importação de cargas
Não é suportada a importação de combinações de carga que contenham combinações de carga com adição não linear.
Não é suportada a referência a uma combinação de carga dentro de outra combinação de carga.
Limitação: Como executar as ligações SAP2000 e ETABS com o IDEA StatiCa 22.1.
Versões problemáticas:
- SAP2000 24.1.0
- ETABS 20.3.0
Descrição do problema:
A nova atualização do SAP2000 24.1.0 não funciona com o IDEA 22.1 mais recente. Ao iniciar o Checkbot a partir do menu, o aspeto é o seguinte e nada pode ser feito/clicado.
Solução:
Isto aplica-se igualmente ao SAP2000 e ao ETABS (versões mais recentes). A solução alternativa consiste em:
1. Localizar o ficheiro de configuração (SAP2000.exe.config ou ETABS.exe.config) em
C:\Program Files\Computers and Structures\SAP2000 24\
ou
C:\Program Files\Computers and Structures\ETABS 20\
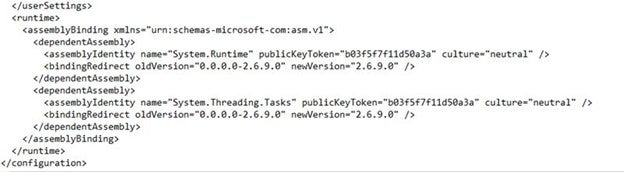
2. Eliminar as seguintes linhas do final do ficheiro e guardá-lo (requer direitos de administrador).

Em alternativa, copie o ficheiro para o ambiente de trabalho, edite-o aí e copie-o de volta para a pasta original.
Este é o aspeto que o ficheiro deve ter (na sua parte inferior) após a eliminação correta da ligação de assemblagem:
3. Em seguida, é possível executar o Checkbot.
Limitação: Equilíbrio
Para garantir o equilíbrio nos nós, defina os Desvios de Comprimento de Extremidade para 0:


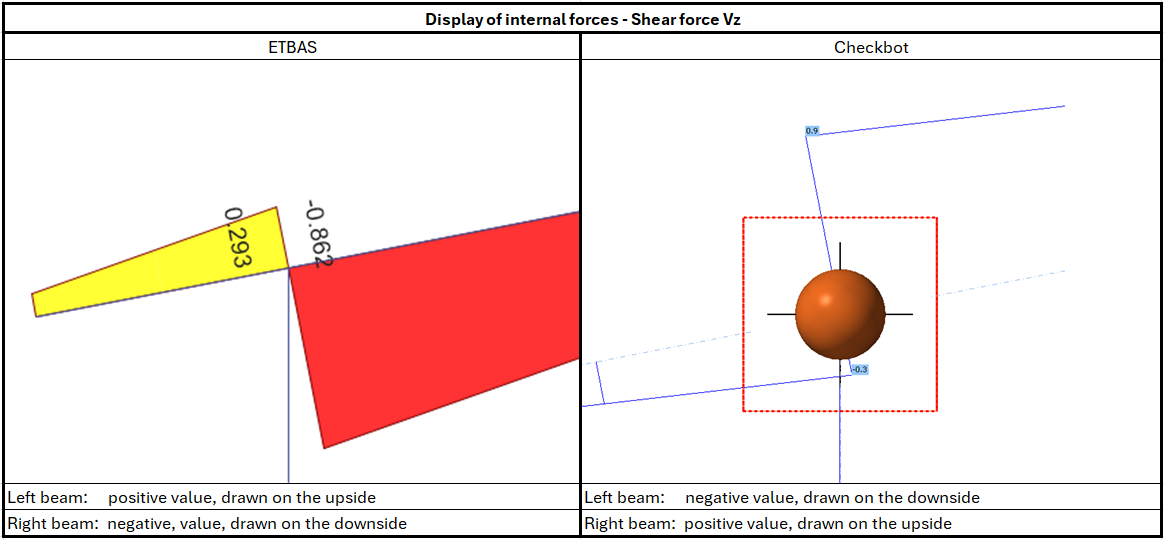
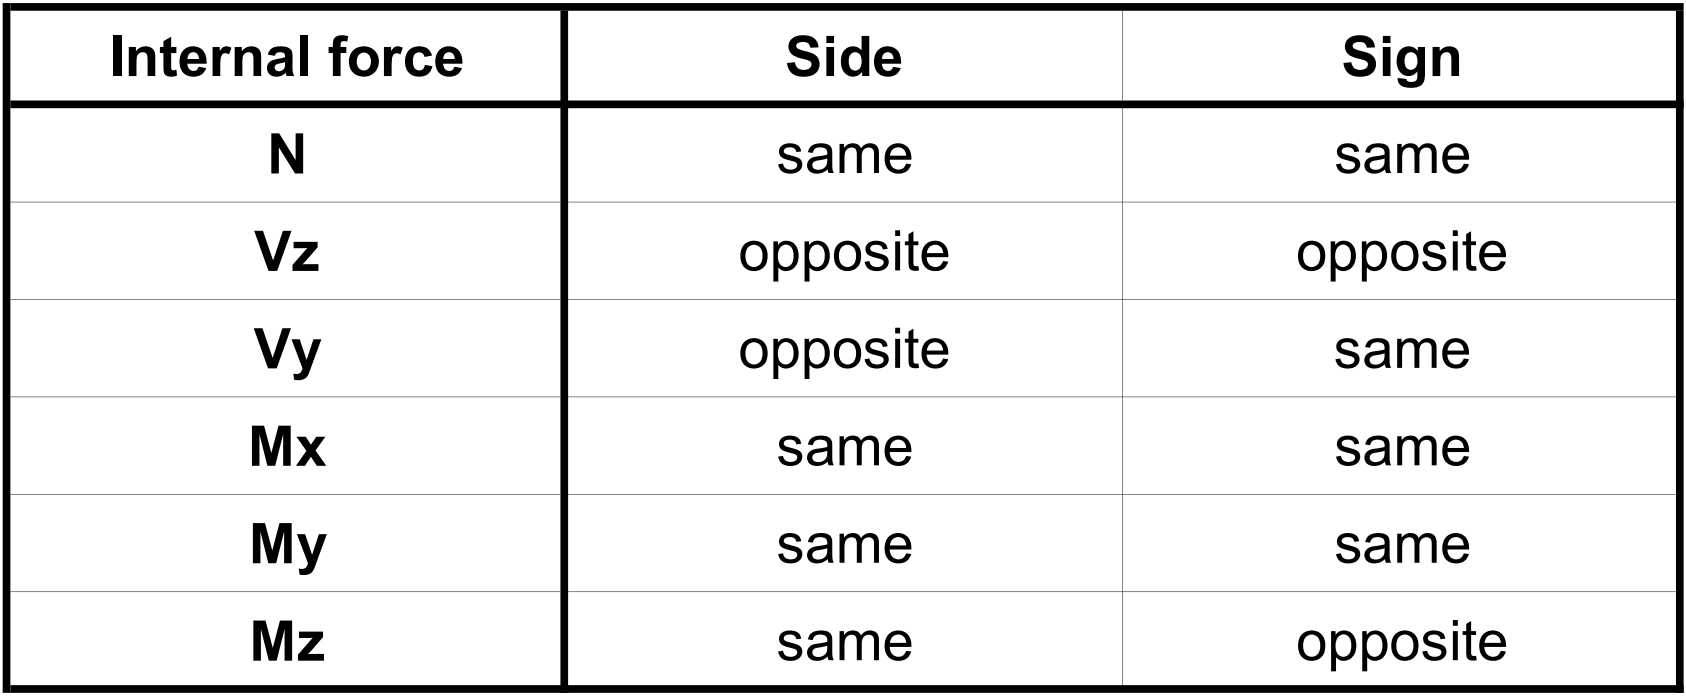
Limitação: Convenção de sinais para esforços internos
Devido às diferentes convenções de sinais no ETABS e no Checkbot, os esforços internos são apresentados de forma diferente. Os efeitos das ações são aplicados corretamente, mas os esforços internos podem ser apresentados com sinal oposto e desenhados no lado oposto do elemento.
Limitação: Várias versões do SAP2000 ou ETABS instaladas no computador
A API do ETABS e do SAP2000 utiliza a biblioteca COM, que necessita de ser registada no registo do sistema. Ao instalar uma nova versão, durante a instalação, o COM para essa versão é registado automaticamente. Assim, quando tenta executar a ligação Checkbot para a versão mais antiga, esta não funciona.
Se pretender alternar entre essas duas versões, deverá:
1) Executar como administrador o ficheiro "UnregisterSAP2000.exe" ou "UnregisterETABS.exe" na pasta da versão mais recente.
2) Em seguida, executar como administrador o ficheiro "RegisterSAP2000.exe" ou "RegisterETABS.exe" na pasta da versão mais antiga.