
ETABS BIM link for steel connection design (AISC)
1 How to activate the link
- Install the latest version of IDEA StatiCa
- Make sure you are using a supported version of ETABS – updates are published in the BIM section of the main website
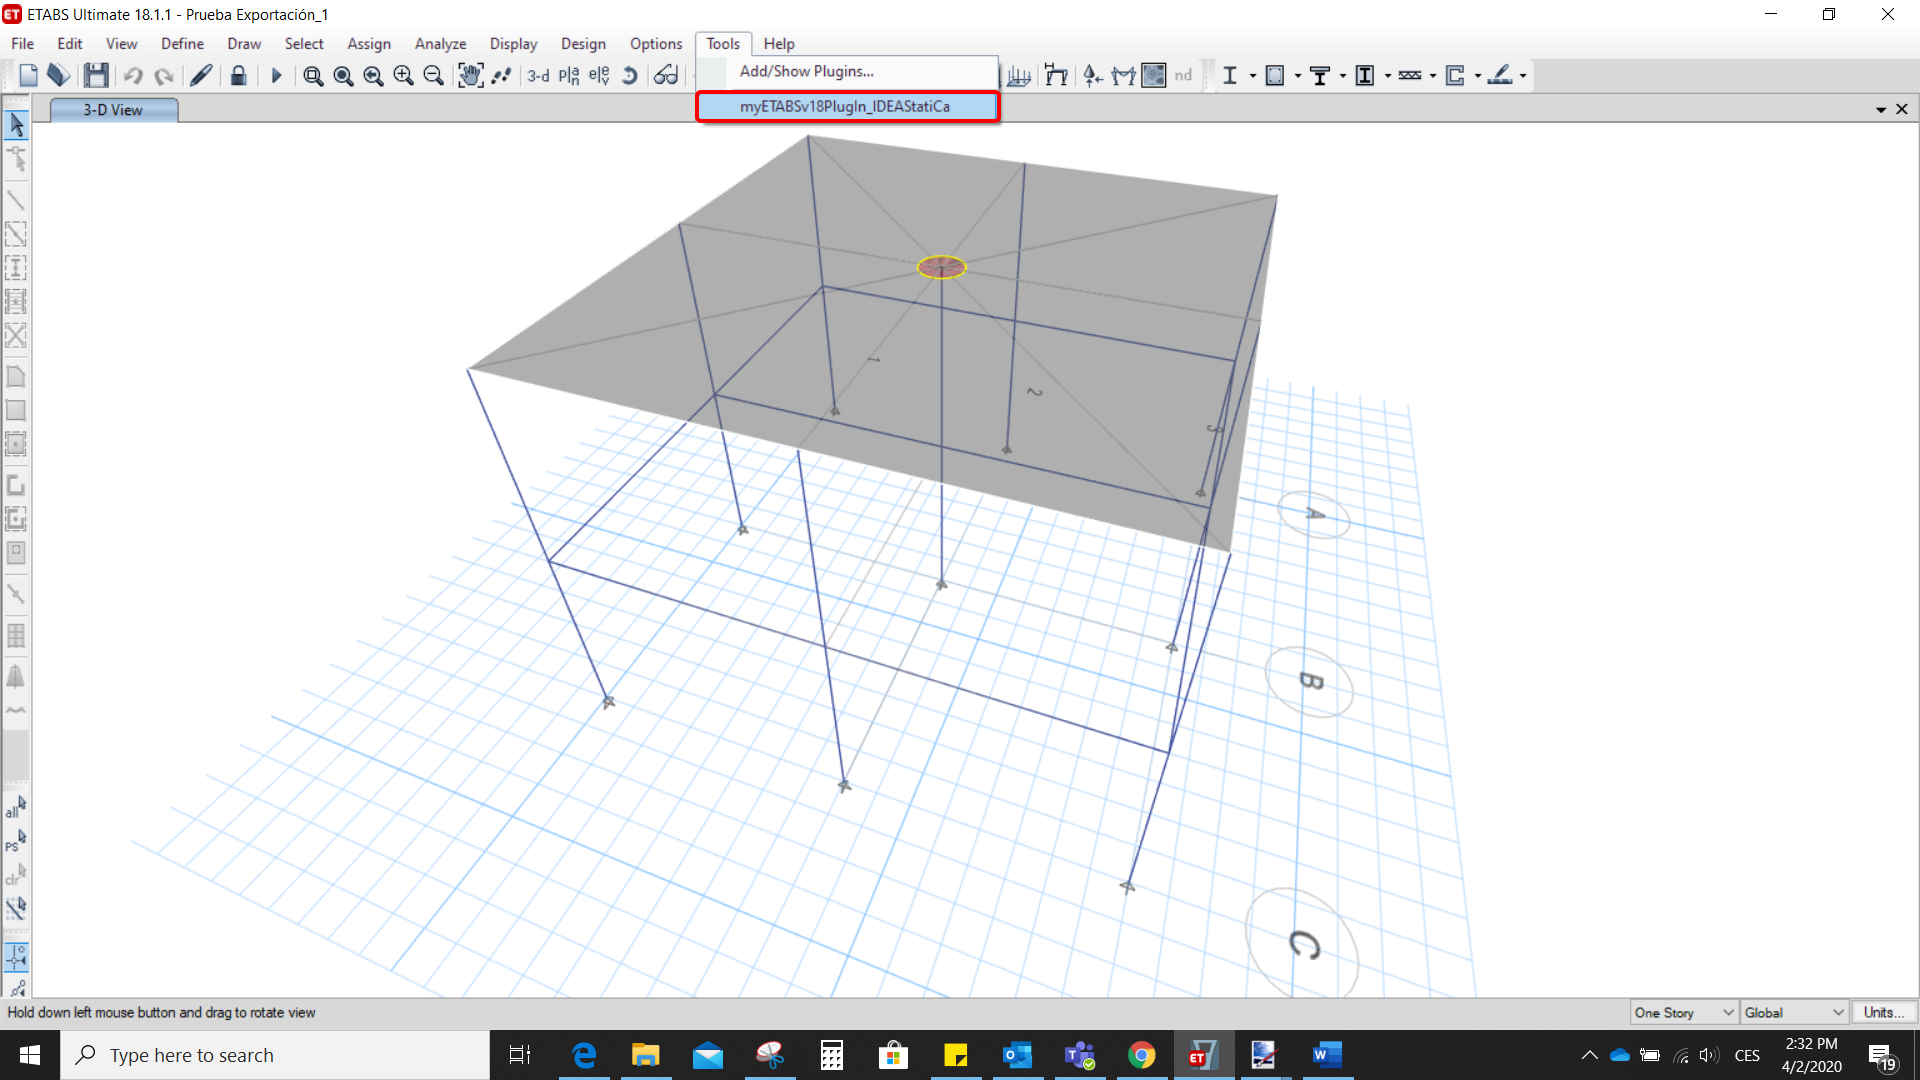
After installation of both programs, start ETABS and Click Tools > Add/Show Plugins to open the Plugin Manager dialog. This option lets you install and add add-ins (programs) to the appropriate places in the ETABS menu.
Browse for
C:\Program Files\IDEA StatiCa\StatiCa 20.0\ETABSv18PlugIn_IDEAStatiCa.dll
and click Add

2 How to use the link
Open the attached project in ETABS and run the analysis.
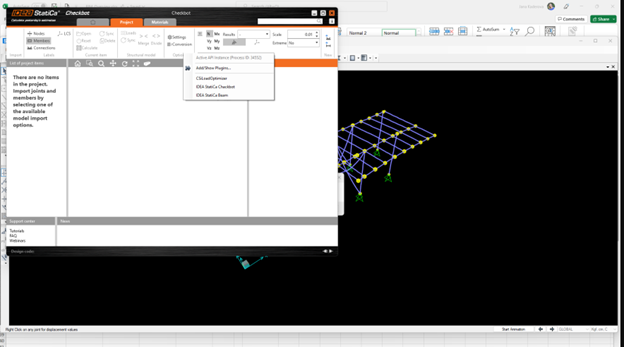
Go to the menu item Tools and run the export command you have just defined.
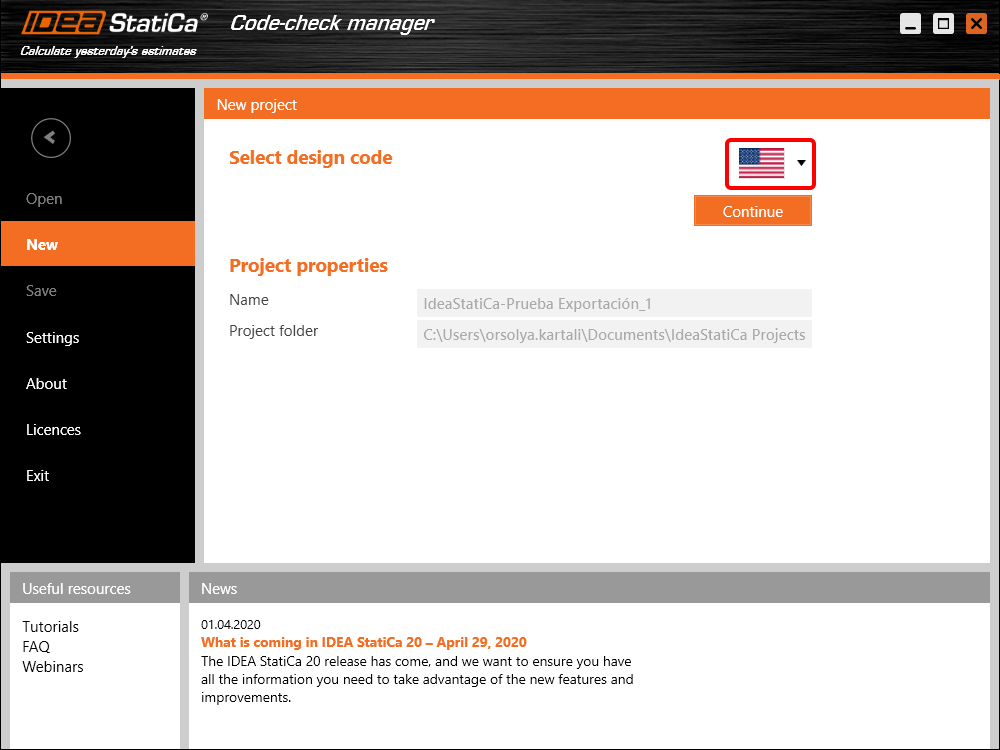
The Code-check manager opens and at first, you need to choose the code.
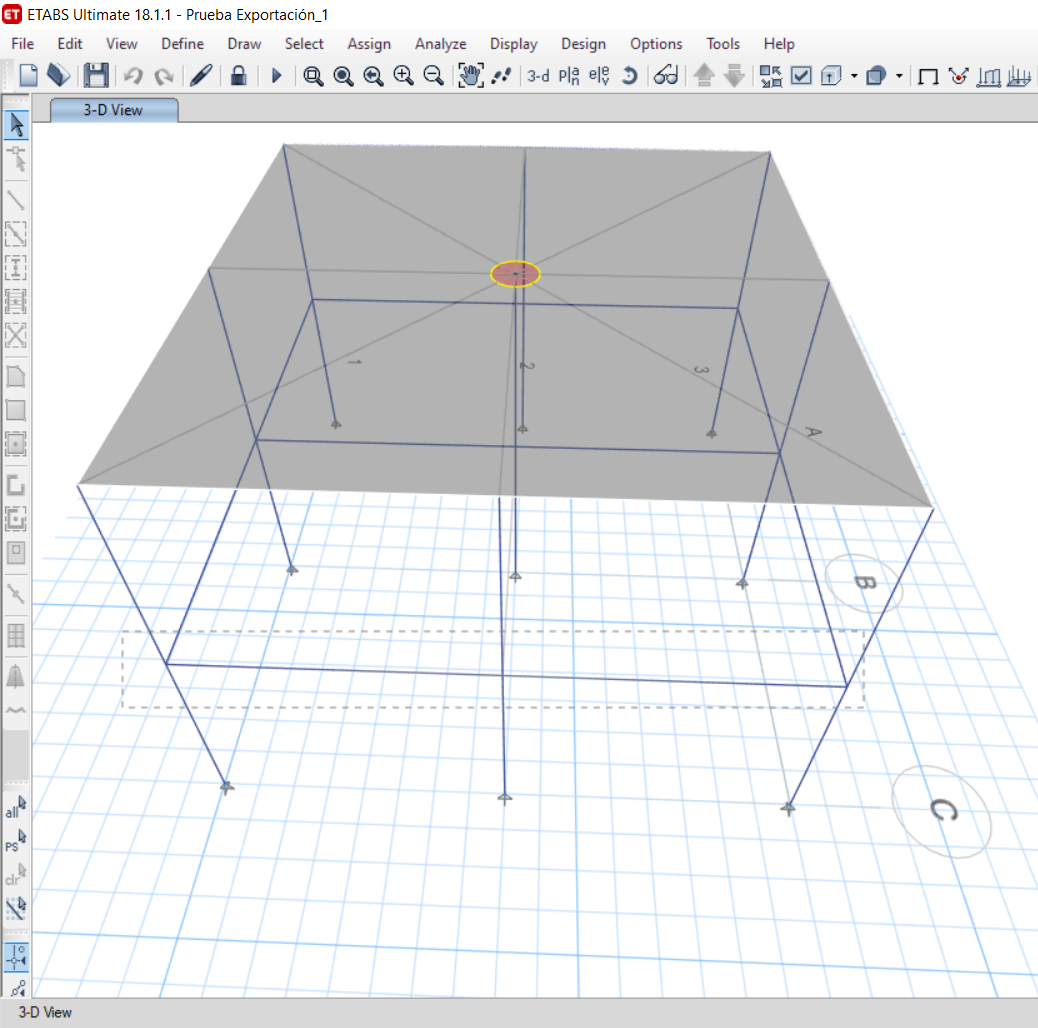
Then you can make a rectangular selection in the ETABS project to choose which joints you want to export. You can export more joints at once using the multiple selections.
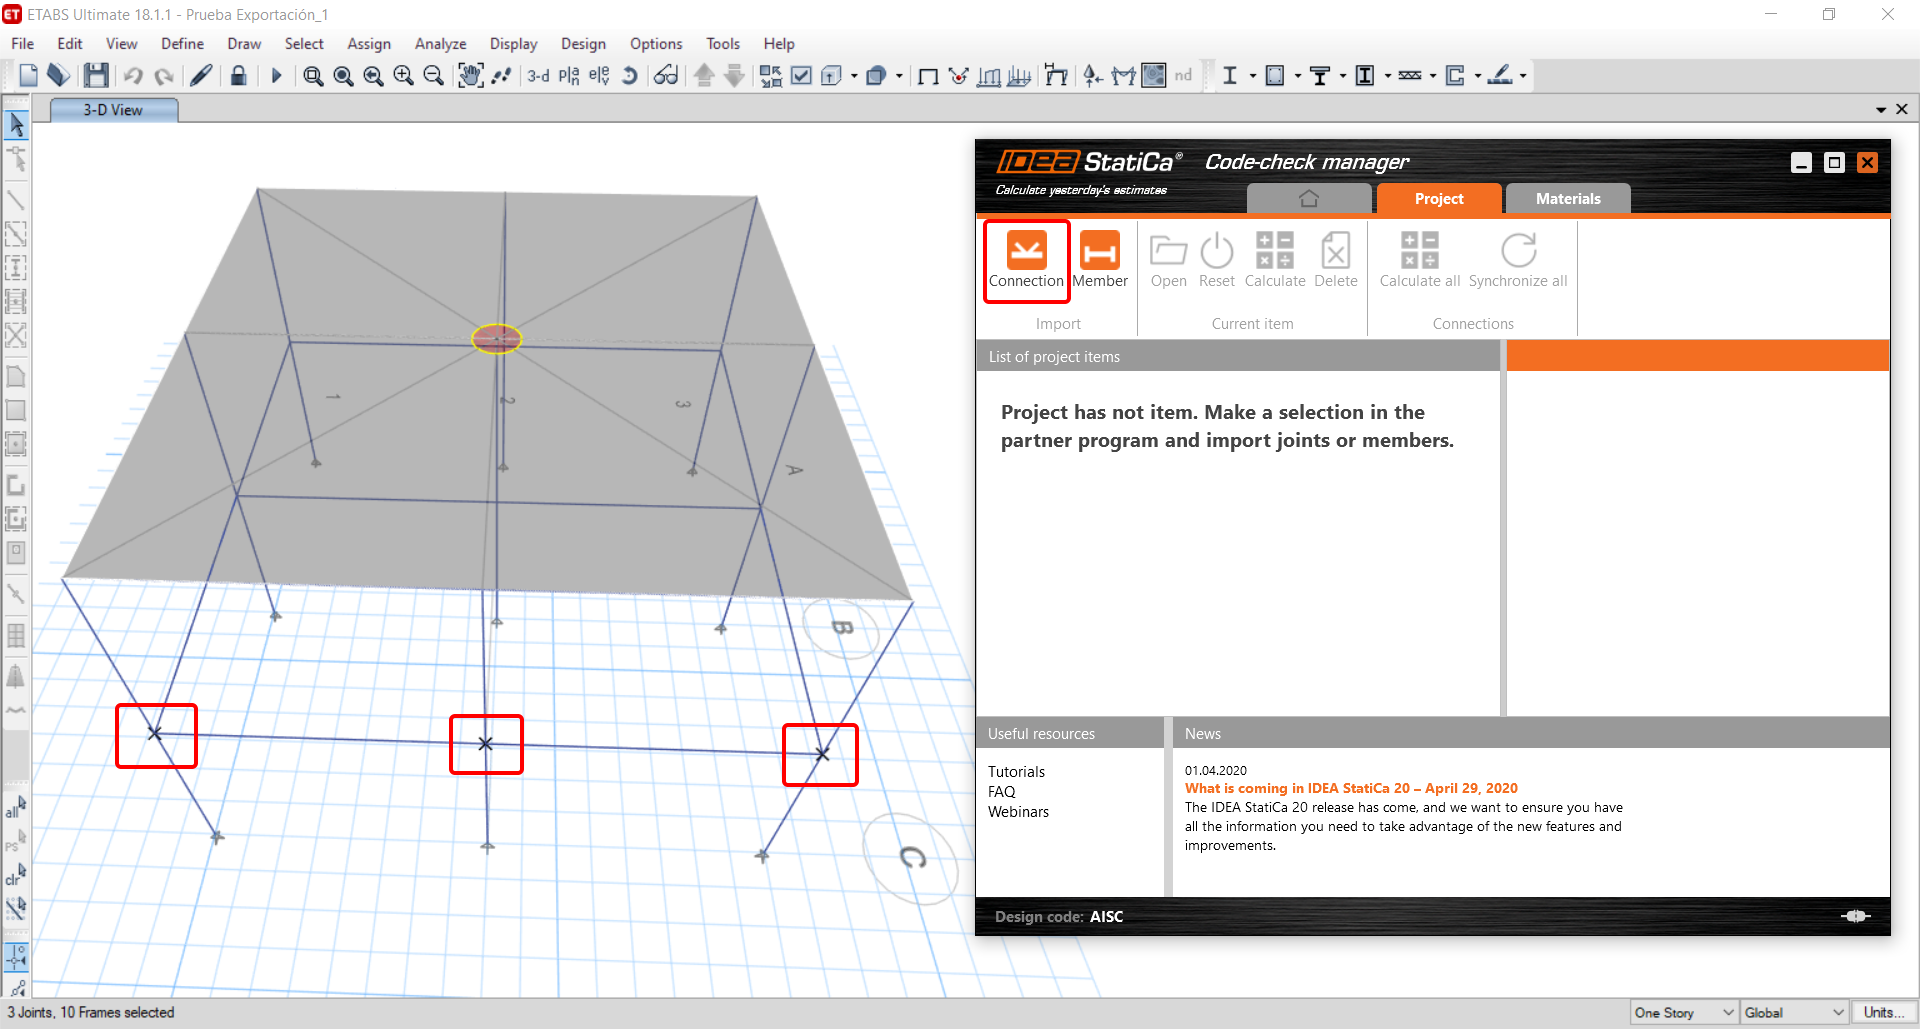
If the joints are selected, you can click on the Connection button in the Code-check manager. With this, all the selected joints from ETABS will be imported into the Code-check manager.
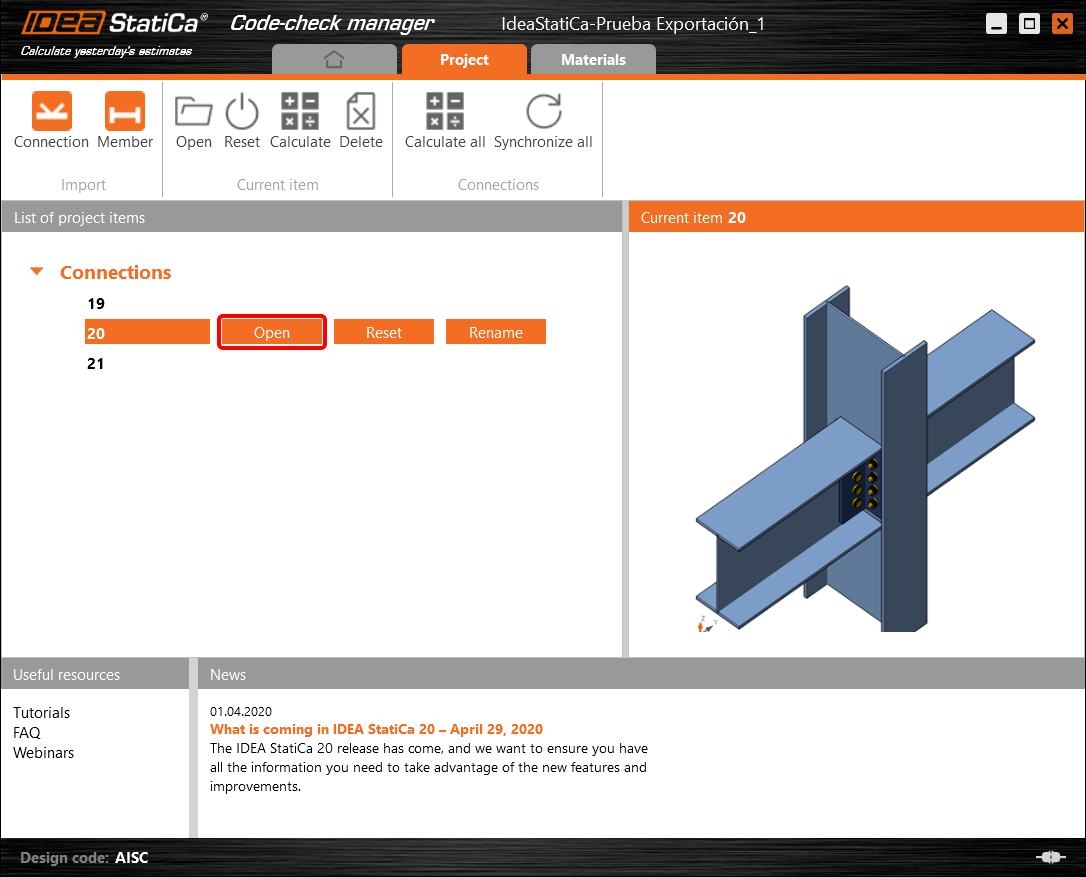
The next thing you need to do is to configure the joints in the Code-check manager. In this tutorial, you will only focus on one of the three imported joints, but the process would be the same for all of them.
You click on the joint on the left side (joint 20). On the right side, you can see the scheme of the joint, you can set the bearing member and merge the continuous members. After that, click on the Finish button to complete the configuration of the joint.
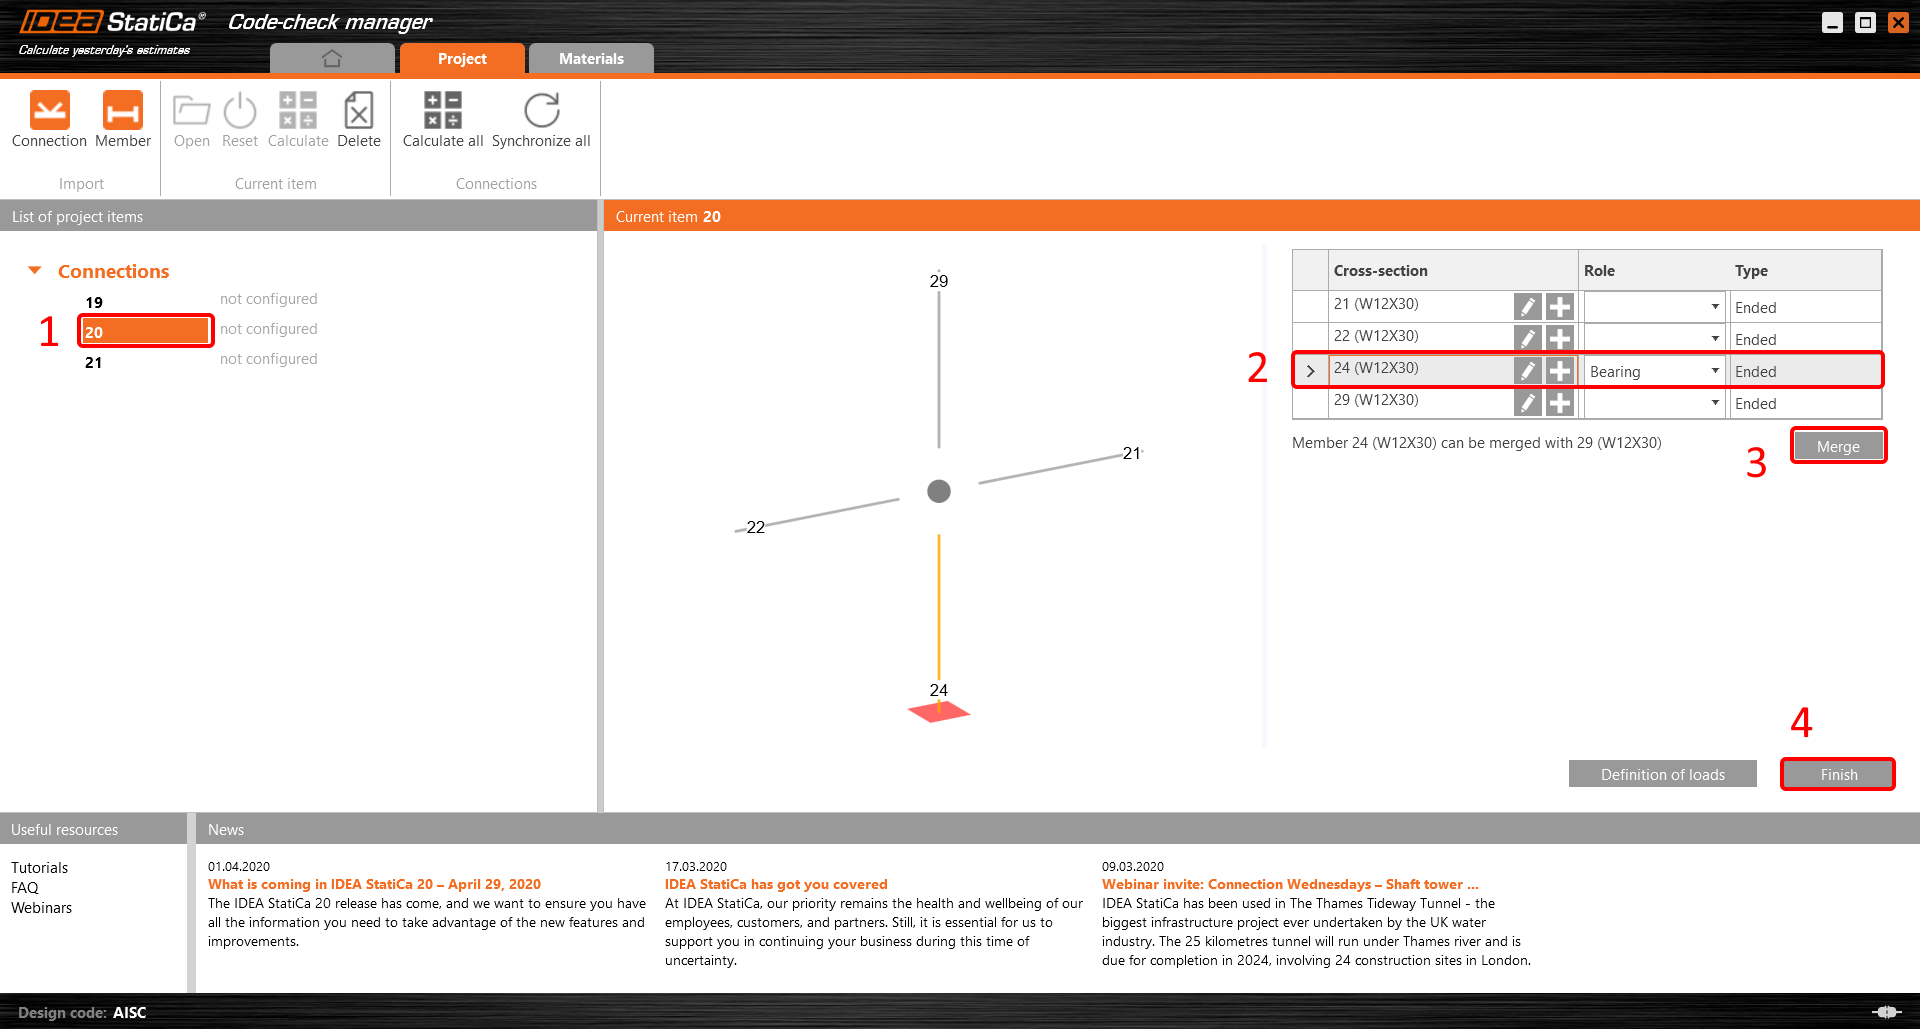
The joint is now ready to be opened in IDEA StatiCa Connection for the CBFEM analysis.

3 Design
Automatic data transfer is started and IDEA StatiCa Connection with a generated project is launched. All members and load effects were added automatically.
This tutorial works with imperial units. If you use metric units, you can switch them to imperial by clicking on the unit in the bottom part of the window.

Now you will define a set of manufacturing operations to model the connection between members. In the items tree, you right-click on Operations and select the option New operation.
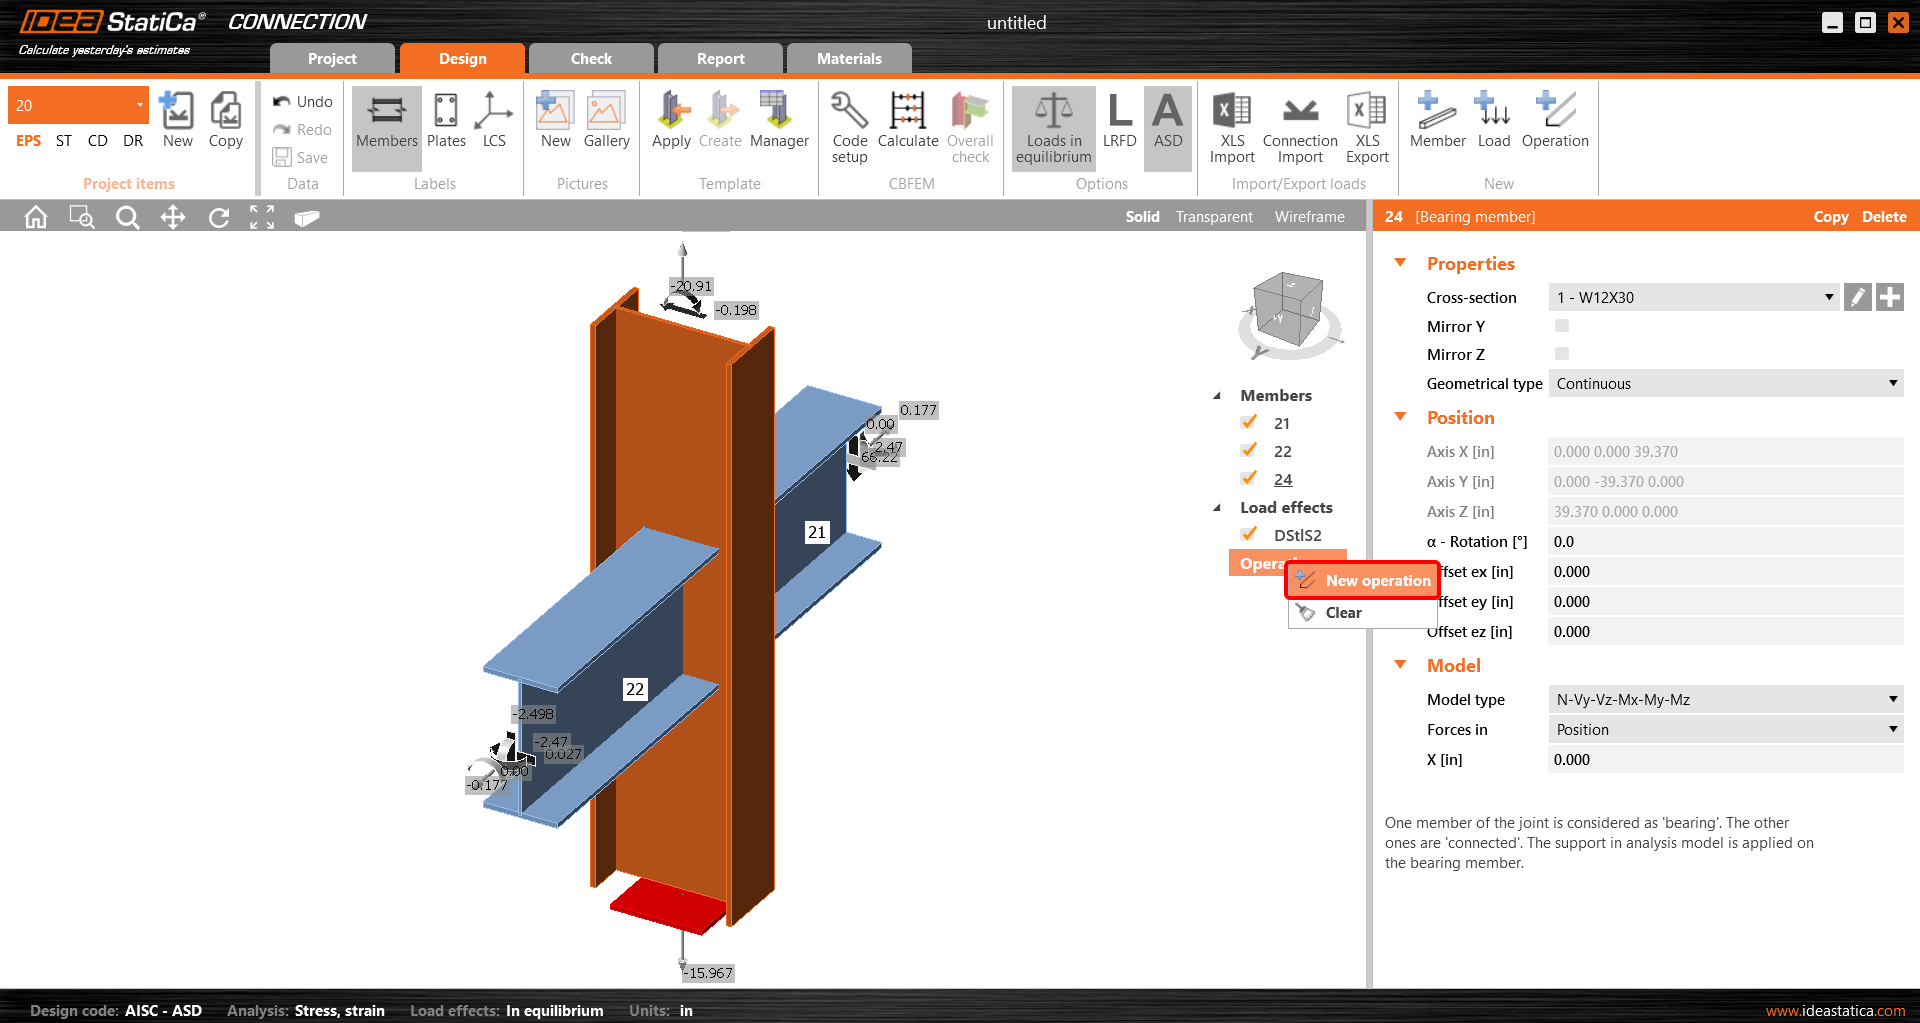
And you add the operation Cleat.


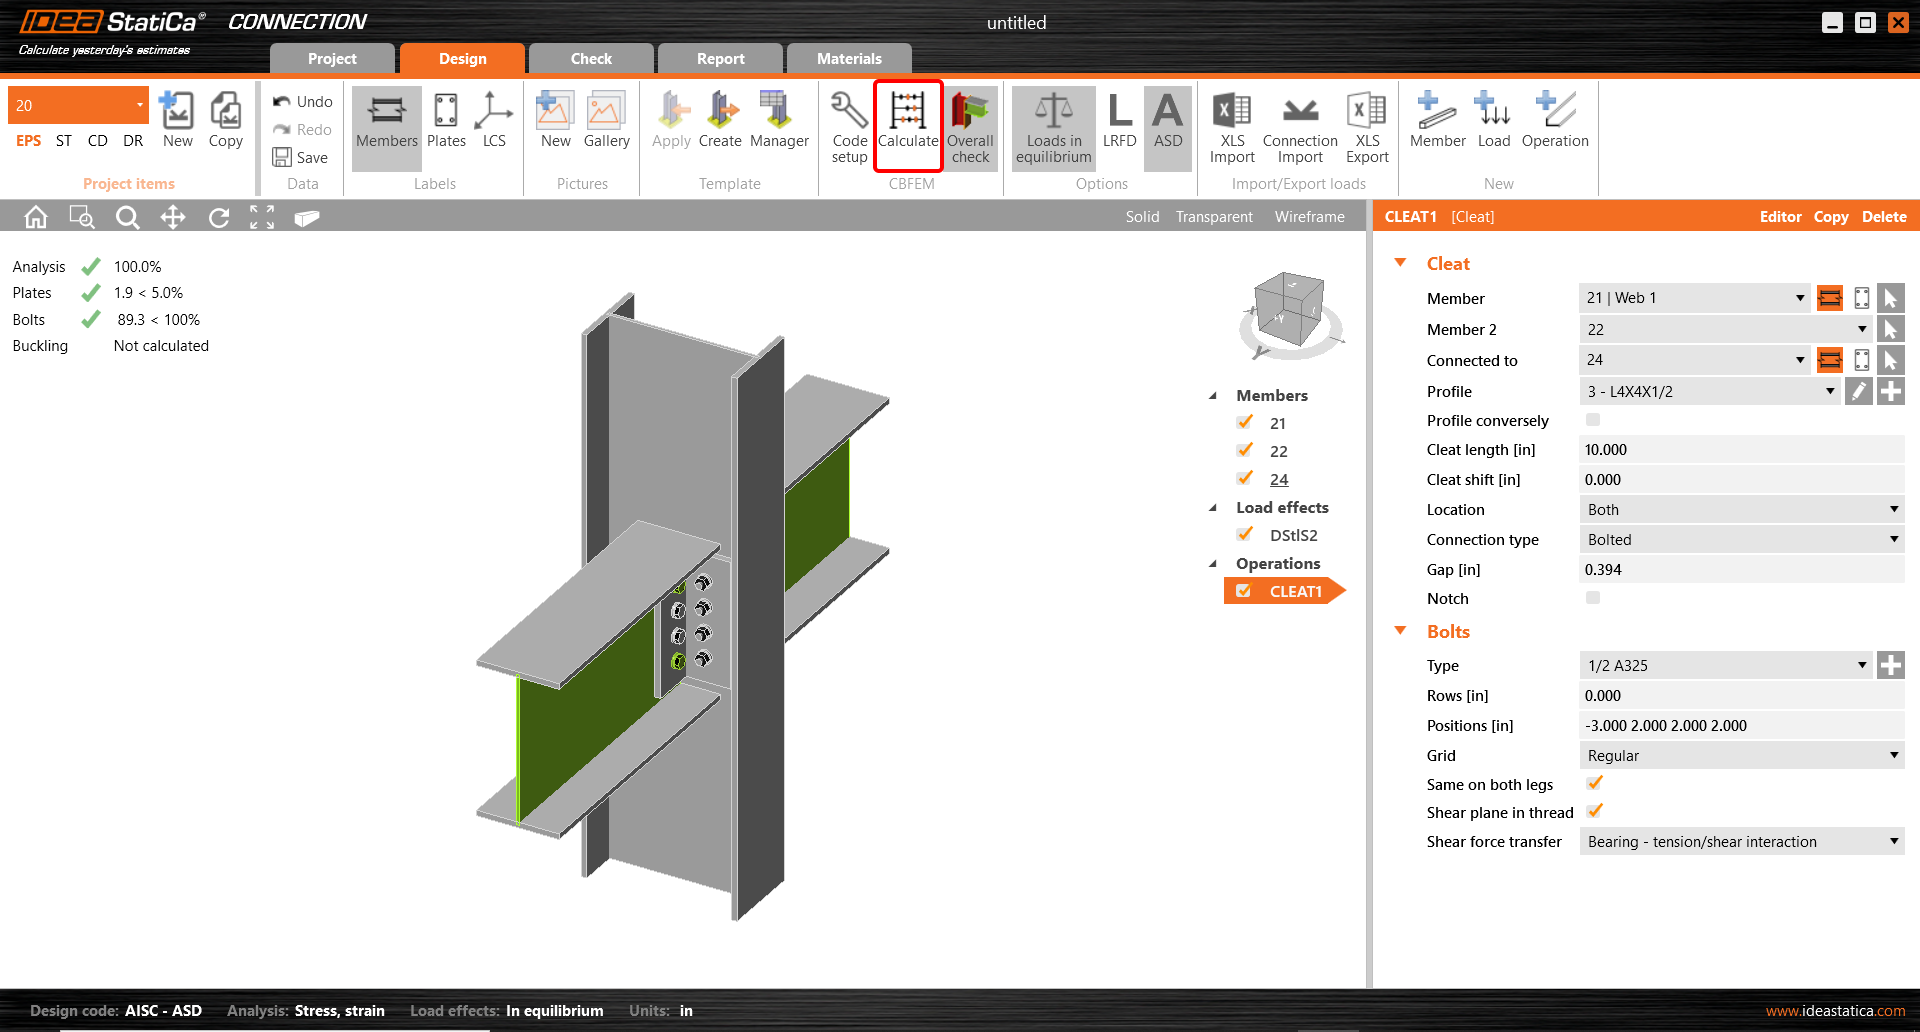
And set the properties of CLEAT1 as follows:

You can check the design of this simple joint.

4 Check
The analysis based on CBFEM is started by the icon Calculate from the top ribbon. The analysis model is automatically generated, the calculation is performed, and you can check the results.
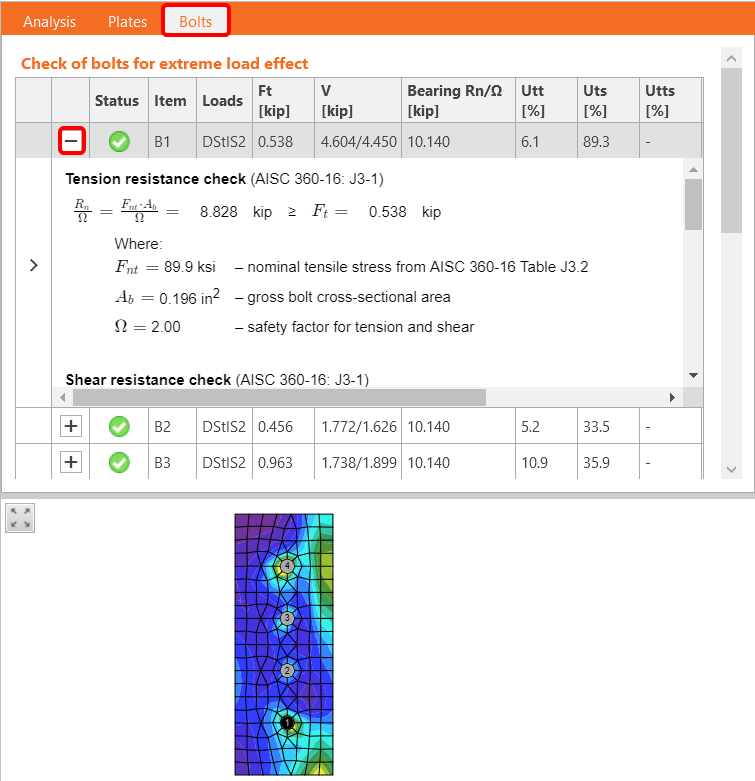
Activate Overall check, Equivalent stress, Mesh and Deformed from the ribbon to get a full picture of what is happening in the joint. Everything is displayed in the 3D window.

All values can be reviewed in detail in the tables and 2D windows. For example, to display the check of bolts, select the Bolts tab.
5 Report
At last, go to the tab Report. IDEA StatiCa offers a fully customizable report to print out or save in an editable format.

You have imported, designed, and code-checked a steel joint according to AISC.
6 Synchronize models
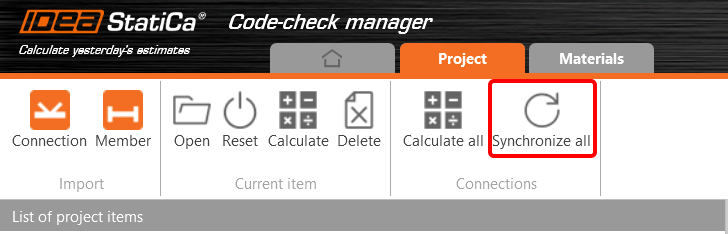
The Code-check manager is a BIM tool to export and synchronize connections from other programs. It is launched directly in the 3rd party applications via a command/icon.
Synchronize all - IDEA StatiCa detects changes in all already imported entities (changes in thickness, changes in cross-section, modification of properties of welds, bolts, etc.) and updates the project in IDEA StatiCa Connection.
Calculate - Synchronize and calculate the current item and provide a new set of results.
Calculate all - Synchronize and calculate all items and provide a new set of results.
Note
Kindly be aware that IDEA StatiCa syncs with a model of the 3rd party application, not the other way around.
Save the project in IDEA StatiCa and close the application Connection. All joints exported from the ETABS project to IDEA StatiCa are kept on the list inside ETABS.
Unlock the model and change the cross-section of member 22 from W12x30 to W12x26.

Run the analysis, select the export command in the upper ribbon, and in the Code-check manager, click on Synchronize.

In the next step, you can Open the joint in IDEA StatiCa Connection to explore the changes.
As you can see, the cross-section of the Member 22 has been changed, but all previous operations remained.

You have imported, designed, and code-checked a steel joint according to AISC.
ETABS 및 SAP2000의 알려진 제한 사항
콘크리트 BIM 링크 제한 사항
다음은 ETABS/SAP2000 BIM 링크를 IDEA StatiCa Checkbot 및 Detail 2D와 함께 사용할 때의 현재 제한 사항 및 고려 사항을 설명하며, 정확한 해석 및 설계를 보장하기 위한 잠재적 제약, 일반적인 문제 및 권장 사항을 강조합니다.
제한 사항: 가져오기
ETABS 하중 케이스에 해석 단계가 포함된 경우, IDEA StatiCa Checkbot은 모든 단계를 고려할 수 없습니다.
- 가져오기 전에 단계별 하중 케이스를 개별 하중 케이스로 분리하는 것을 권장합니다.
제한 사항: 동기화 기능
모델을 동기화할 때 하중 조합 유형이 초기화됩니다.
- 사용자는 각 동기화 후 올바른 하중 조합 유형을 다시 지정해야 합니다.
제한 사항: Detail 요소 생성
Checkbot에서 Detail을 생성할 때 다음 제한 사항이 적용됩니다:
- Detail은 동일 평면에 있는 벽 요소에 대해서만 생성할 수 있습니다.
- 선택한 요소가 동일 평면에 있지 않으면 오류가 발생하며, 다른 부재 집합을 선택해야 합니다.
제한 사항: Detail 내보내기
Detail을 내보낼 때 다음 제한 사항이 적용됩니다(해당되는 경우 Checkbot에 경고가 표시됩니다):
- 2D 부재에 적용된 면외 등분포 하중은 Detail 2D로 전달되지 않습니다.
- 2D 부재는 두께, 재료 또는 면내 하중값이 다를 경우 병합되지 않습니다.
- 면외 하중은 내보낼 수 없습니다. 하중 케이스의 총 엣지 하중이 ±1 kN을 초과하면 경고가 표시됩니다.
- 비수직 2D 부재는 Detail 2D로 전달하지 않아야 합니다. 해당 애플리케이션은 이러한 부재에 적합하지 않습니다.
워크플로우의 일반적인 문제
- 집중 점하중은 비선형 해석 실패를 유발할 수 있습니다. 하중을 분산시키기 위해 전달 장치(예: 지압판)를 추가하십시오.
- 거친 ETABS 또는 SAP2000 메시(전체 모델에서 일반적)는 응력 집중을 유발하고 철근 설계에서 값과 위치 모두에서 비현실적인 집중력을 생성할 수 있습니다.
- 권장 사항: 가져온 벽 요소의 메시를 100 mm x 100 mm로 수정하십시오.
- 거친 메시는 IDEA StatiCa에서 정확하게 포착할 수 없는 상당한 면내 모멘트를 유발할 수도 있습니다.
- 권장 사항: 전체 모델의 주변 구조 요소가 면외 힘을 적절히 부담하고 전달할 수 있도록 가져온 벽 요소의 면외 강성을 낮은 값으로 설정하십시오.
- 엣지 점하중이 (예: 횡하중으로 인해) 엣지에 인장을 유발하는 경우 비선형 해석이 실패할 수 있습니다.
- 권장 사항: 적절한 콘크리트 맞물림을 확보하기 위해 점하중을 약간 내측으로 이동하십시오.

강구조 BIM 링크 제한 사항
이 링크는 현재 다양한 연결/접합부에 대해 작동합니다. 그러나 아직 지원되지 않는 기능을 고려하시기 바랍니다:
제한 사항: 하중 가져오기
선형 이외의 하중 조합을 포함하는 하중 조합의 가져오기는 지원되지 않습니다.
하중 조합 내에서 다른 하중 조합을 참조하는 것은 지원되지 않습니다.
제한 사항: IDEA StatiCa 22.1에서 SAP2000 및 ETABS 링크를 실행하는 방법
문제가 있는 버전:
- SAP2000 24.1.0
- ETABS 20.3.0
문제 설명:
SAP2000 24.1.0의 새 패치는 최신 IDEA 22.1과 호환되지 않습니다. 메뉴에서 Checkbot을 시작하면 다음과 같이 표시되며 아무것도 실행/클릭할 수 없습니다.
해결 방법:
이는 SAP2000 및 ETABS(최신 버전)에도 동일하게 적용됩니다. 해결 방법은 다음과 같습니다:
1. 다음 경로에서 구성 파일(SAP2000.exe.config 또는 ETABS.exe.config)을 찾으십시오.
C:\Program Files\Computers and Structures\SAP2000 24\
또는
C:\Program Files\Computers and Structures\ETABS 20\
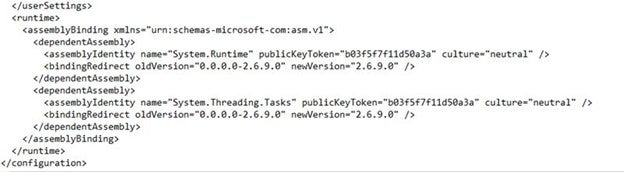
2. 파일 하단에서 다음 줄을 삭제하고 저장하십시오(관리자 권한 필요).

또는 파일을 바탕 화면에 복사하여 편집한 후 원래 폴더에 다시 복사하십시오.
어셈블리 바인딩이 올바르게 삭제된 후 파일(하단 부분)은 다음과 같이 표시되어야 합니다:
3. 그런 다음 Checkbot을 실행할 수 있습니다.
제한 사항: 평형
노드에서 평형을 확보하려면 단부 길이 오프셋을 0으로 설정하십시오:


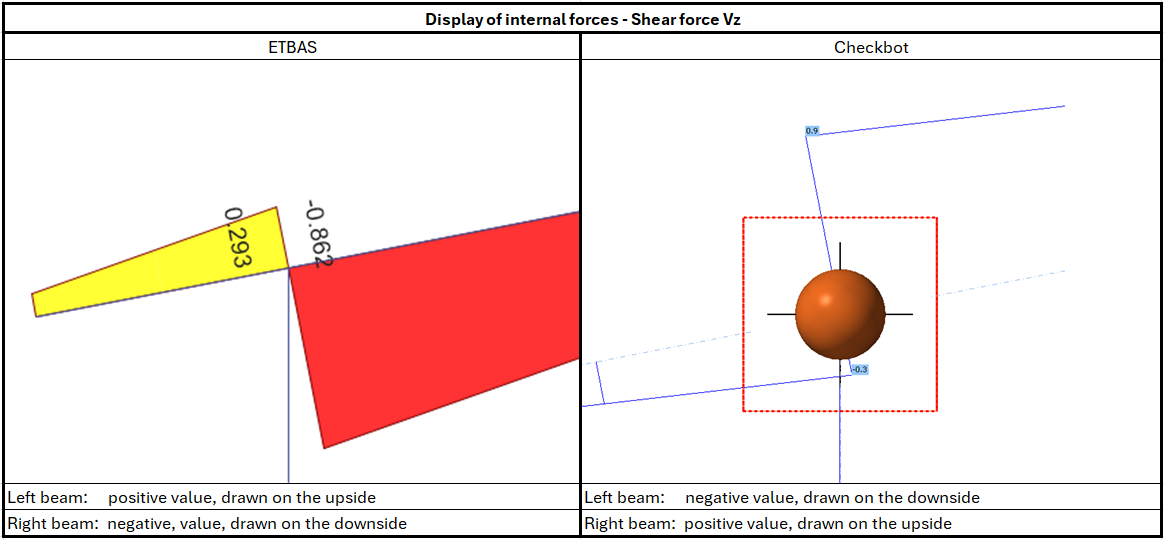
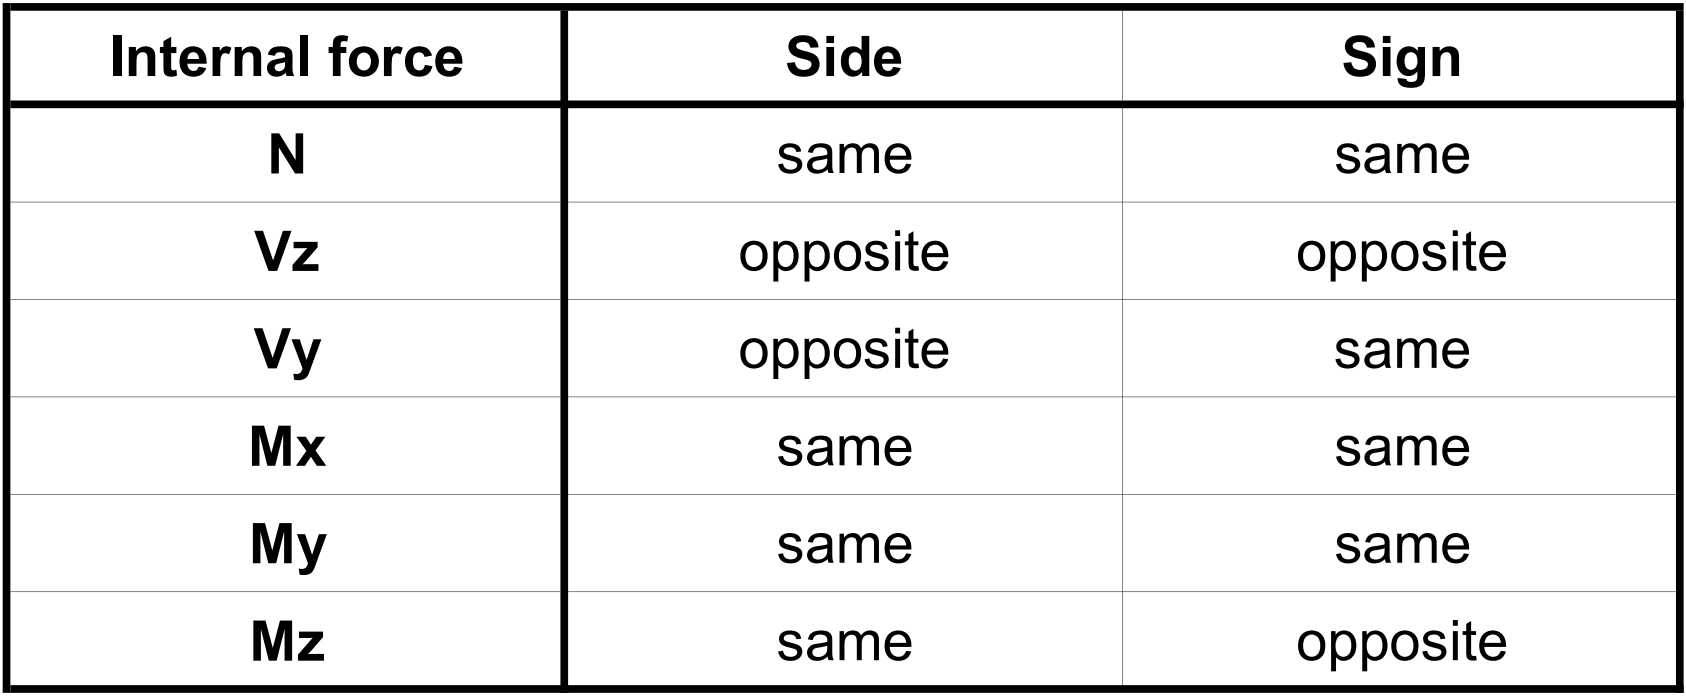
제한 사항: 내력의 부호 규약
ETABS와 Checkbot의 부호 규약이 다르기 때문에 내력이 다르게 표시됩니다. 하중 효과는 올바르게 적용되지만, 내력은 반대 부호로 표시되고 보의 반대쪽에 그려질 수 있습니다.
제한 사항: 컴퓨터에 여러 버전의 SAP2000 또는 ETABS가 설치된 경우
ETABS 및 SAP2000 API는 레지스트리에 등록되어야 하는 COM 라이브러리를 사용합니다. 새 버전을 설치하면 설치 중에 해당 버전의 COM이 자동으로 등록됩니다. 따라서 이전 버전의 Checkbot 링크를 실행하려고 하면 작동하지 않습니다.
두 버전 간에 전환하려면 다음을 수행해야 합니다:
1) 새 버전이 있는 폴더에서 "UnregisterSAP2000.exe" 또는 "UnregisterETABS.exe"를 관리자 권한으로 실행하십시오.
2) 그런 다음 이전 버전이 있는 폴더에서 "RegisterSAP2000.exe" 또는 "RegisterETABS.exe"를 관리자 권한으로 실행하십시오.