
ETABS BIM link for steel connection design (AISC)
1 How to activate the link
- Install the latest version of IDEA StatiCa
- Make sure you are using a supported version of ETABS – updates are published in the BIM section of the main website
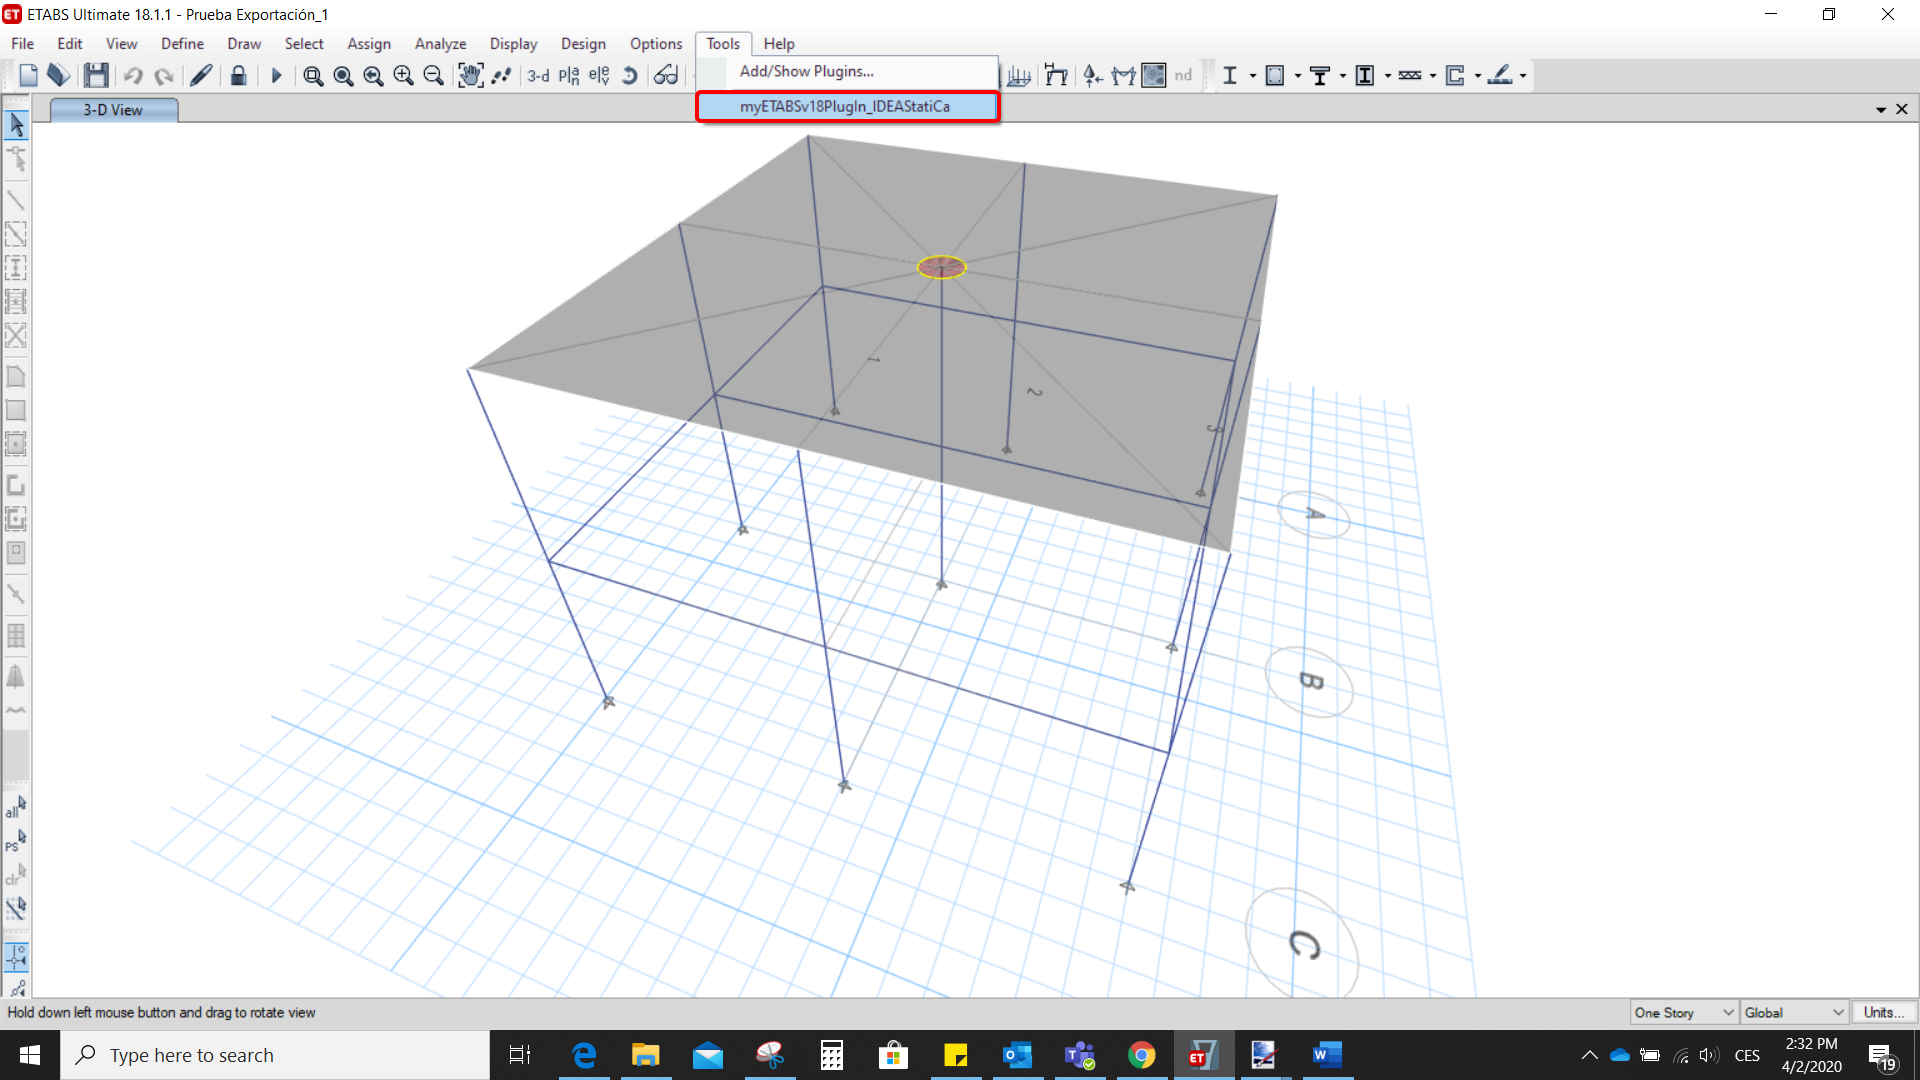
After installation of both programs, start ETABS and Click Tools > Add/Show Plugins to open the Plugin Manager dialog. This option lets you install and add add-ins (programs) to the appropriate places in the ETABS menu.
Browse for
C:\Program Files\IDEA StatiCa\StatiCa 20.0\ETABSv18PlugIn_IDEAStatiCa.dll
and click Add

2 How to use the link
Open the attached project in ETABS and run the analysis.
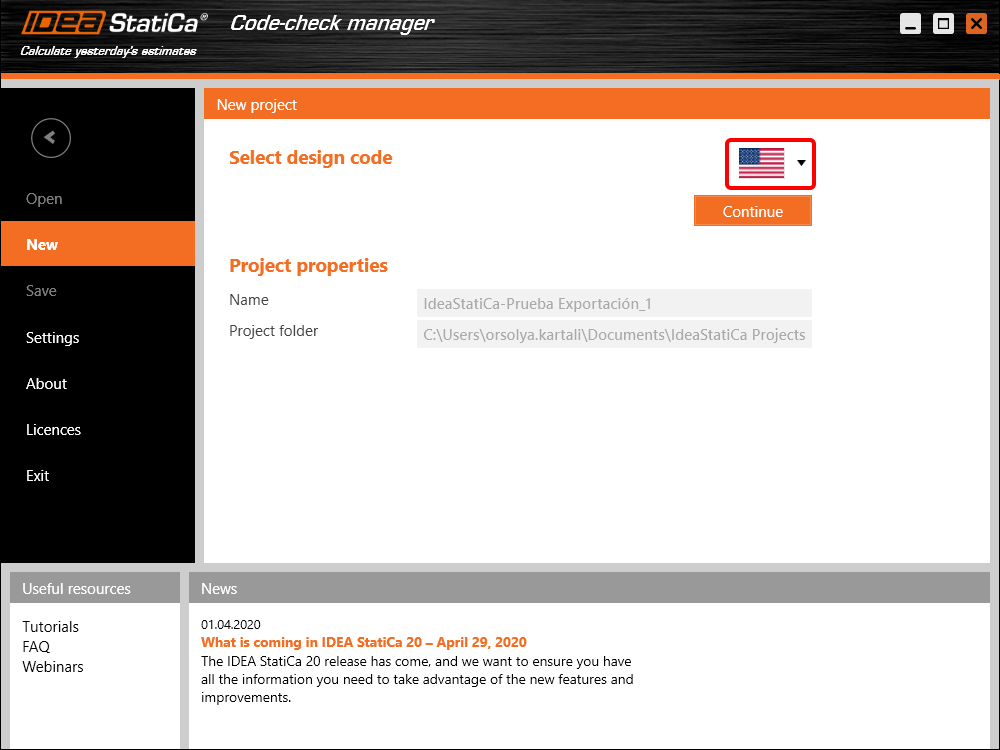
Go to the menu item Tools and run the export command you have just defined.
The Code-check manager opens and at first, you need to choose the code.
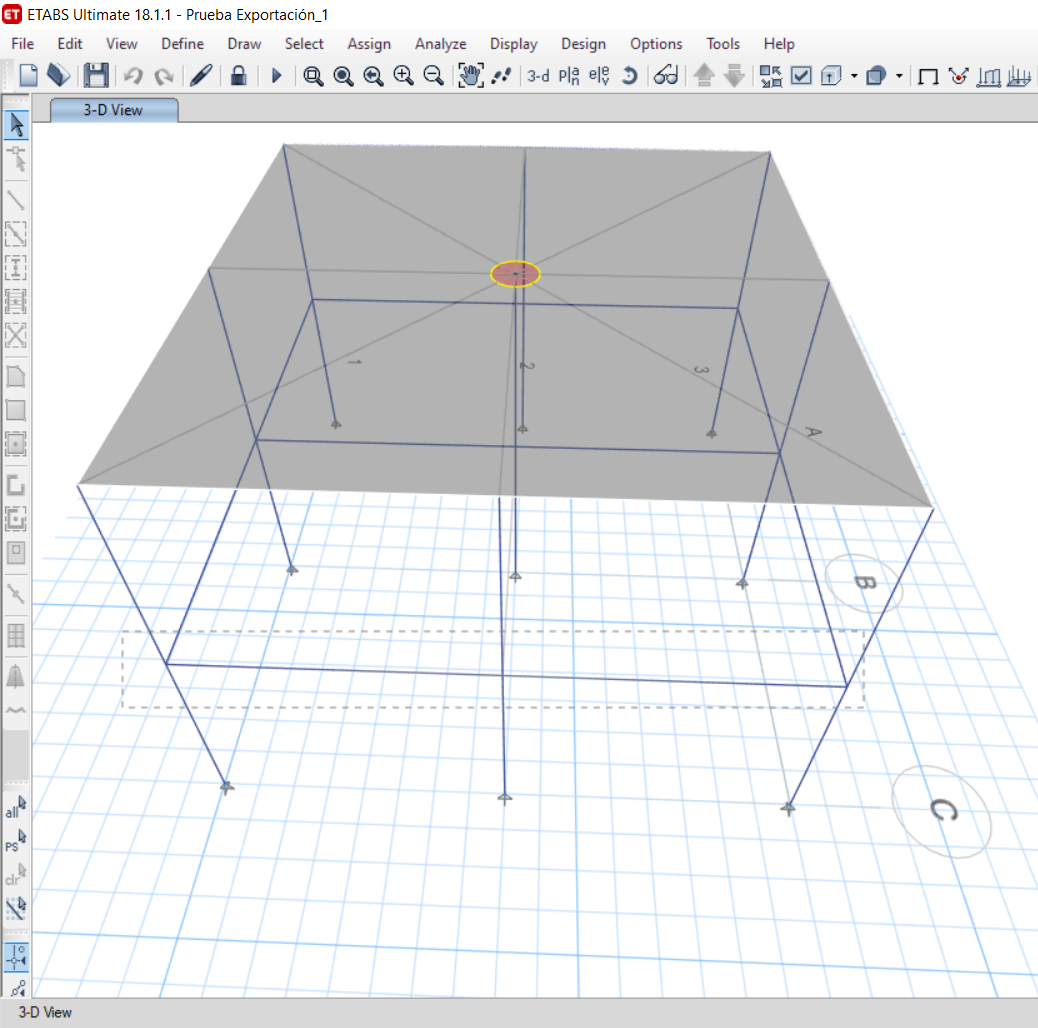
Then you can make a rectangular selection in the ETABS project to choose which joints you want to export. You can export more joints at once using the multiple selections.
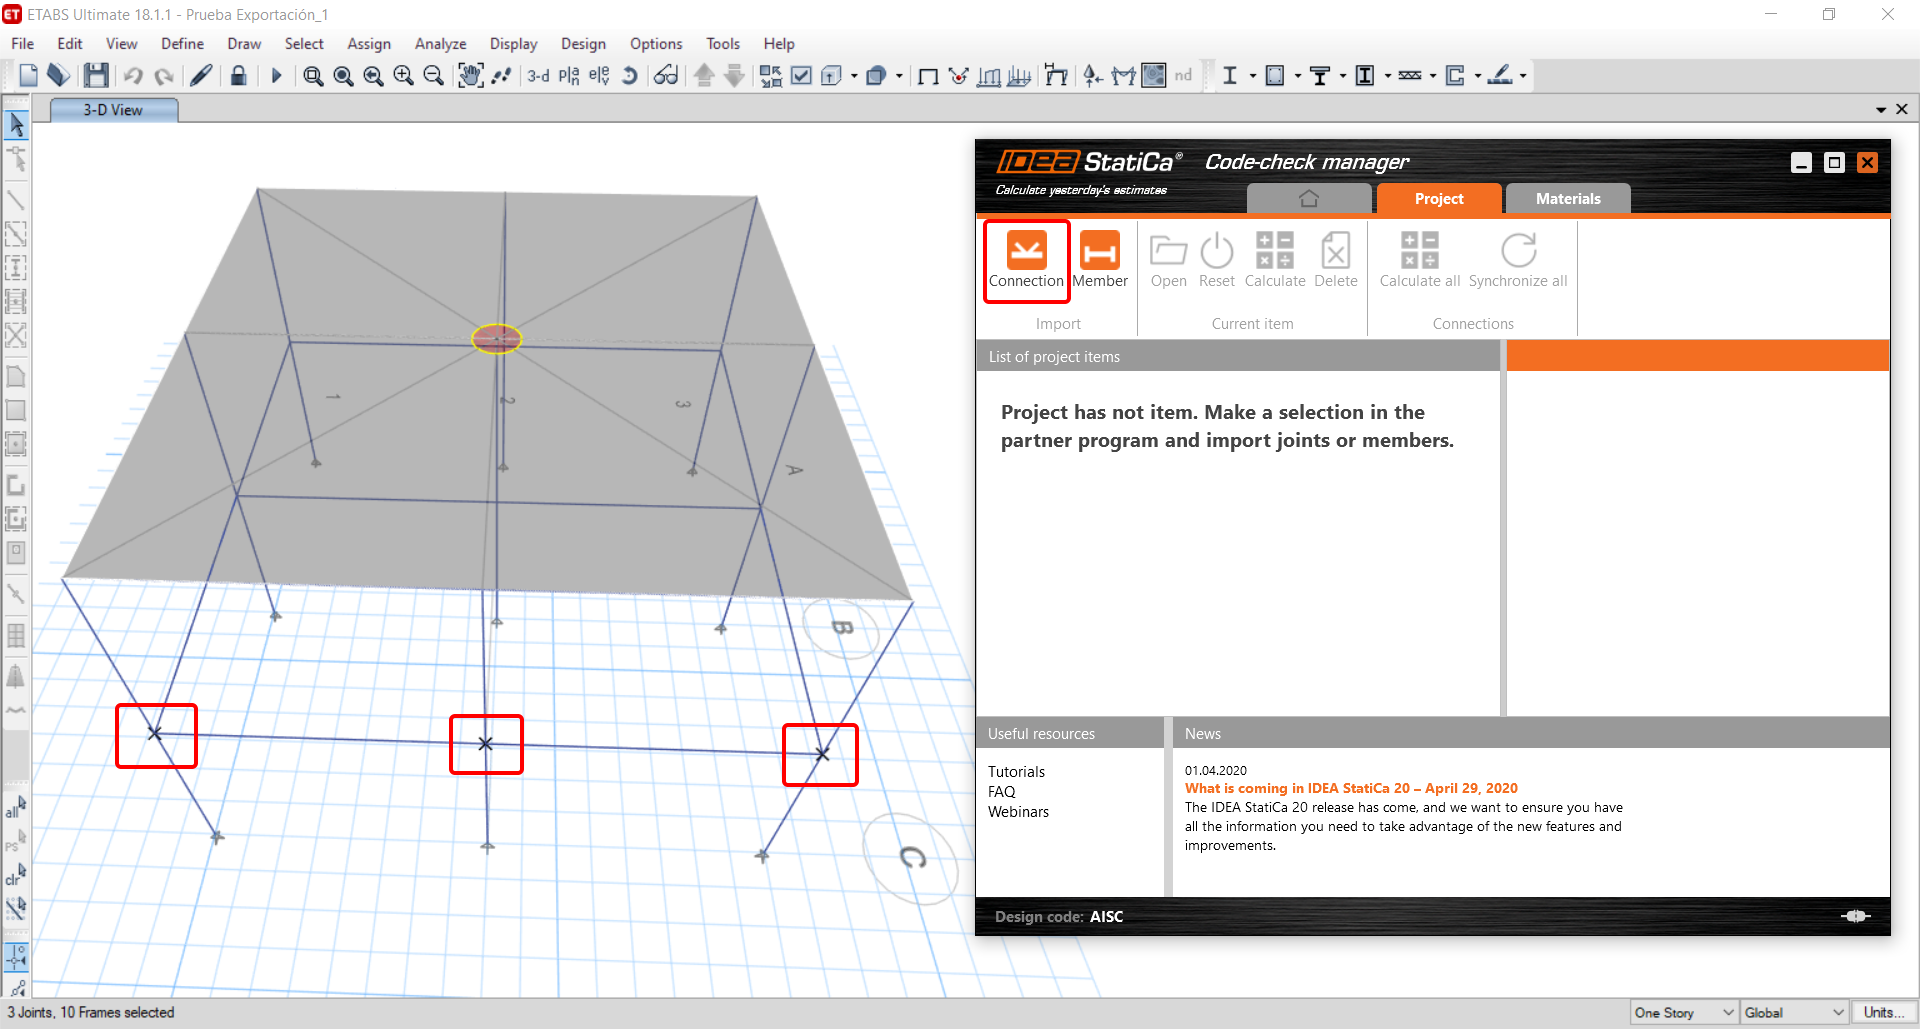
If the joints are selected, you can click on the Connection button in the Code-check manager. With this, all the selected joints from ETABS will be imported into the Code-check manager.
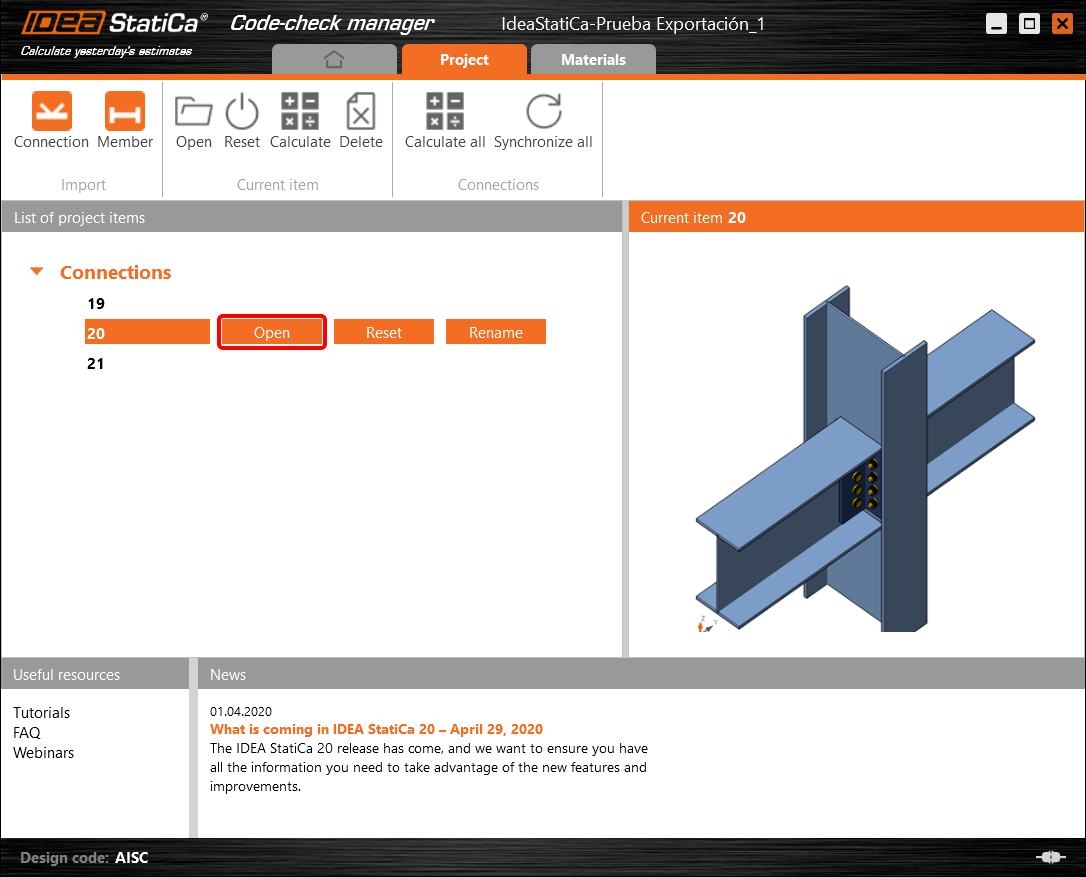
The next thing you need to do is to configure the joints in the Code-check manager. In this tutorial, you will only focus on one of the three imported joints, but the process would be the same for all of them.
You click on the joint on the left side (joint 20). On the right side, you can see the scheme of the joint, you can set the bearing member and merge the continuous members. After that, click on the Finish button to complete the configuration of the joint.
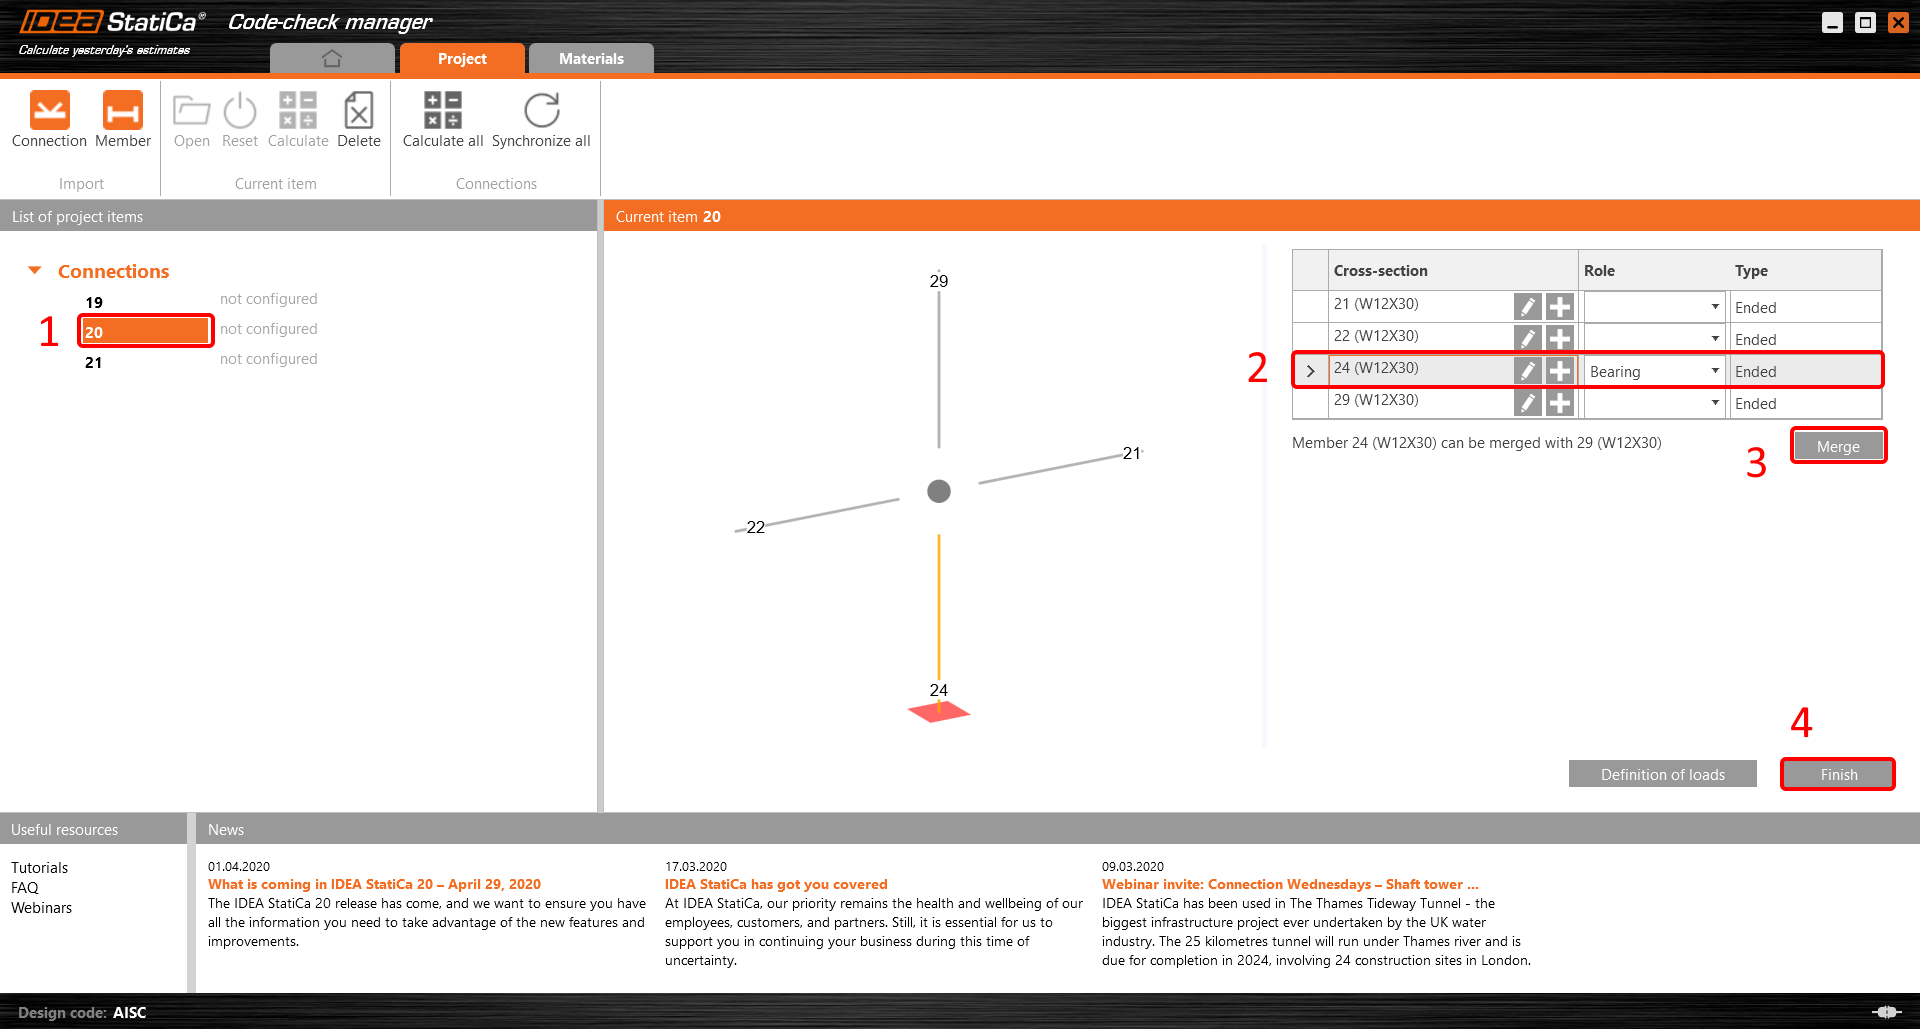
The joint is now ready to be opened in IDEA StatiCa Connection for the CBFEM analysis.

3 Design
Automatic data transfer is started and IDEA StatiCa Connection with a generated project is launched. All members and load effects were added automatically.
This tutorial works with imperial units. If you use metric units, you can switch them to imperial by clicking on the unit in the bottom part of the window.

Now you will define a set of manufacturing operations to model the connection between members. In the items tree, you right-click on Operations and select the option New operation.
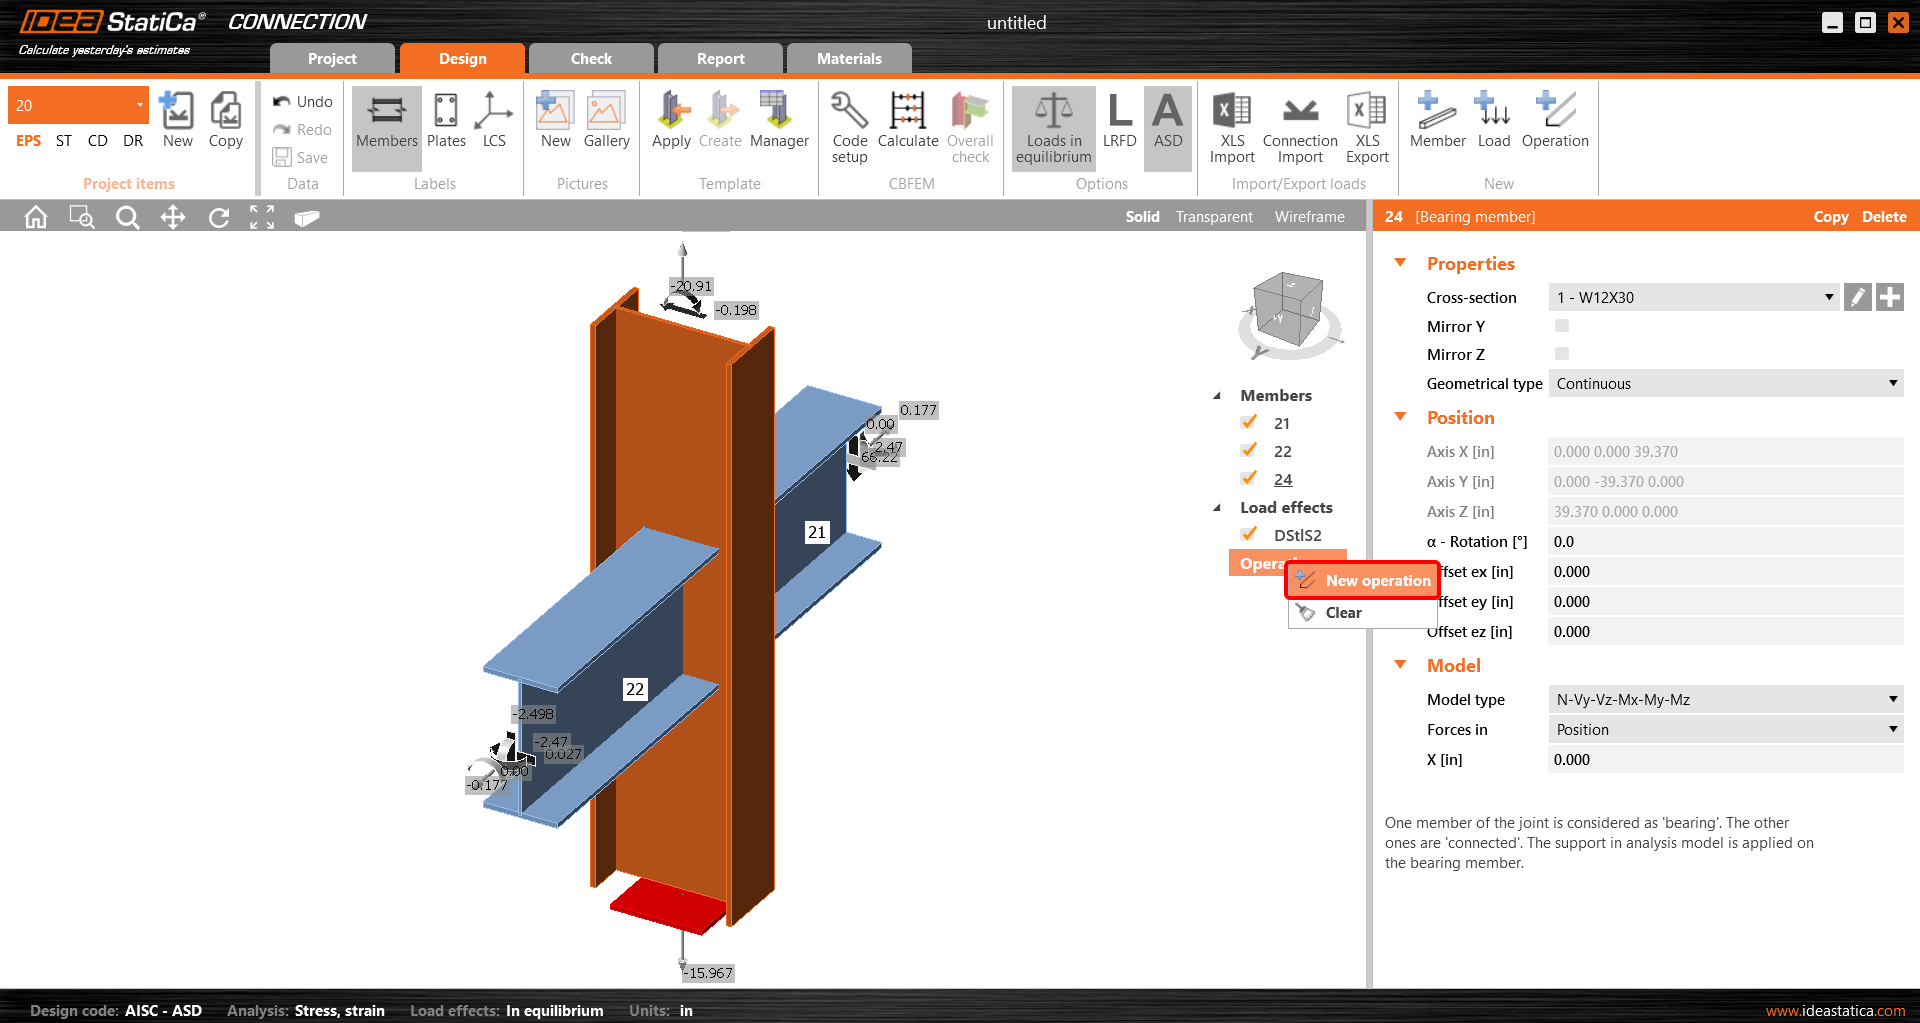
And you add the operation Cleat.


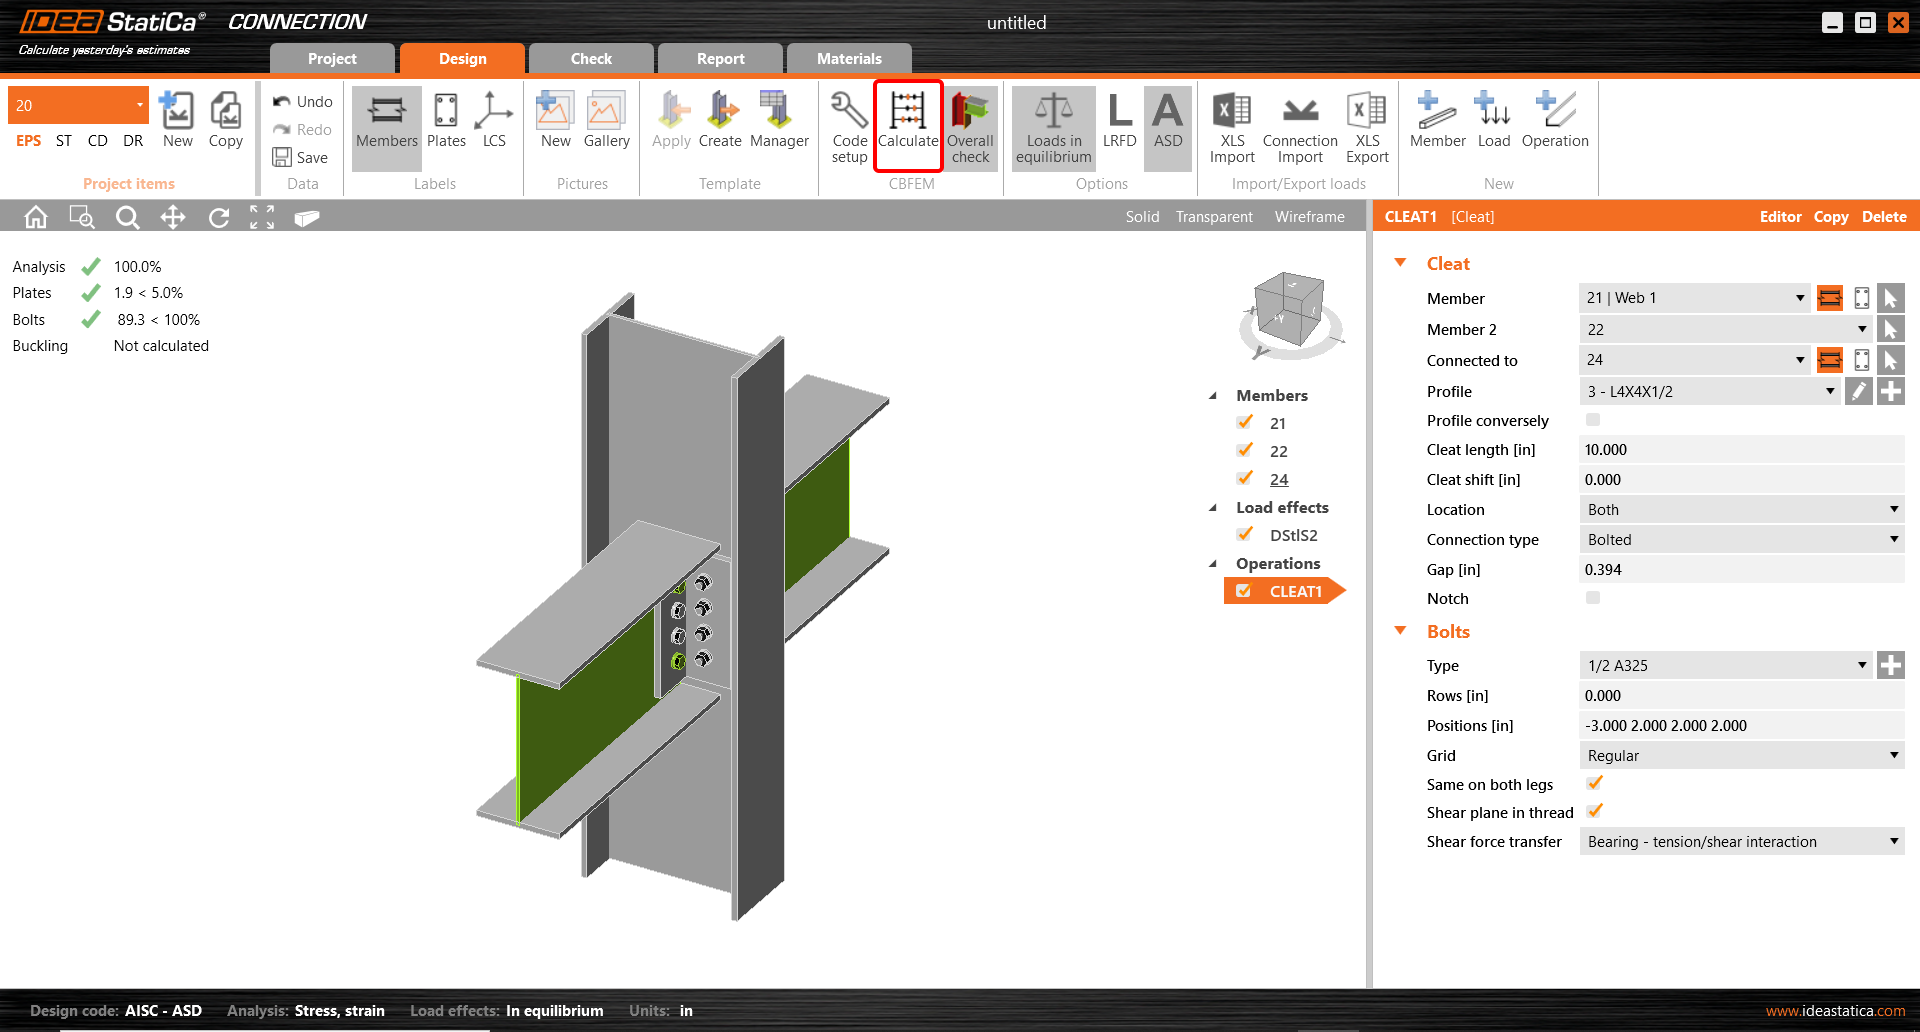
And set the properties of CLEAT1 as follows:

You can check the design of this simple joint.

4 Check
The analysis based on CBFEM is started by the icon Calculate from the top ribbon. The analysis model is automatically generated, the calculation is performed, and you can check the results.
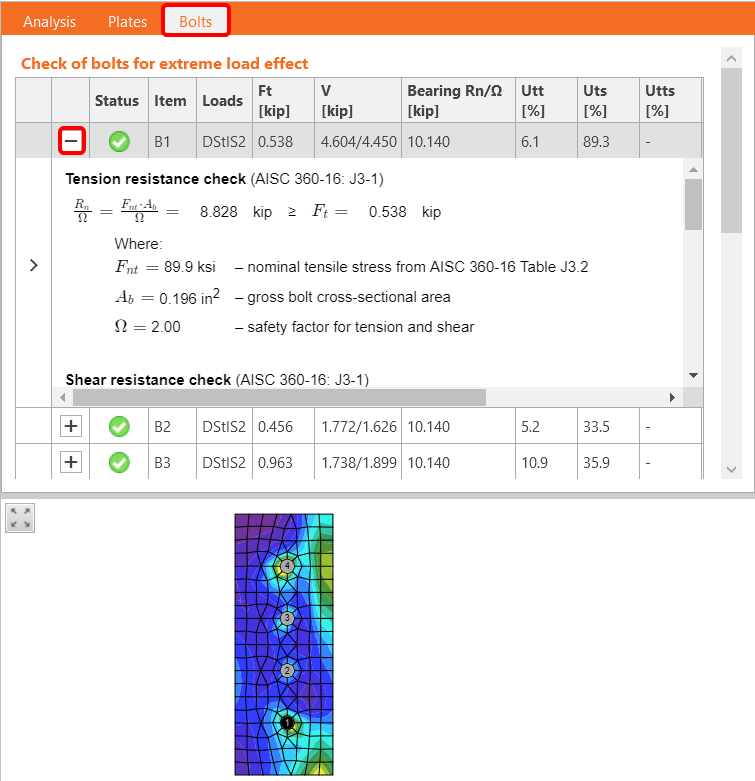
Activate Overall check, Equivalent stress, Mesh and Deformed from the ribbon to get a full picture of what is happening in the joint. Everything is displayed in the 3D window.

All values can be reviewed in detail in the tables and 2D windows. For example, to display the check of bolts, select the Bolts tab.
5 Report
At last, go to the tab Report. IDEA StatiCa offers a fully customizable report to print out or save in an editable format.

You have imported, designed, and code-checked a steel joint according to AISC.
6 Synchronize models
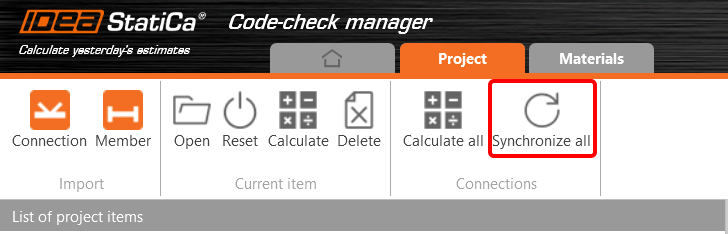
The Code-check manager is a BIM tool to export and synchronize connections from other programs. It is launched directly in the 3rd party applications via a command/icon.
Synchronize all - IDEA StatiCa detects changes in all already imported entities (changes in thickness, changes in cross-section, modification of properties of welds, bolts, etc.) and updates the project in IDEA StatiCa Connection.
Calculate - Synchronize and calculate the current item and provide a new set of results.
Calculate all - Synchronize and calculate all items and provide a new set of results.
Note
Kindly be aware that IDEA StatiCa syncs with a model of the 3rd party application, not the other way around.
Save the project in IDEA StatiCa and close the application Connection. All joints exported from the ETABS project to IDEA StatiCa are kept on the list inside ETABS.
Unlock the model and change the cross-section of member 22 from W12x30 to W12x26.

Run the analysis, select the export command in the upper ribbon, and in the Code-check manager, click on Synchronize.

In the next step, you can Open the joint in IDEA StatiCa Connection to explore the changes.
As you can see, the cross-section of the Member 22 has been changed, but all previous operations remained.

You have imported, designed, and code-checked a steel joint according to AISC.
Ismert korlátozások az ETABS és SAP2000 esetén
Beton BIM link korlátozások
Az alábbiakban összefoglaljuk az ETABS/SAP2000 BIM link IDEA StatiCa Checkbot és Detail 2D alkalmazással való használatakor fennálló jelenlegi korlátozásokat és szempontokat, kiemelve a lehetséges kényszerfeltételeket, gyakori problémákat és ajánlott gyakorlatokat a pontos elemzés és tervezés érdekében.
Korlátozás: Importálás
Ha egy ETABS teherkombináció analízislépéseket tartalmaz, az IDEA StatiCa Checkbot nem tudja mindegyiket figyelembe venni.
- Ajánlott a lépéses tehereseteket egyedi teheresetekre bontani az importálás előtt.
Korlátozás: Szinkronizálási funkció
A modell szinkronizálásakor a teherkombináció-típusok visszaállnak.
- A felhasználónak minden szinkronizálás után újra kell rendelnie a megfelelő teherkombináció-típusokat.
Korlátozás: Detail elem létrehozása
A következő korlátozások érvényesek, amikor Detail-t hozunk létre a Checkbot-ban:
- Detail-ek csak azonos síkban fekvő falelemekhez hozhatók létre.
- Ha a kiválasztott elemek nem koplanárisak, hiba lép fel, és más elemkészletet kell kiválasztani.
Korlátozás: Detail exportálás
Detail exportálásakor a következő korlátozások érvényesek (a Checkbot figyelmeztetést jelenít meg, ha szükséges):
- A 2D elemekre alkalmazott síkon kívüli egyenletes terhek nem kerülnek át a Detail 2D-be.
- A 2D elemek nem kerülnek összevonásra, ha eltérő vastagságuk, anyaguk vagy síkbeli terhelési értékeik vannak.
- A síkon kívüli terhelés nem exportálható. Figyelmeztetés jelenik meg, ha egy teherkombináció teljes élterhelése meghaladja a ±1 kN-t.
- A nem függőleges 2D elemeket nem szabad átvinni a Detail 2D-be; az alkalmazás nem alkalmas ilyen elemekre.
Gyakori problémák a munkafolyamatban
- A koncentrált pontterhelések nemlineáris analízis hibát okozhatnak. Adjon hozzá egy teherátadó eszközt (pl. alátétlemez) a terhelés elosztásához.
- Egy durva ETABS vagy SAP2000 háló (globális modelleknél jellemző) feszültségcsúcsokat okozhat, és irreális koncentrált erőket eredményezhet mind értékben, mind pozícióban a vasalás tervezéséhez.
- Ajánlás: Módosítsa a hálót 100 mm x 100 mm-re az importált falelemek esetén.
- A durva háló jelentős síkbeli nyomatékokat is okozhat, amelyeket az IDEA StatiCa nem tud pontosan kezelni.
- Ajánlás: Állítsa az importált falelemek síkon kívüli merevségét alacsony értékre, hogy a globális modell környező szerkezeti elemei megfelelően felvehessék és átadhassák a síkon kívüli erőket.
- Ha egy élpontterhelés húzást okoz az élen (pl. vízszintes terhelésből), a nemlineáris analízis meghiúsulhat.
- Ajánlás: Helyezze a pontterhelést kissé befelé a megfelelő beton igénybevétel biztosítása érdekében.

Acél BIM link korlátozások
A link már számos kapcsolat/csukló esetén működik. Kérjük azonban, vegye figyelembe a még nem támogatott funkciókat:
Korlátozás: Terhek importálása
Nem támogatjuk olyan teherkombináció importálását, amely lineáristól eltérő módon adja össze a teherkombinációkat.
Nem támogatjuk egy teherkombináció hivatkozását egy másik teherkombináción belül.
Korlátozás: Az SAP2000 és ETABS linkek futtatása az IDEA StatiCa 22.1-gyel.
Problémás verziók:
- SAP2000 24.1.0
- ETABS 20.3.0
A probléma leírása:
Az SAP2000 24.1.0 új javítócsomagja nem működik együtt a legújabb IDEA 22.1-gyel. Amikor elindítja a Checkbot-ot a menüből, az így néz ki, és semmi sem tehető/kattintható.
Megoldás:
Ez az SAP2000 és az ETABS esetén is érvényes (legújabb verziók). A megkerülő megoldás a következő:
1. Keresse meg a konfigurációs fájlt (vagy SAP2000.exe.config vagy ETABS.exe.config) a következő helyen:
C:\Program Files\Computers and Structures\SAP2000 24\
vagy
C:\Program Files\Computers and Structures\ETABS 20\
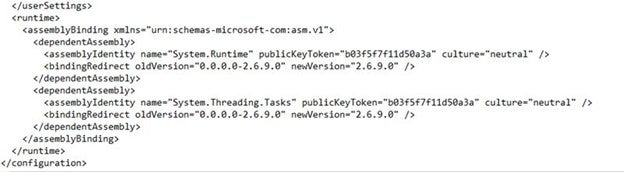
2. Törölje a következő sorokat a fájl aljáról, és mentse el (rendszergazdai jogok szükségesek).

Alternatívaként másolja a fájlt az asztalra, ott szerkessze, majd másolja vissza az eredeti mappába.
A fájlnak így kell kinéznie (az alsó részének) az assembly kötés megfelelő törlése után:
3. Ezt követően lehetséges a Checkbot futtatása.
Korlátozás: Egyensúly
A csomópontokban lévő egyensúly biztosításához kérjük, állítsa a végponti hossz-eltolásokat 0-ra:


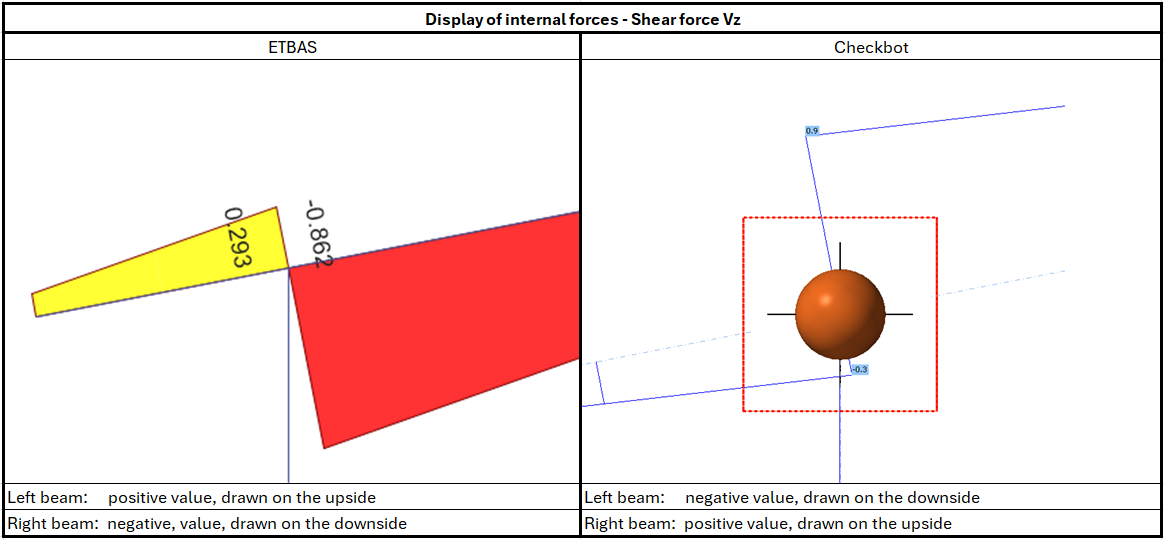
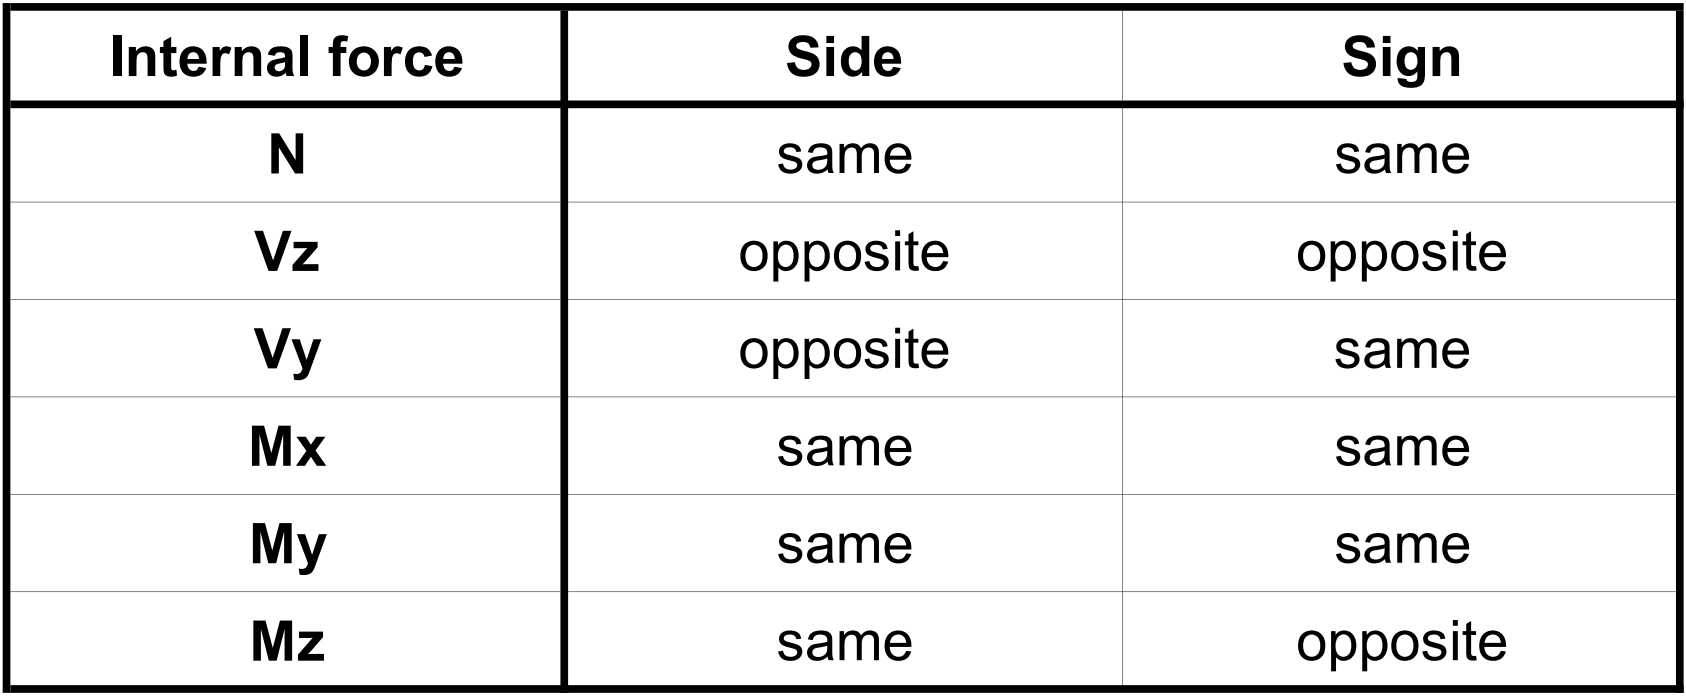
Korlátozás: Belső erők előjelkonvenciója
Az ETABS és a Checkbot eltérő előjelkonvenciói miatt a belső erők eltérően jelennek meg. A teherhatások helyesen kerülnek alkalmazásra, de a belső erők ellentétes előjellel jelenhetnek meg, és a gerenda másik oldalán kerülhetnek ábrázolásra.
Korlátozás: Az SAP2000 vagy ETABS több verziója telepítve a számítógépen
AzETABS és az SAP2000 API COM könyvtárat használ, amelyet regisztrálni kell a rendszerleíró adatbázisban. Amikor új verziót telepít, a telepítés során az adott verzió COM-ja automatikusan regisztrálódik. Így amikor megpróbálja futtatni a Checkbot linket a régebbi verzióhoz, az nem működik.
Ha váltani szeretne a két verzió között, a következőket kell tennie:
1) Futtassa rendszergazdaként az "UnregisterSAP2000.exe" vagy "UnregisterETABS.exe" fájlt az újabb verzió mappájában.
2) Majd futtassa rendszergazdaként a "RegisterSAP2000.exe" vagy "RegisterETABS.exe" fájlt a régebbi verzió mappájában.