
ETABS BIM link for connection design
1 How to activate the link
- Install the latest version of IDEA StatiCa
- Make sure you are using a supported version of ETABS – updates are published in the BIM section of the main website
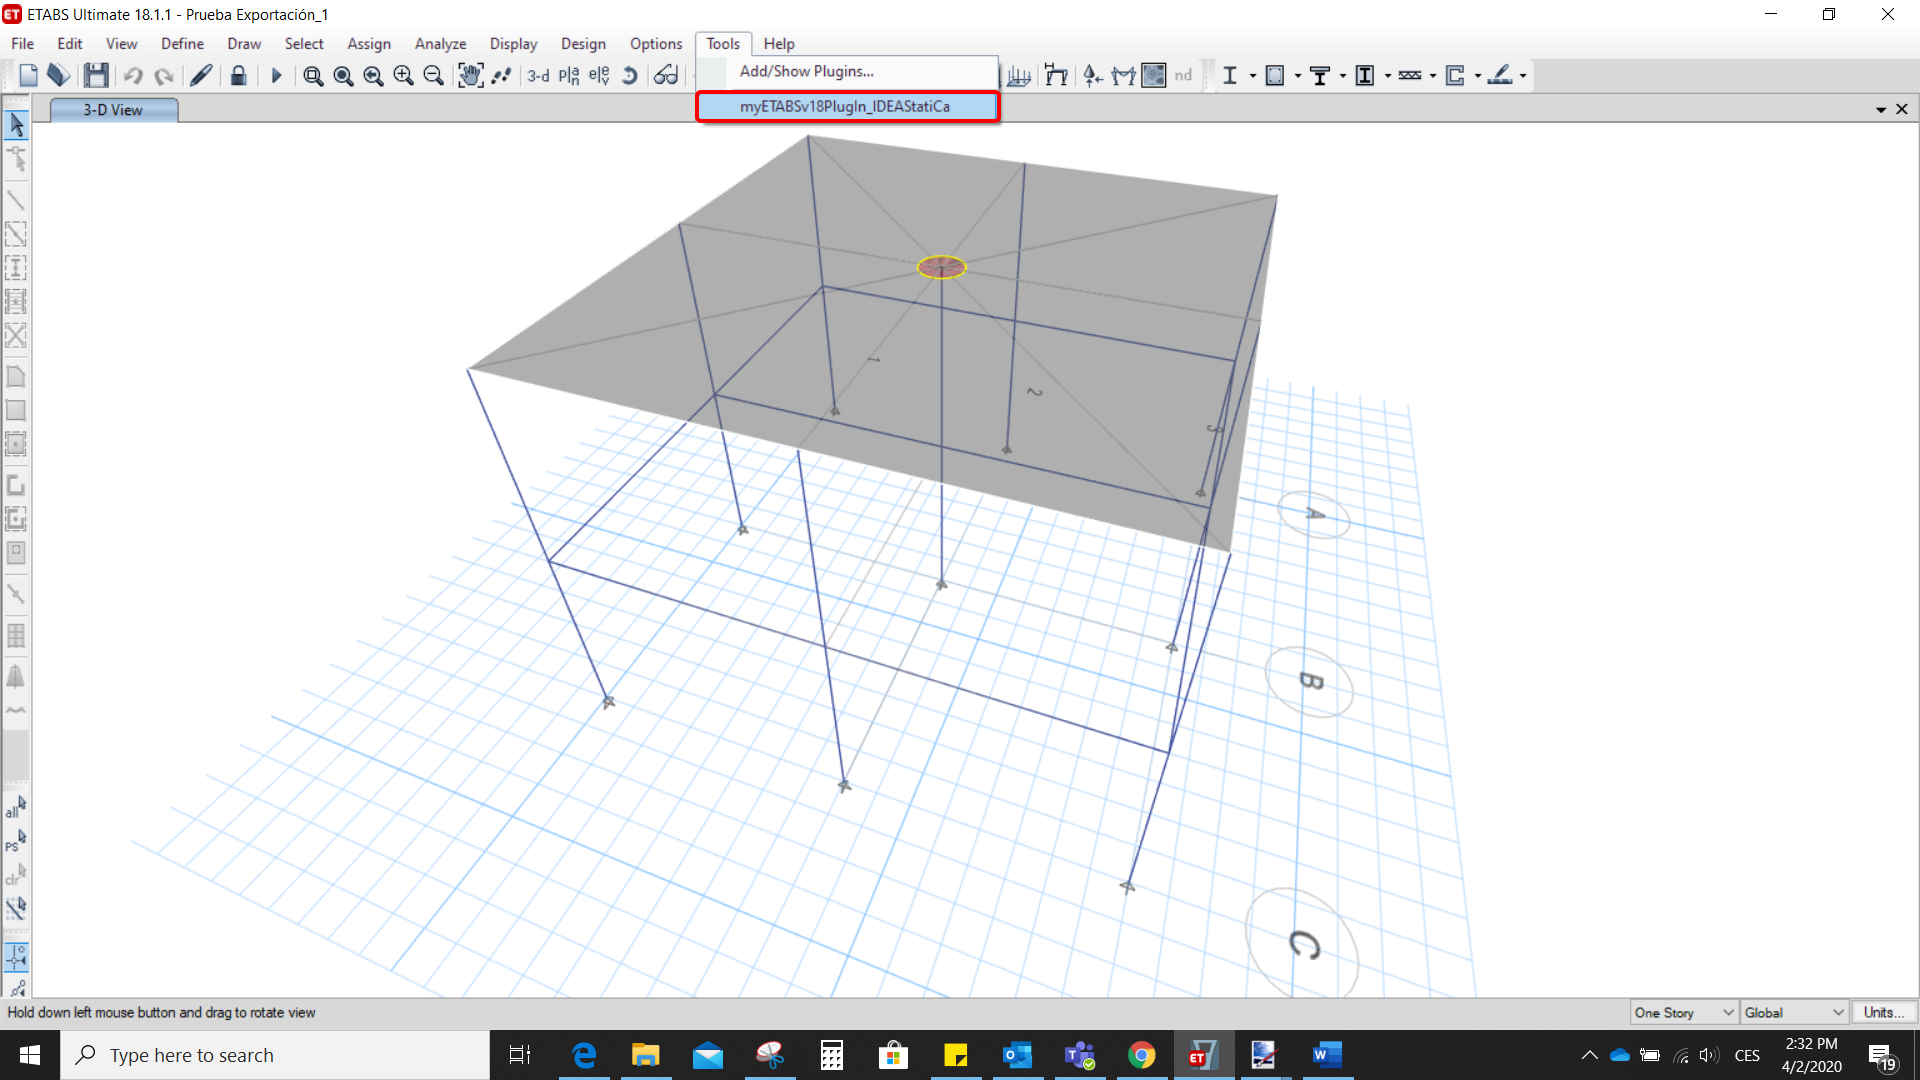
After installation of both programs, start ETABS and Click Tools > Add/Show Plugins to open the Plugin Manager dialog. This option lets you install and add add-ins (programs) to the appropriate places in the ETABS menu.
Browse for
C:\Program Files\IDEA StatiCa\StatiCa 20.0\ETABSv18PlugIn_IDEAStatiCa.dll
and click Add

2 How to use the link
Open the attached project in ETABS and run the analysis.
Go to the menu item Tools and run the export command you have just defined.
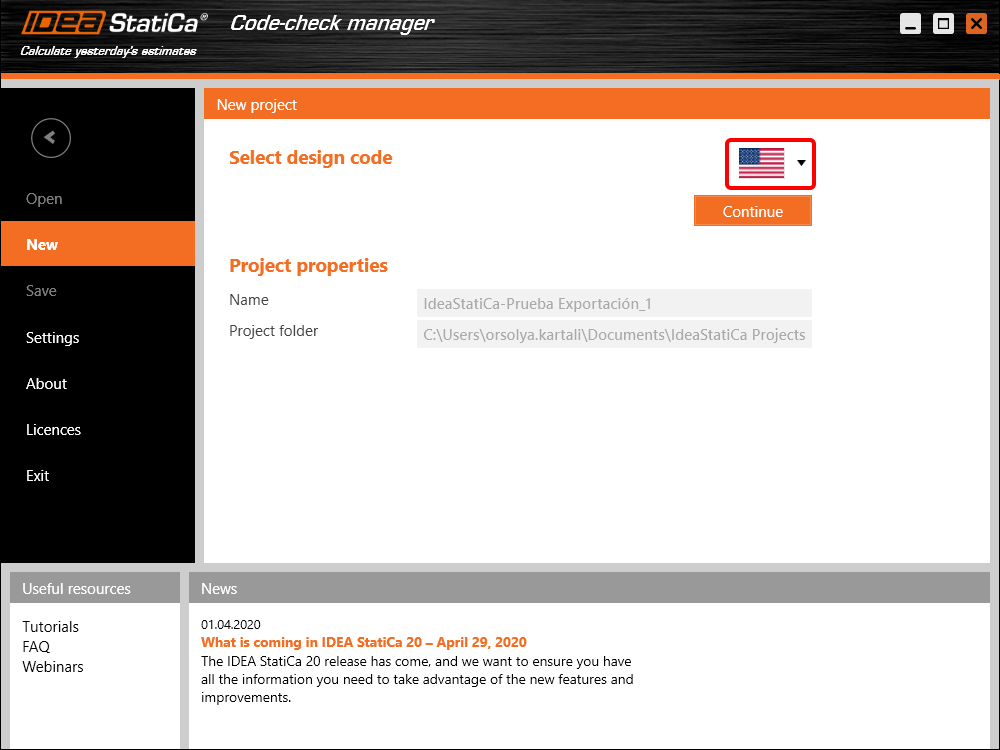
The Code-check manager opens and at first, you need to choose the code.
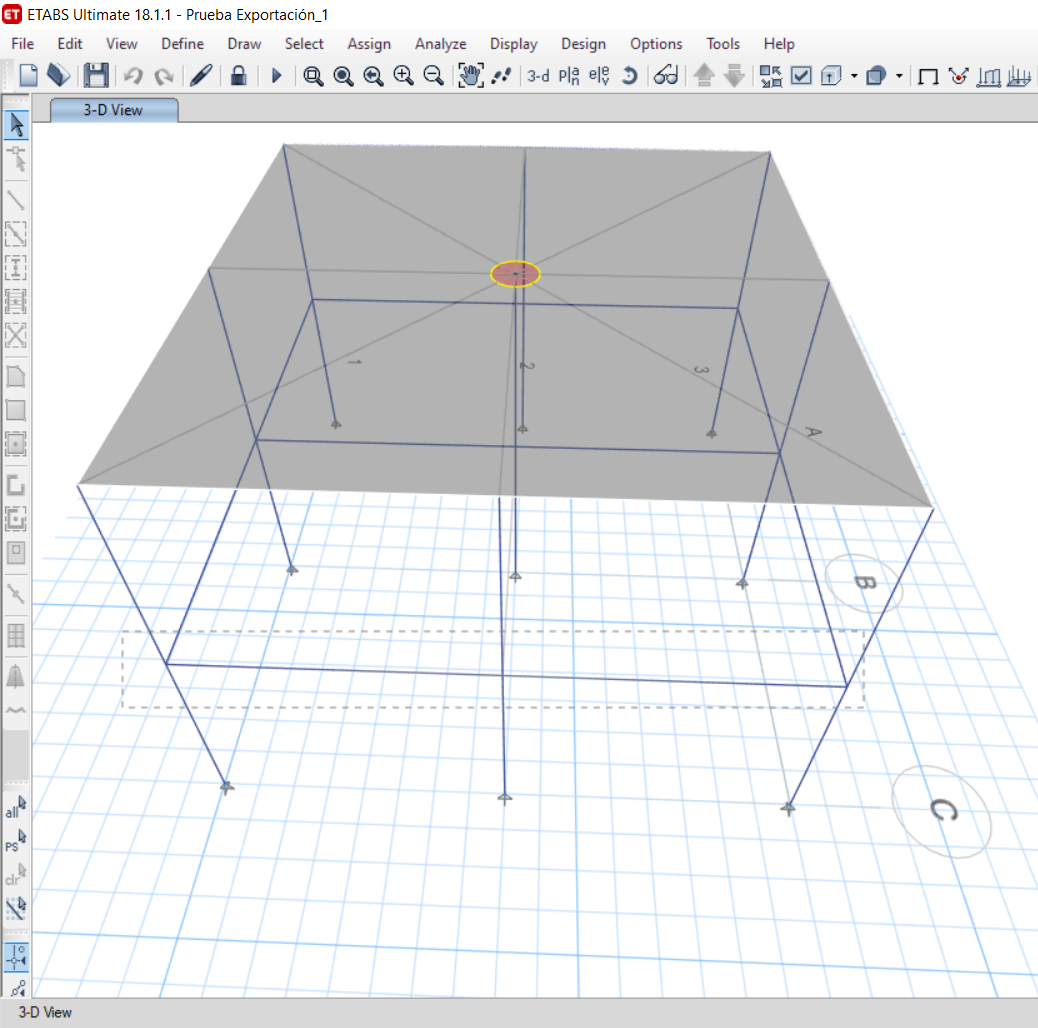
Then you can make a rectangular selection in the ETABS project to choose which joints you want to export. You can export more joints at once using the multiple selections.
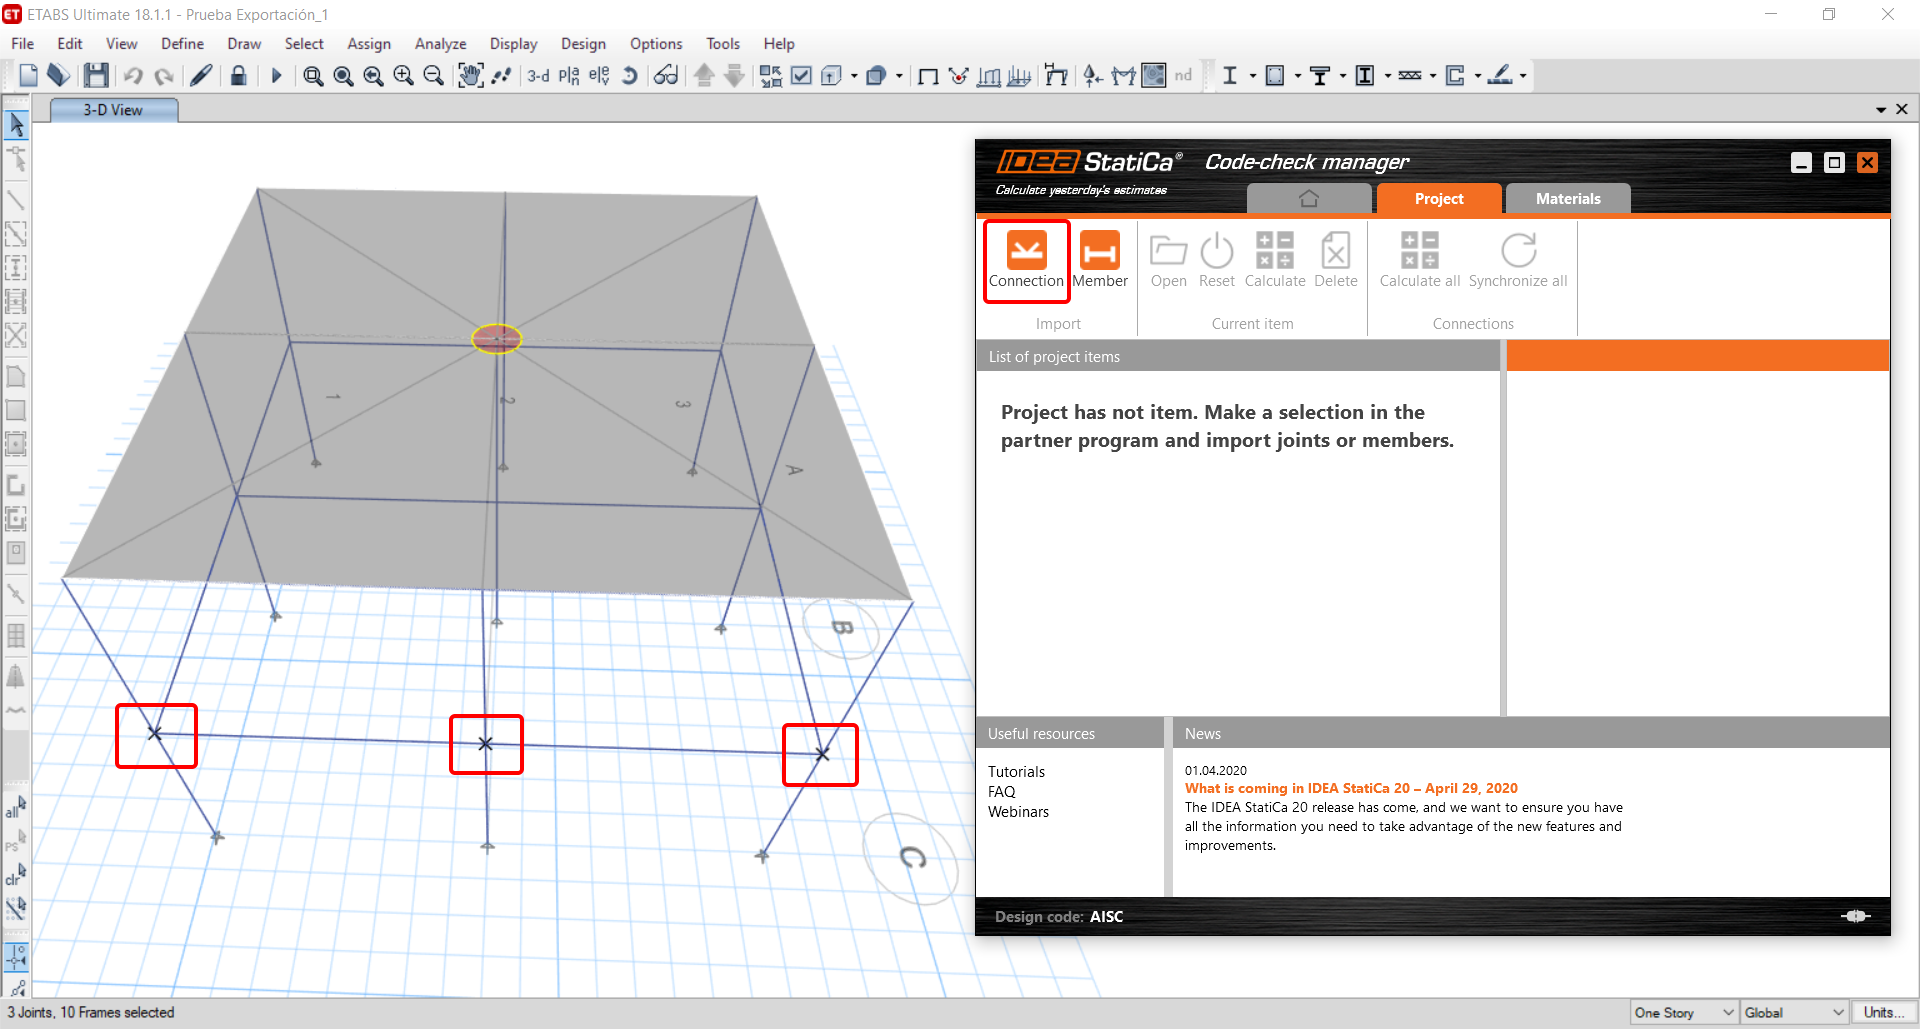
If the joints are selected, you can click on the Connection button in the Code-check manager. With this, all the selected joints from ETABS will be imported into the Code-check manager.
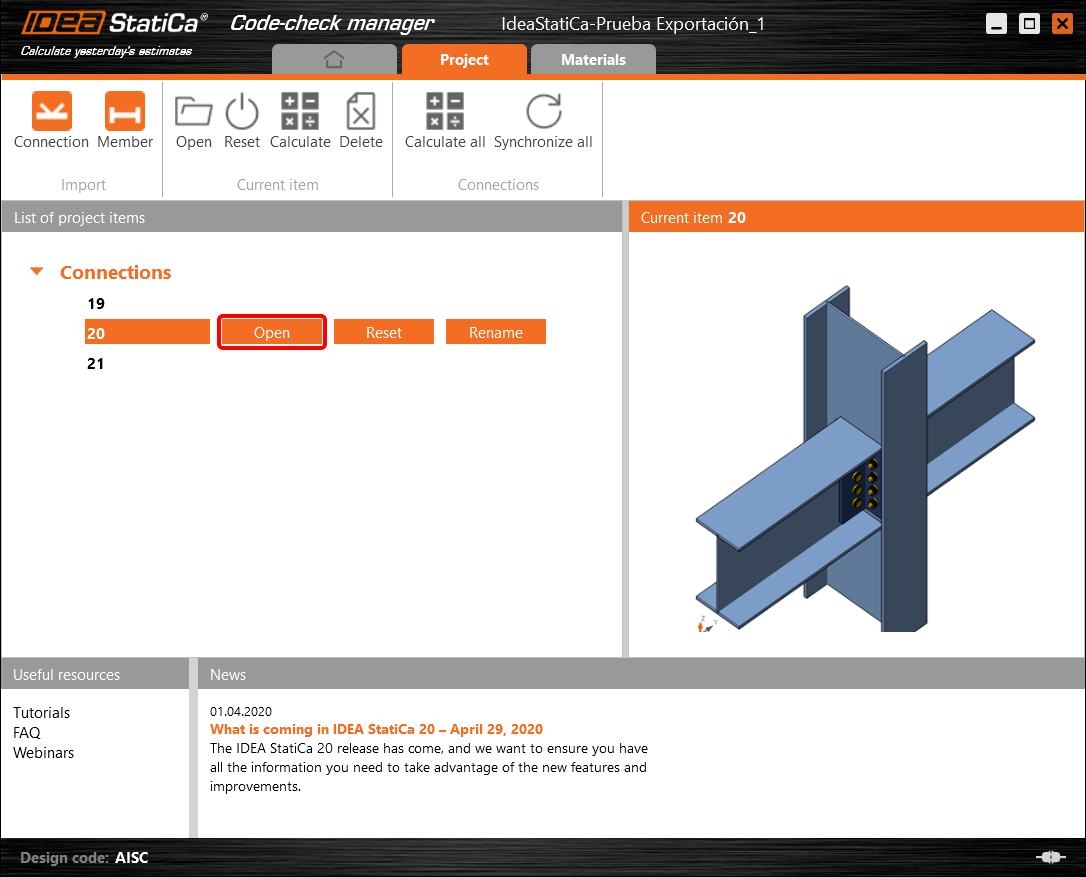
The next thing you need to do is to configure the joints in the Code-check manager. In this tutorial, you will only focus on one of the three imported joints, but the process would be the same for all of them.
You click on the joint on the left side (joint 20). On the right side, you can see the scheme of the joint, you can set the bearing member and merge the continuous members. After that, click on the Finish button to complete the configuration of the joint.
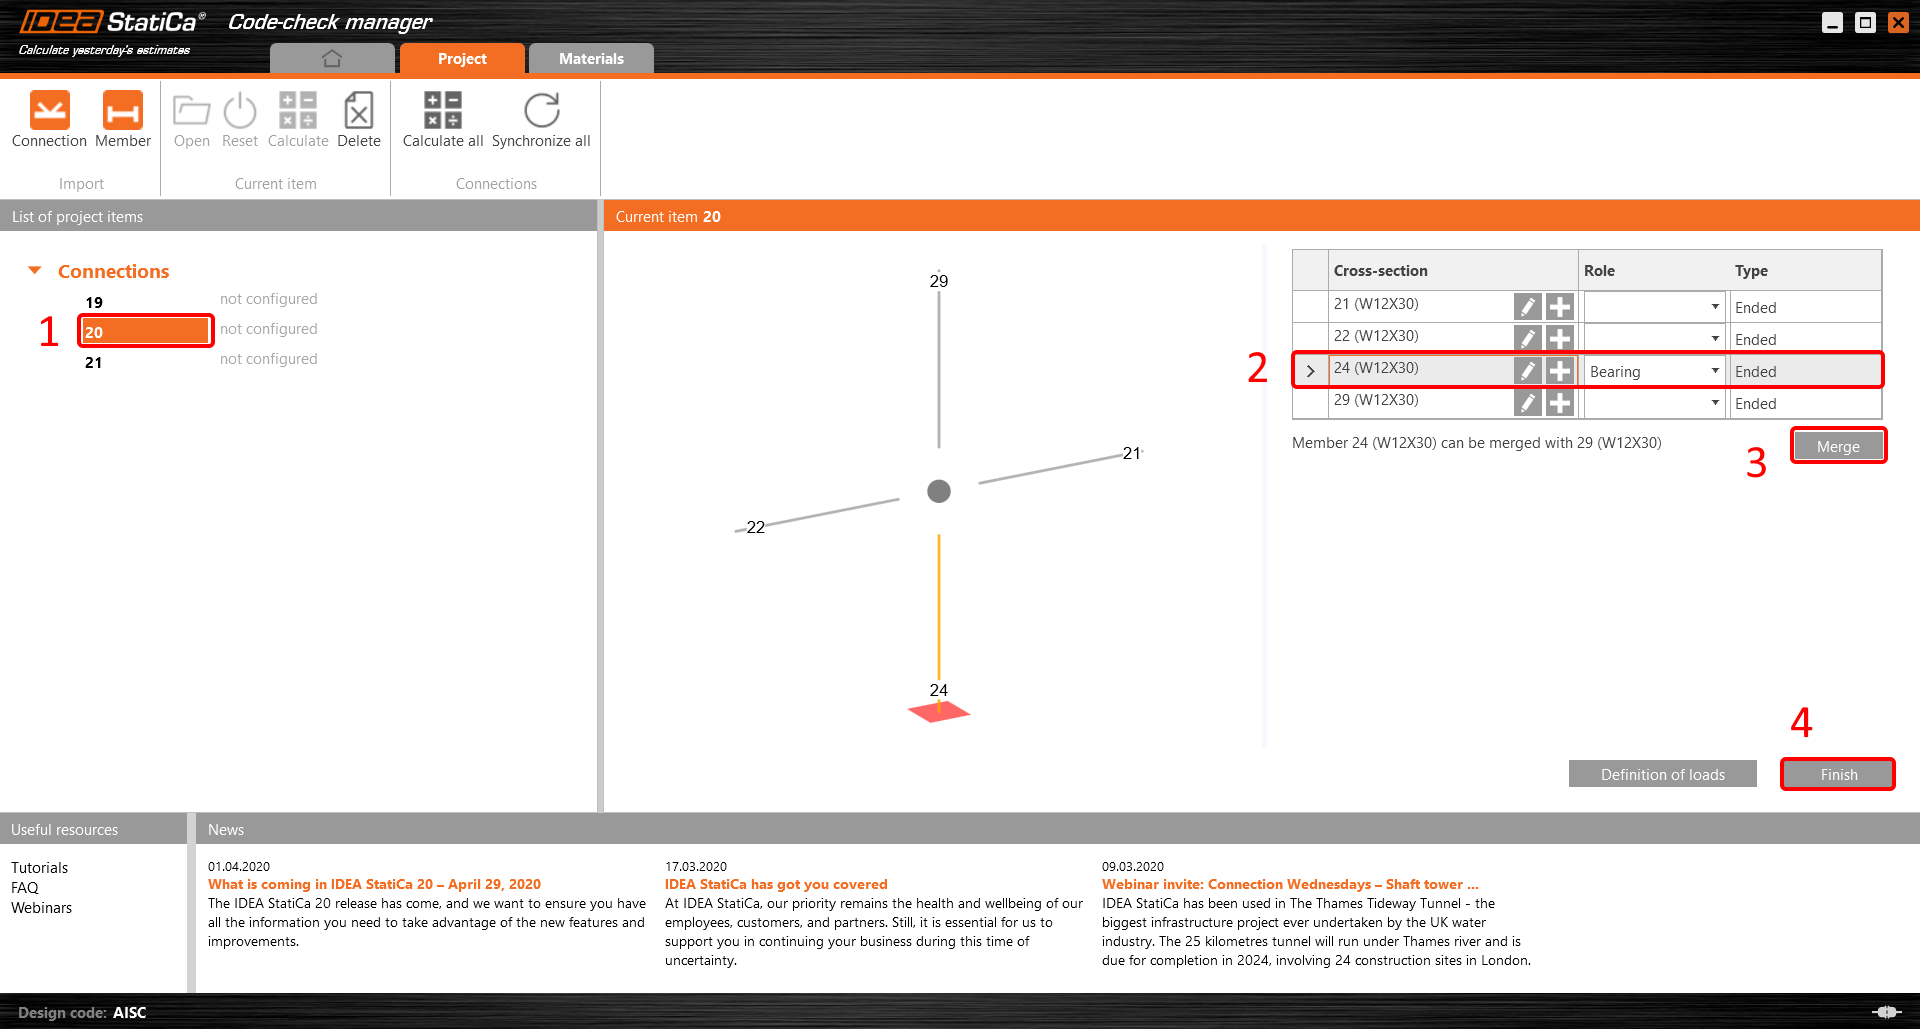
The joint is now ready to be opened in IDEA StatiCa Connection for the CBFEM analysis.

3 Design
Automatic data transfer is started and IDEA StatiCa Connection with a generated project is launched. All members and load effects were added automatically.
This tutorial works with imperial units. If you use metric units, you can switch them to imperial by clicking on the unit in the bottom part of the window.

Now you will define a set of manufacturing operations to model the connection between members. In the items tree you right-click on Operations and select the option New operation.
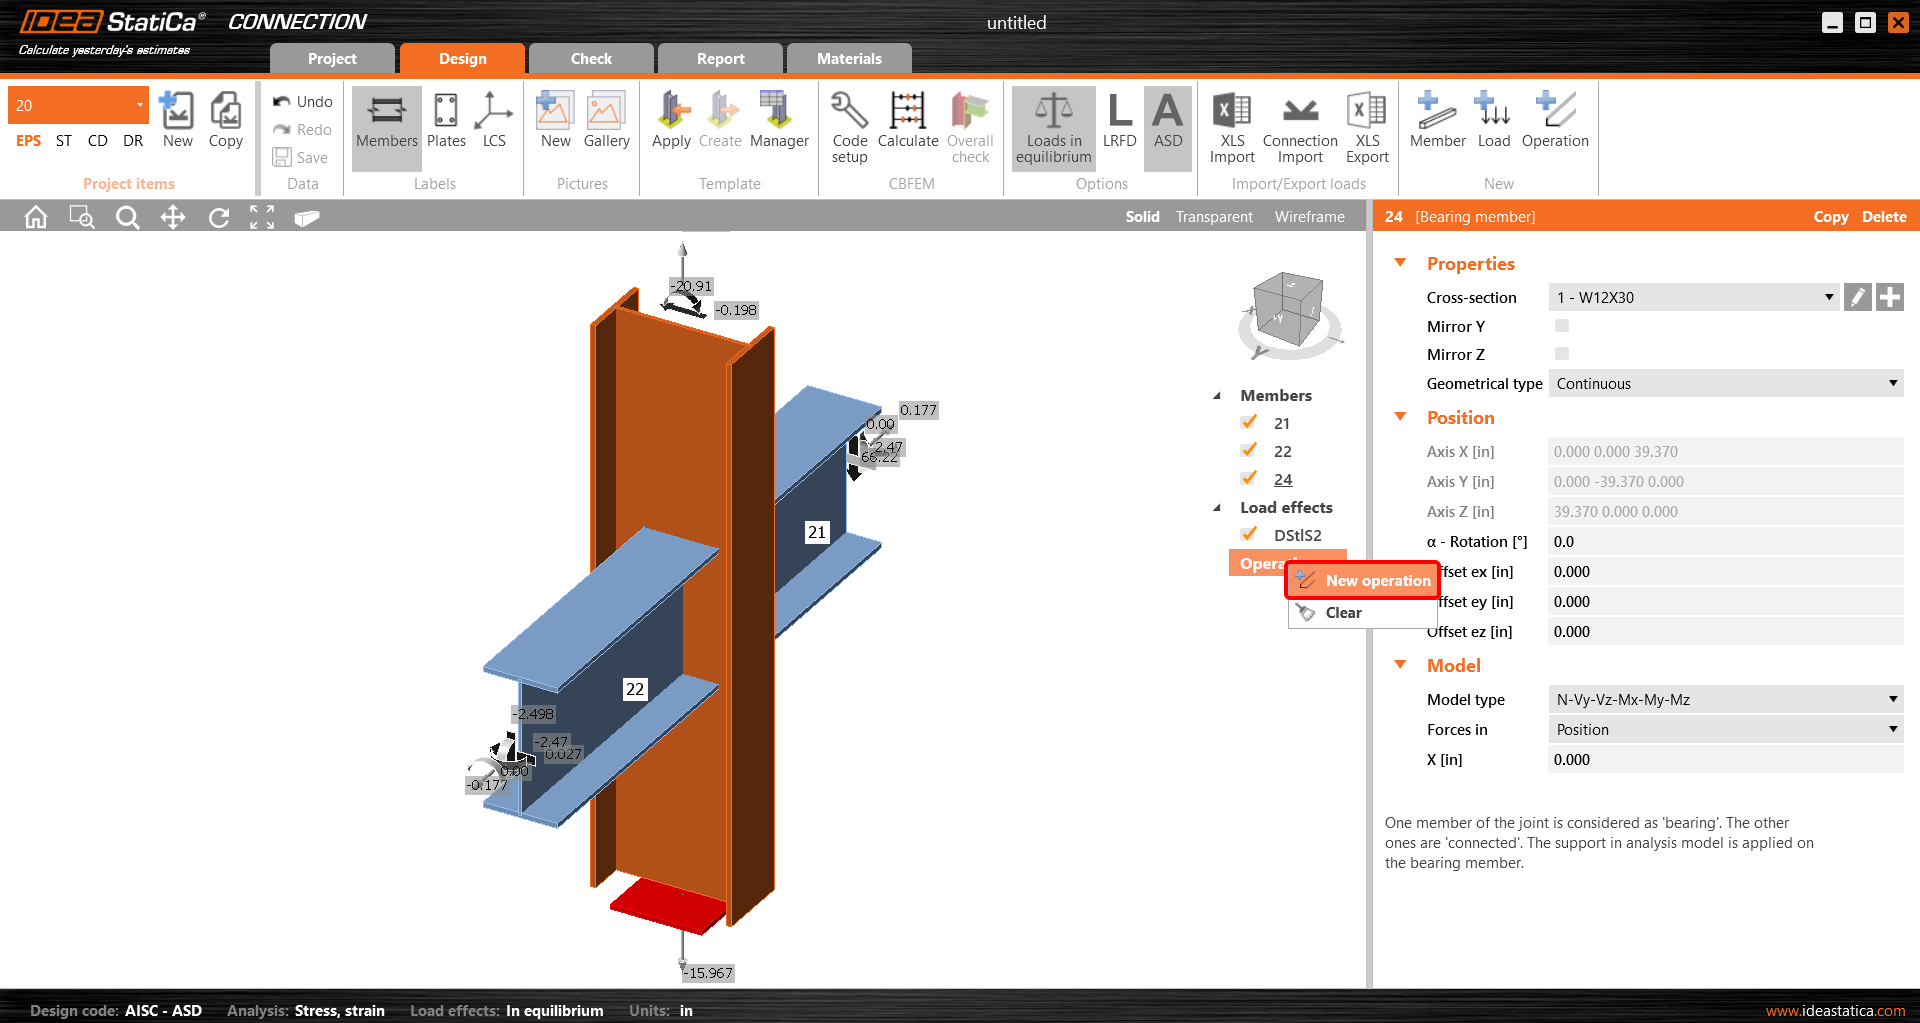
And you add the operation Cleat.


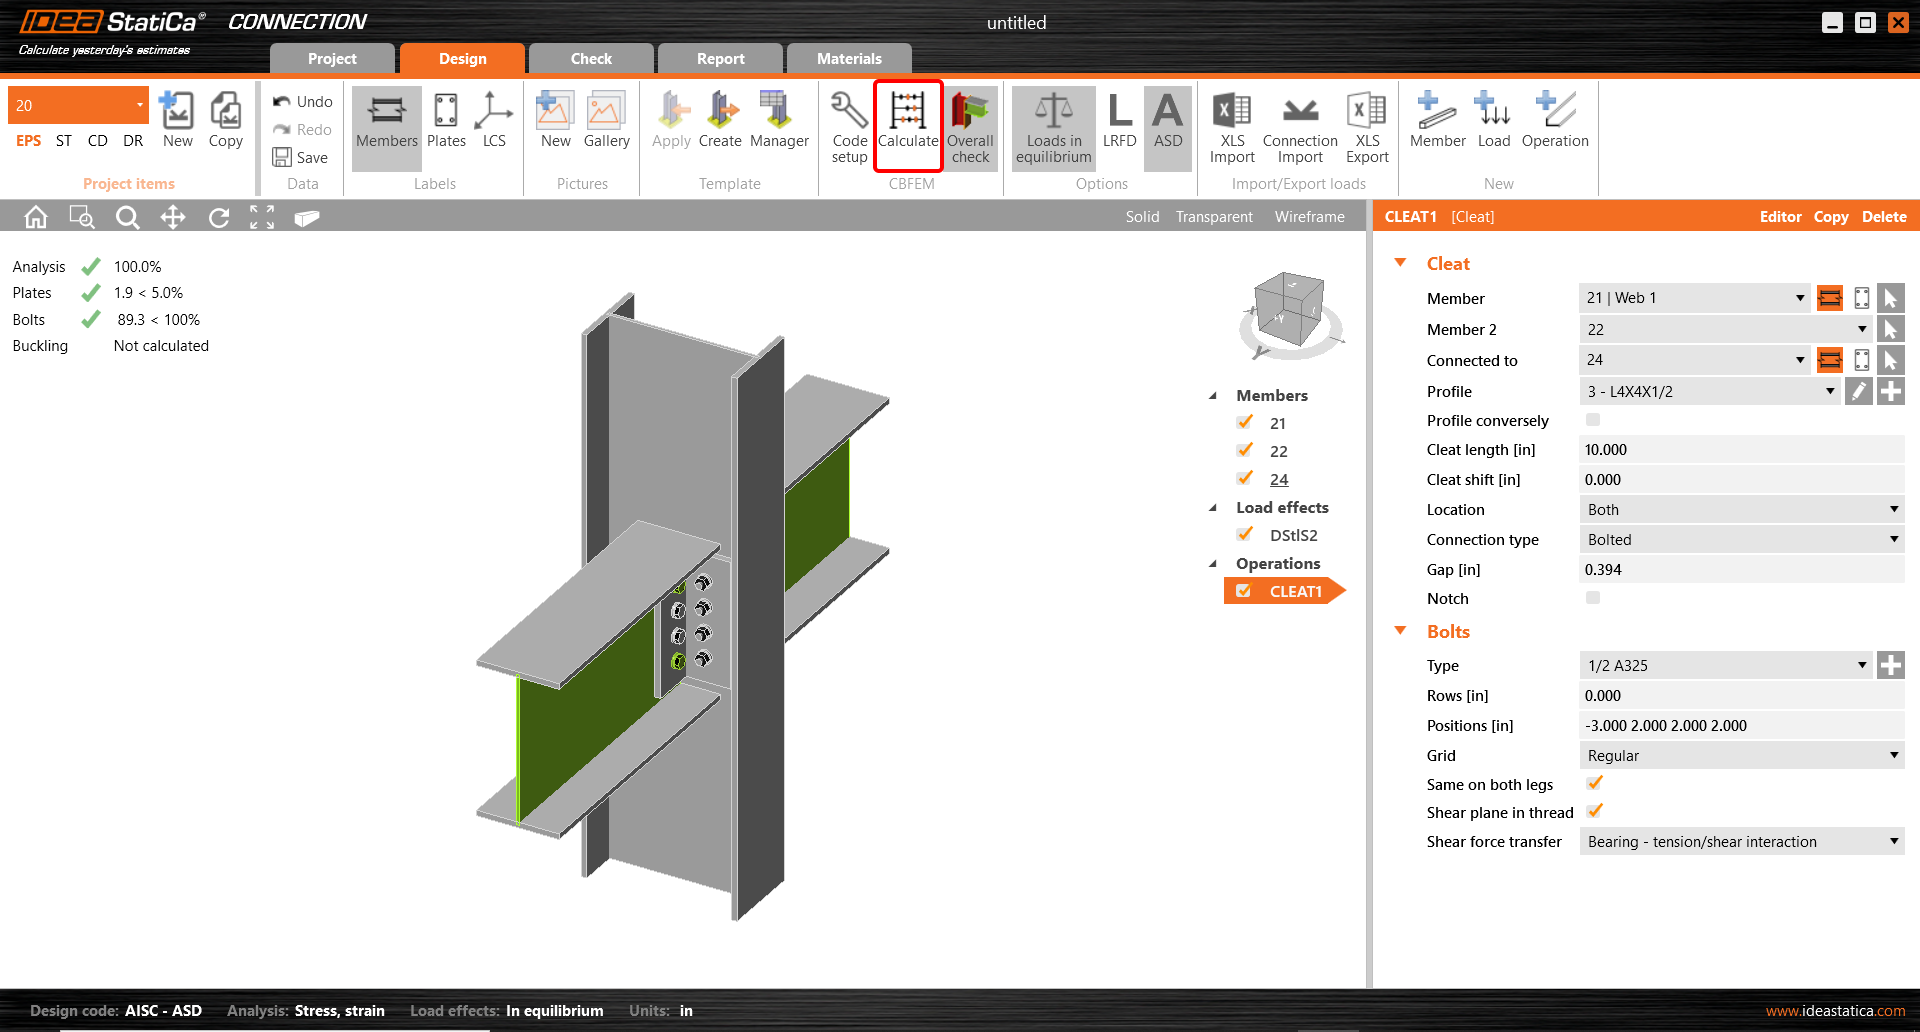
And set the properties of CLEAT1 as follows:

You can check the design of this simple joint.

4 Check
The analysis based on CBFEM is started by the icon Calculate from the top ribbon. The analysis model is automatically generated, the calculation is performed and you can check results.
Activate Overall check, Equivalent stress, Mesh and Deformed from the ribbon to get a full picture of what is happening in the joint. Everything is displayed in the 3D window.

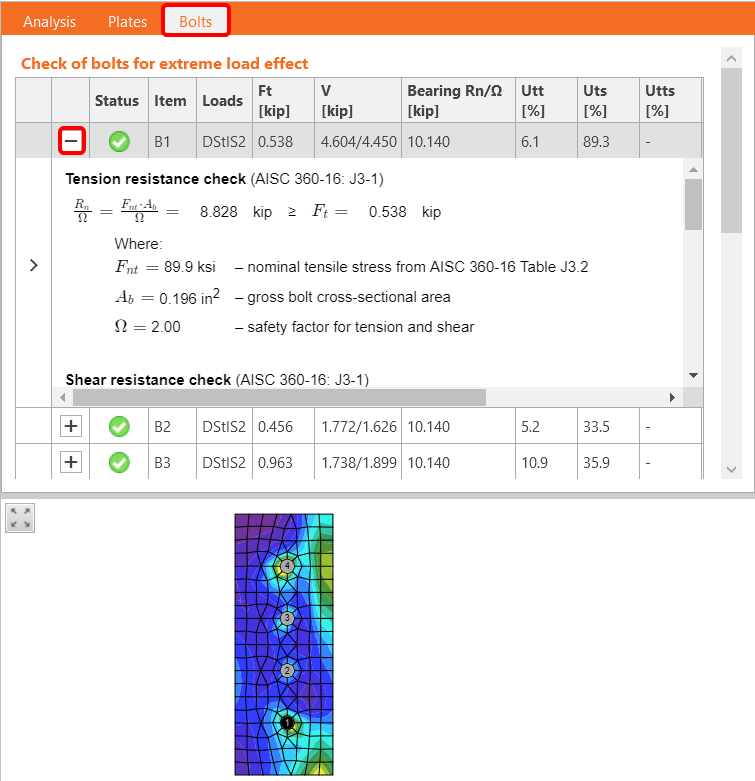
All values can be reviewed in detail in the tables and 2D windows. For example, to display the check of bolts select the Bolts tab.
5 Report
At last, go to the tab Report. IDEA StatiCa offers a fully customizable report to print out or save in an editable format.

You have imported, designed and code-checked a steel joint according to AISC.
6 Synchronize models
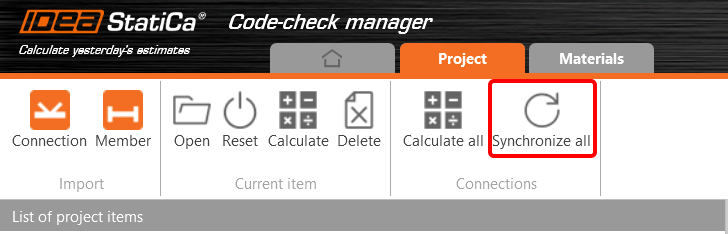
The Code-check manager is a BIM tool to export and synchronize connections from other programs. It is launched directly in the 3rd party applications via a command/icon.
Synchronize all - IDEA StatiCa detects changes in all already imported entities (changes in thickness, changes in cross-section, modification of properties of welds, bolts, etc.) and updates the project in IDEA StatiCa Connection.
Calculate - Synchronize and calculate the current item and provide a new set of results.
Calculate all - Synchronize and calculate all items and provide a new set of results.
Note
Kindly be aware that IDEA StatiCa syncs with a model of the 3rd party application, not the other way around.
Save the project in IDEA StatiCa and close the application Connection. All joints exported from the ETABS project to IDEA StatiCa are kept on the list inside ETABS.
Unlock the model and change the cross-section of member 22 from W12x30 to W12x26.

Run the analysis, select the export command in the upper ribbon and in the Code-check manager click on Synchronize.

In the next step, you can Open the joint in IDEA StatiCa Connection to explore the changes.
As you can see, the cross-section of the Member 22 has been changed, but all previous operations remained.

You have imported, designed and code-checked a steel joint according to AISC.
Bekende beperkingen voor ETABS en SAP2000
Beperkingen van de beton BIM-koppeling
Het volgende beschrijft de huidige beperkingen en aandachtspunten bij het gebruik van de ETABS/SAP2000 BIM-koppeling met IDEA StatiCa Checkbot en Detail 2D, met aandacht voor mogelijke beperkingen, veelvoorkomende problemen en aanbevolen werkwijzen voor een nauwkeurige analyse en ontwerp.
Beperking: Import
Als een ETABS belastingsgeval analysestappen bevat, kan IDEA StatiCa Checkbot niet alle stappen in beschouwing nemen.
- Het wordt aanbevolen om getrapt opgebouwde belastingsgevallen te splitsen in afzonderlijke belastingsgevallen vóór de import.
Beperking: Synchronisatiefunctionaliteit
Bij het synchroniseren van het model worden de typen belastingscombinaties gereset.
- De gebruiker moet na elke synchronisatie de juiste typen belastingscombinaties opnieuw toewijzen.
Beperking: Aanmaken van Detail-elementen
De volgende beperkingen gelden bij het aanmaken van een Detail in Checkbot:
- Details kunnen alleen worden aangemaakt voor wandelementen die in hetzelfde vlak liggen.
- Als de geselecteerde elementen niet coplanair zijn, treedt er een fout op en moet een andere set staven worden geselecteerd.
Beperking: Detail exporteren
Bij het exporteren van een Detail gelden de volgende beperkingen (een waarschuwing wordt weergegeven in Checkbot indien van toepassing):
- Uit-het-vlak uniforme belastingen op 2D-elementen worden niet overgedragen naar Detail 2D.
- 2D-elementen worden niet samengevoegd als ze verschillende diktes, materialen of in-het-vlak belastingswaarden hebben.
- Uit-het-vlak belasting kan niet worden geëxporteerd. Er verschijnt een waarschuwing als de totale randbelasting voor een belastingsgeval ±1 kN overschrijdt.
- Niet-verticale 2D-elementen mogen niet worden overgedragen naar Detail 2D; de applicatie is niet geschikt voor dergelijke elementen.
Veelvoorkomende problemen in de workflow
- Geconcentreerde puntlasten kunnen leiden tot falen van de niet-lineaire analyse. Voeg een overdrachtselement toe (bijv. oplegplaat) om de belasting te verdelen.
- Een grof ETABS- of SAP2000-mesh (typisch voor globale modellen) kan leiden tot spanningspieken en onrealistische geconcentreerde krachten in zowel waarde als positie voor het ontwerp van de wapening.
- Aanbeveling: Pas het mesh aan naar 100 mm x 100 mm voor geïmporteerde wandelementen.
- Een grof mesh kan ook leiden tot aanzienlijke in-het-vlak momenten die niet nauwkeurig kunnen worden vastgelegd in IDEA StatiCa.
- Aanbeveling: Stel de uit-het-vlak stijfheid van geïmporteerde wandelementen in op een lage waarde, zodat de omliggende constructieve elementen in het globale model de uit-het-vlak krachten op de juiste wijze kunnen opnemen en overdragen.
- Als een randpuntlast trek aan de rand veroorzaakt (bijv. door een horizontale belasting), kan de niet-lineaire analyse falen.
- Aanbeveling: Verschuif de puntlast iets naar binnen om een goede betonactivering te waarborgen.

Beperkingen van de staal BIM-koppeling
De koppeling werkt nu voor een breed scala aan verbindingen/knopen. Houd echter rekening met de nog niet ondersteunde functionaliteit:
Beperking: Import van belastingen
We ondersteunen geen import van belastingscombinaties die belastingscombinaties bevatten met een andere dan lineaire combinatieregel.
We ondersteunen geen verwijzing naar een belastingscombinatie binnen een andere belastingscombinatie.
Beperking: SAP2000 en ETABS koppelingen uitvoeren met IDEA StatiCa 22.1.
Problematische versies:
- SAP2000 24.1.0
- ETABS 20.3.0
Probleembeschrijving:
De nieuwe patch van SAP2000 24.1.0 werkt niet met de nieuwste IDEA 22.1. Zodra u Checkbot start vanuit het menu, ziet het er als volgt uit en kan er niets worden gedaan/aangeklikt.
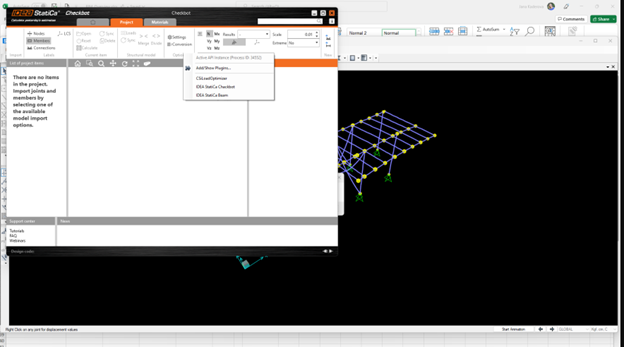
Oplossing:
Dit geldt ook voor SAP2000 en ETABS (nieuwste versies). De oplossing is als volgt:
1. Zoek het configuratiebestand (ofwel SAP2000.exe.config of ETABS.exe.config) in
C:\Program Files\Computers and Structures\SAP2000 24\
of
C:\Program Files\Computers and Structures\ETABS 20\
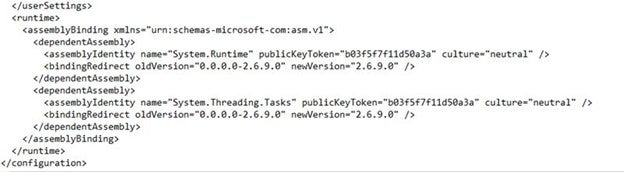
2. Verwijder de volgende regels onderaan het bestand en sla het op (vereist beheerdersrechten).

U kunt het bestand ook naar het bureaublad kopiëren, het daar bewerken en terugkopiëren naar de oorspronkelijke map.
Zo ziet het bestand eruit (het onderste gedeelte) nadat de assembly-binding correct is verwijderd:
3. Daarna is het mogelijk om Checkbot te starten.
Beperking: Evenwicht
Om het evenwicht in de knopen te waarborgen, stelt u de eindlengte-offsets in op 0:


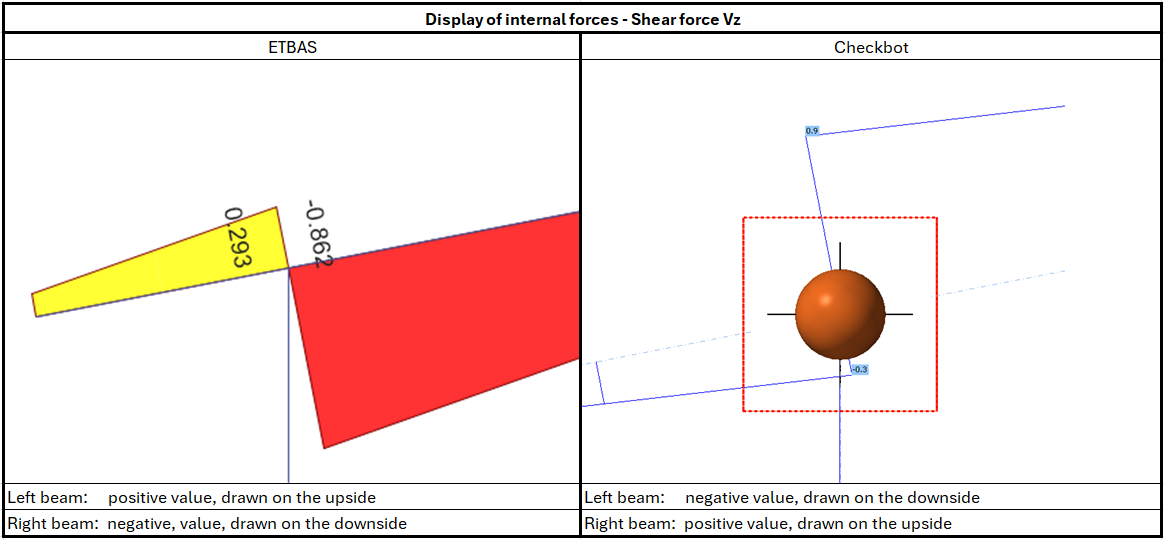
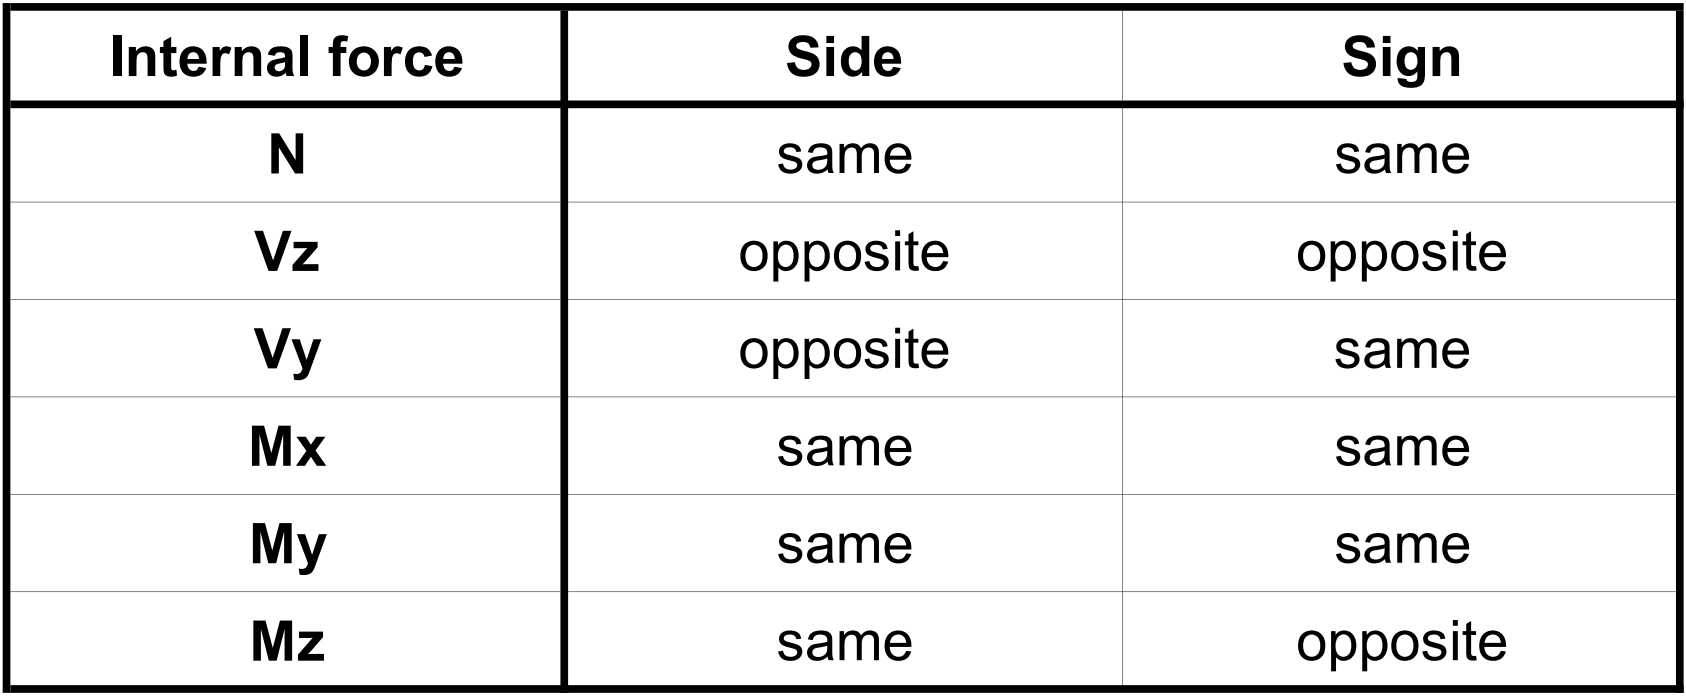
Beperking: Tekenconventie voor inwendige krachten
Door de verschillende tekenconventies in ETABS en in Checkbot worden de inwendige krachten anders weergegeven. De belastingseffecten worden correct toegepast, maar de inwendige krachten kunnen met het tegengestelde teken worden weergegeven en aan de andere zijde van de ligger worden getekend.
Beperking: Meerdere versies van SAP2000 of ETABS geïnstalleerd op de computer
De ETABS- en SAP2000-API maakt gebruik van een COM-bibliotheek die in het register moet worden geregistreerd. Wanneer u een nieuwe versie installeert, wordt de COM voor die versie automatisch geregistreerd tijdens de installatie. Wanneer u vervolgens de Checkbot-koppeling voor een oudere versie probeert te starten, werkt dit niet.
Als u wilt wisselen tussen deze twee versies, moet u het volgende doen:
1) Voer als beheerder "UnregisterSAP2000.exe" of "UnregisterETABS.exe" uit in de map met de nieuwere versie.
2) Voer vervolgens als beheerder "RegisterSAP2000.exe" of "RegisterETABS.exe" uit in de map met de oudere versie.