
ETABS BIM link for steel connection design (AISC)
1 How to activate the link
- Install the latest version of IDEA StatiCa
- Make sure you are using a supported version of ETABS – updates are published in the BIM section of the main website
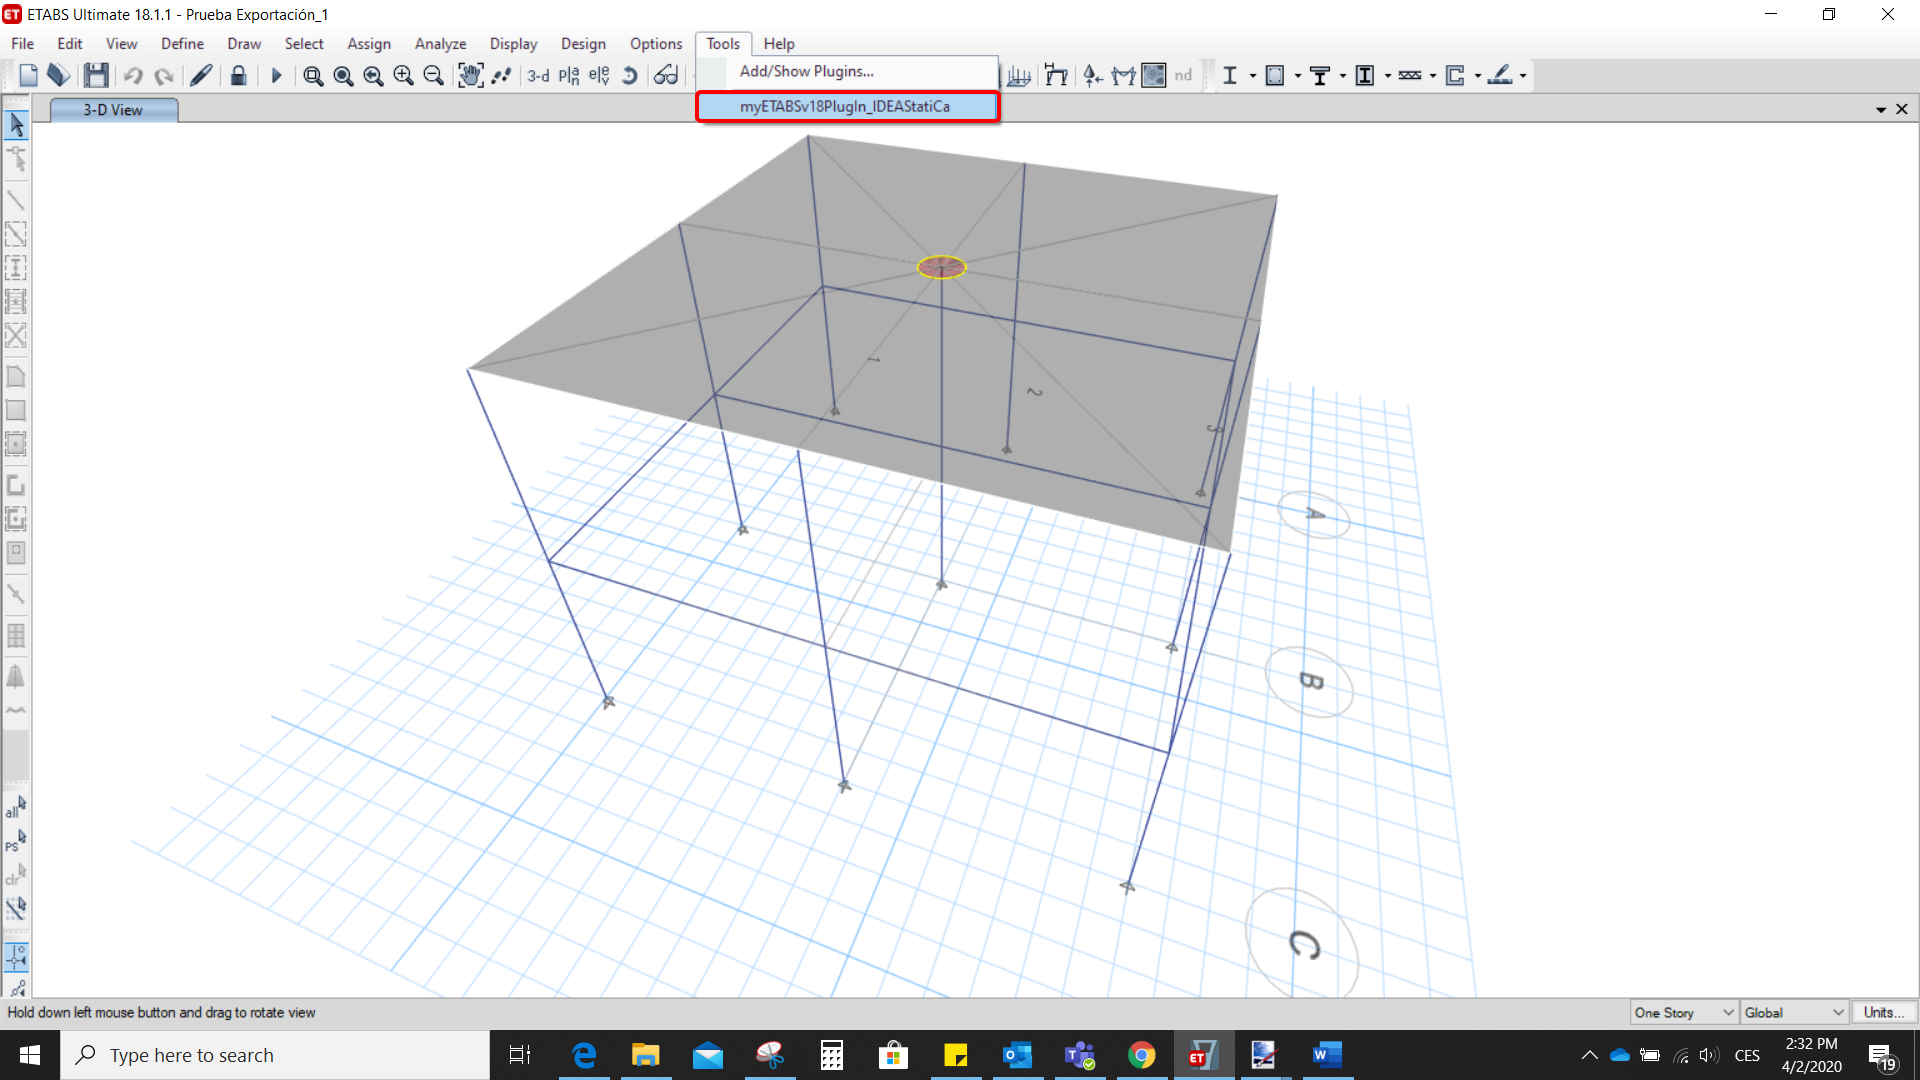
After installation of both programs, start ETABS and Click Tools > Add/Show Plugins to open the Plugin Manager dialog. This option lets you install and add add-ins (programs) to the appropriate places in the ETABS menu.
Browse for
C:\Program Files\IDEA StatiCa\StatiCa 20.0\ETABSv18PlugIn_IDEAStatiCa.dll
and click Add

2 How to use the link
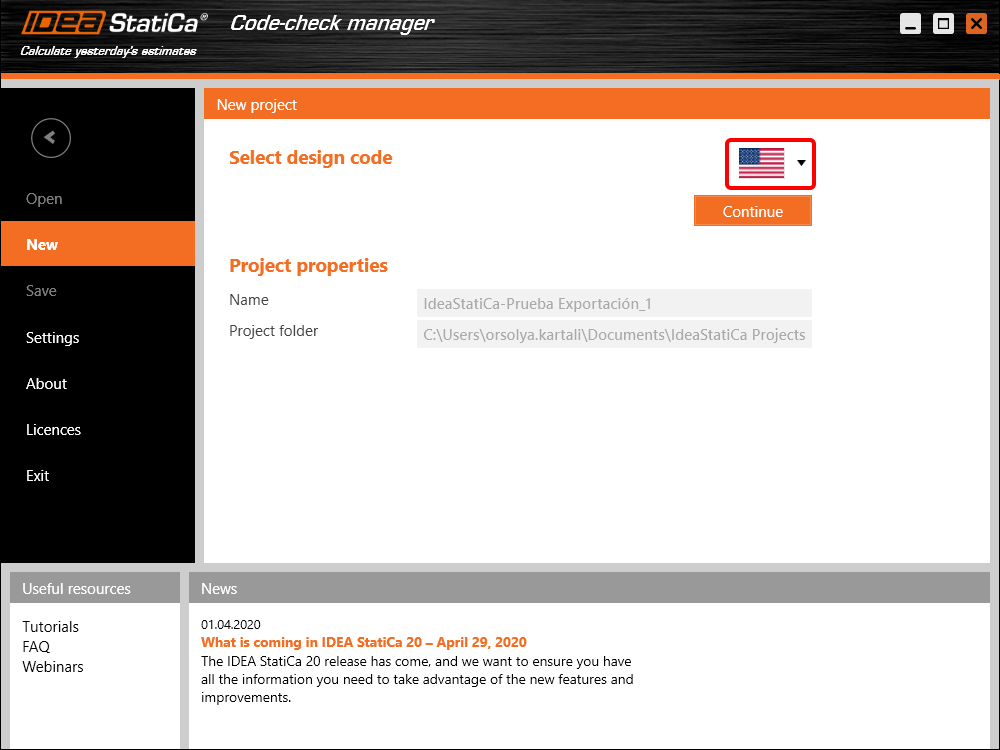
Open the attached project in ETABS and run the analysis.
Go to the menu item Tools and run the export command you have just defined.
The Code-check manager opens and at first, you need to choose the code.
Then you can make a rectangular selection in the ETABS project to choose which joints you want to export. You can export more joints at once using the multiple selections.
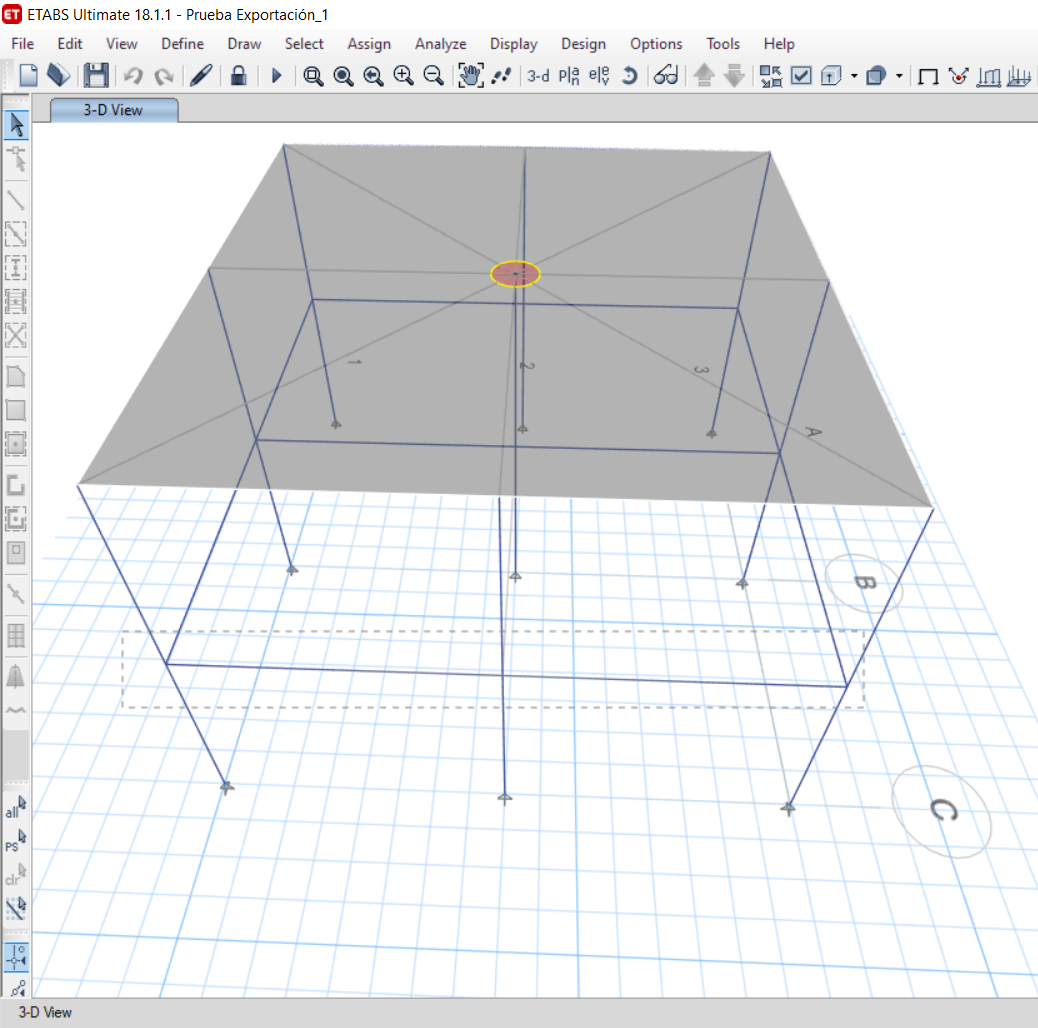
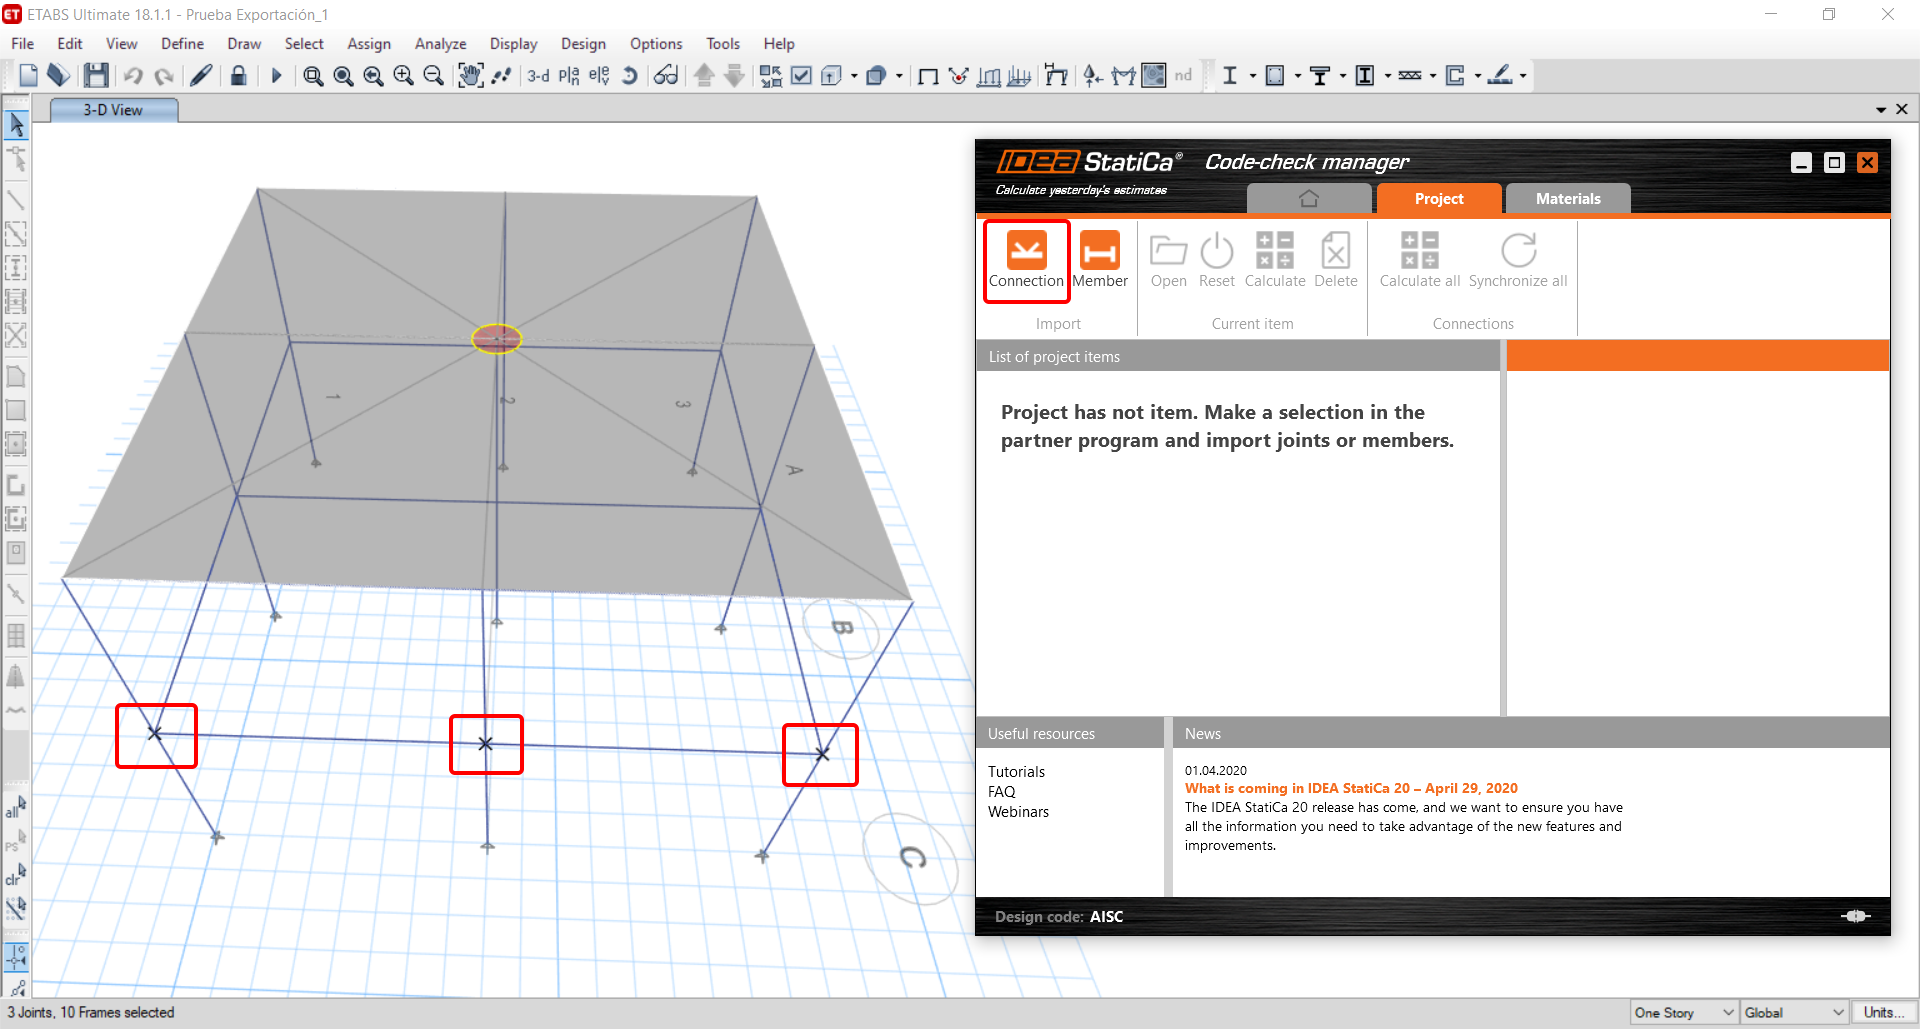
If the joints are selected, you can click on the Connection button in the Code-check manager. With this, all the selected joints from ETABS will be imported into the Code-check manager.
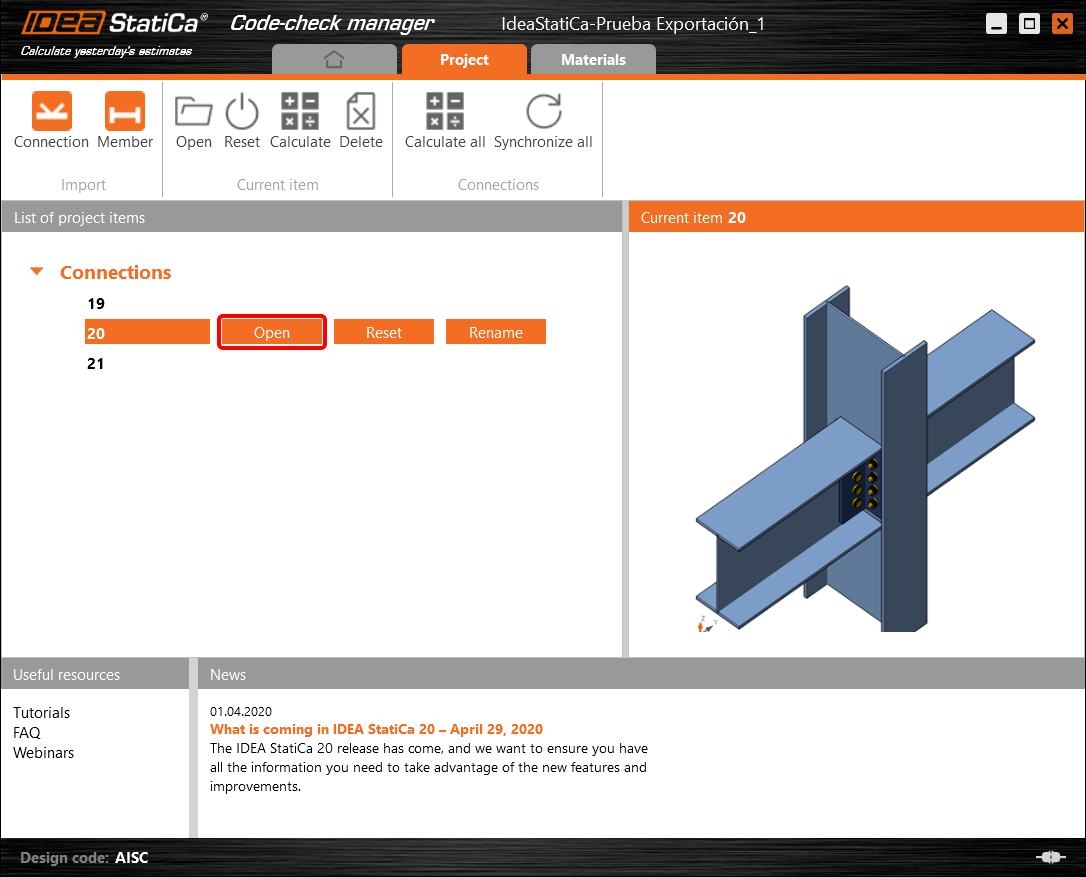
The next thing you need to do is to configure the joints in the Code-check manager. In this tutorial, you will only focus on one of the three imported joints, but the process would be the same for all of them.
You click on the joint on the left side (joint 20). On the right side, you can see the scheme of the joint, you can set the bearing member and merge the continuous members. After that, click on the Finish button to complete the configuration of the joint.
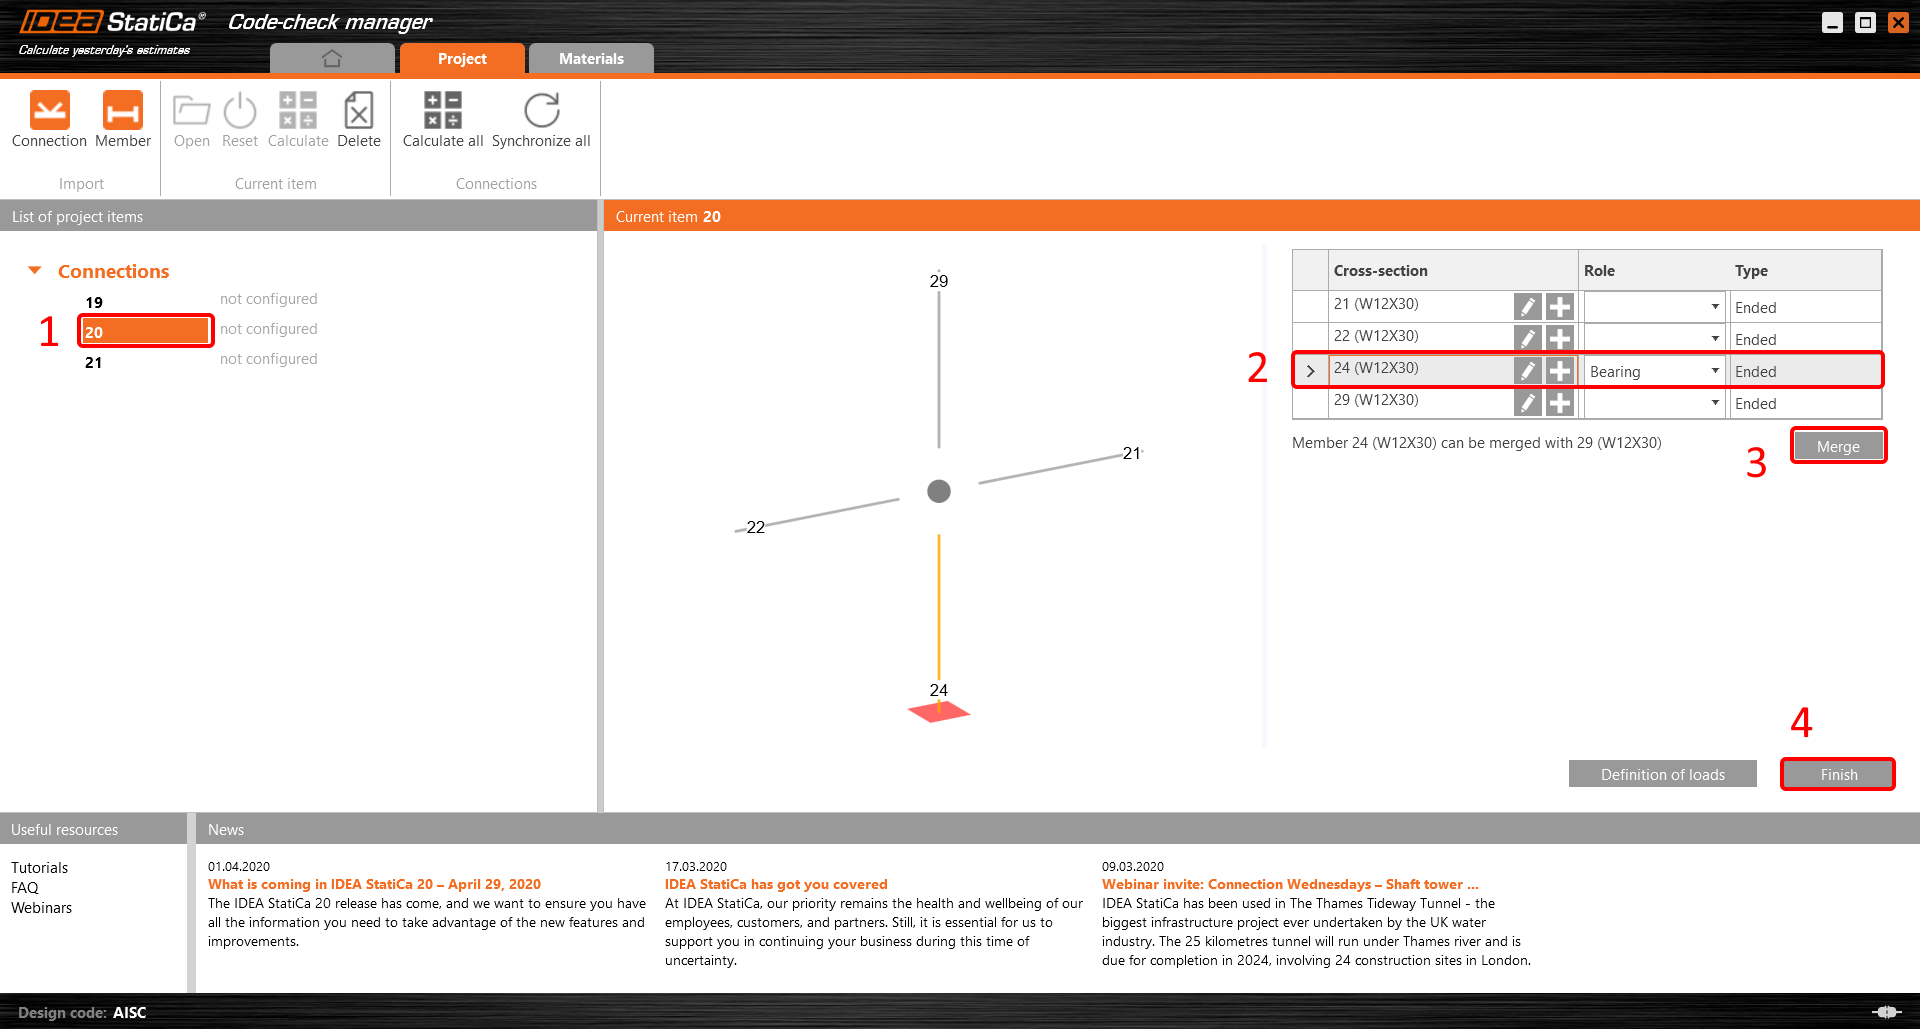
The joint is now ready to be opened in IDEA StatiCa Connection for the CBFEM analysis.

3 Design
Automatic data transfer is started and IDEA StatiCa Connection with a generated project is launched. All members and load effects were added automatically.
This tutorial works with imperial units. If you use metric units, you can switch them to imperial by clicking on the unit in the bottom part of the window.

Now you will define a set of manufacturing operations to model the connection between members. In the items tree, you right-click on Operations and select the option New operation.
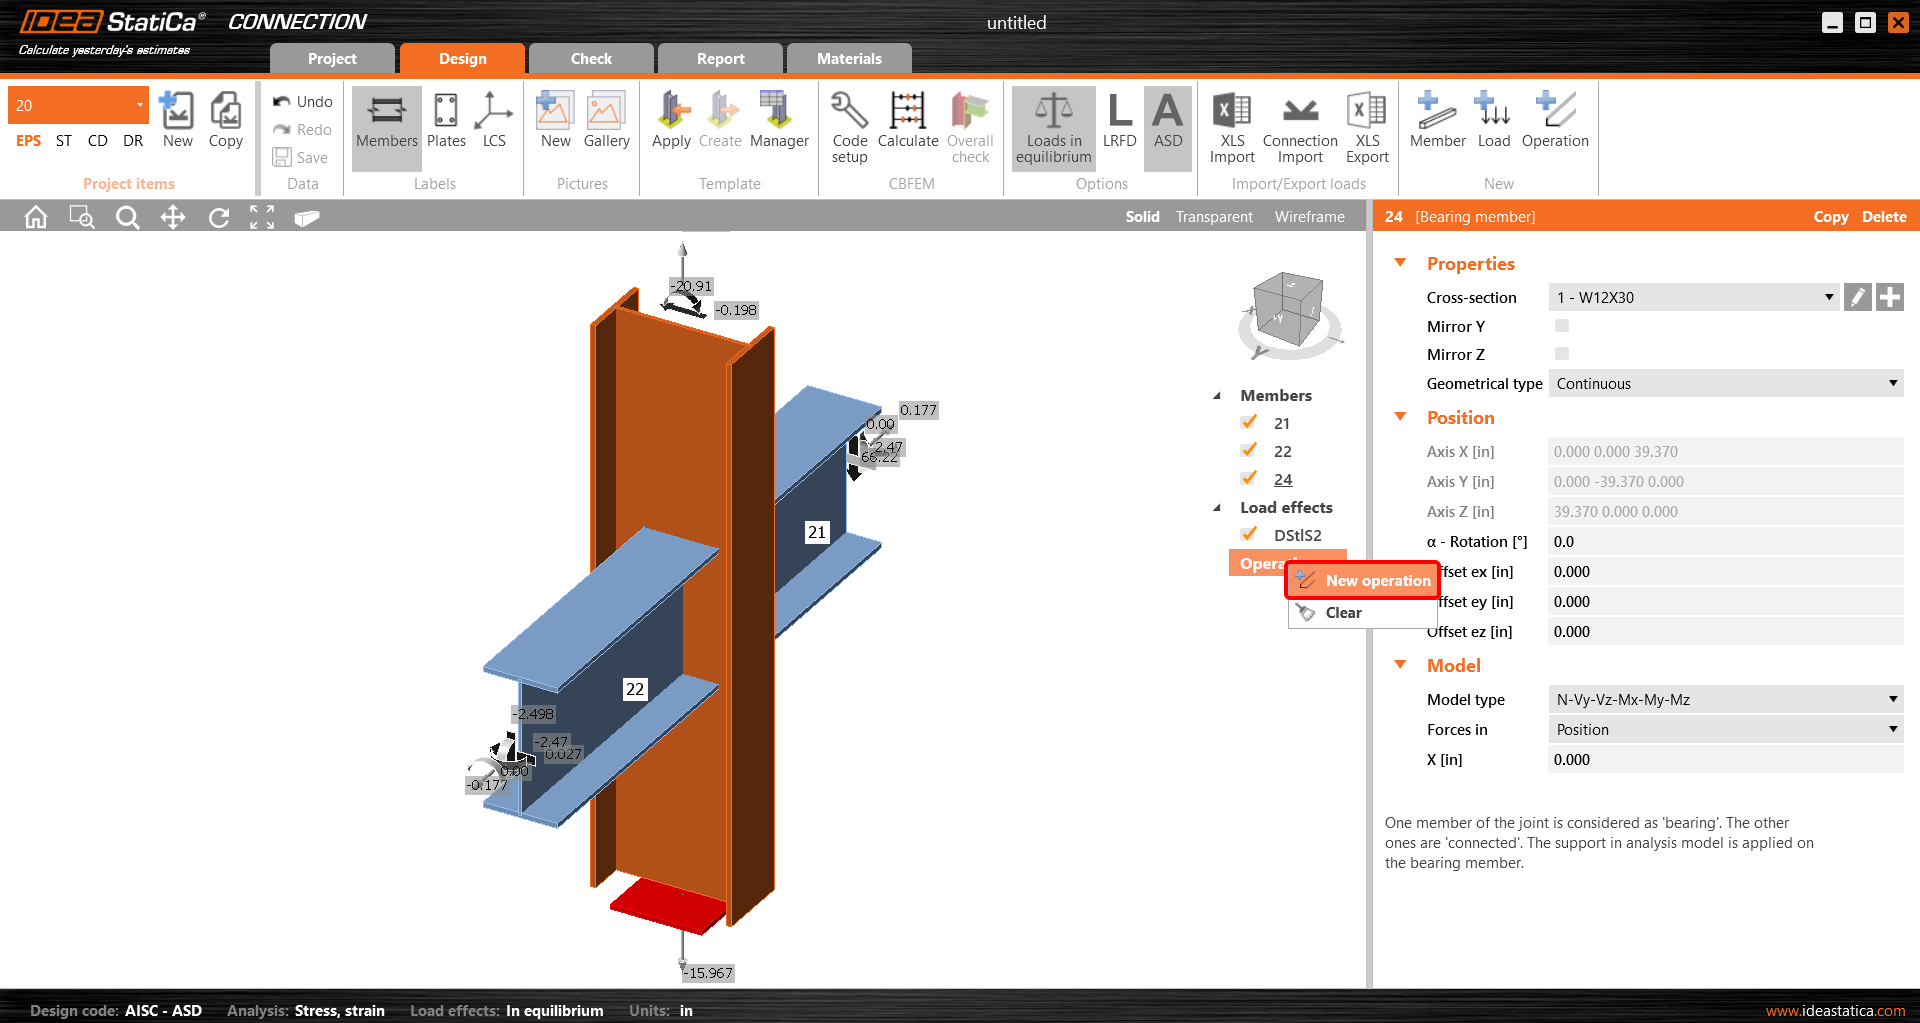
And you add the operation Cleat.


And set the properties of CLEAT1 as follows:

You can check the design of this simple joint.

4 Check
The analysis based on CBFEM is started by the icon Calculate from the top ribbon. The analysis model is automatically generated, the calculation is performed, and you can check the results.
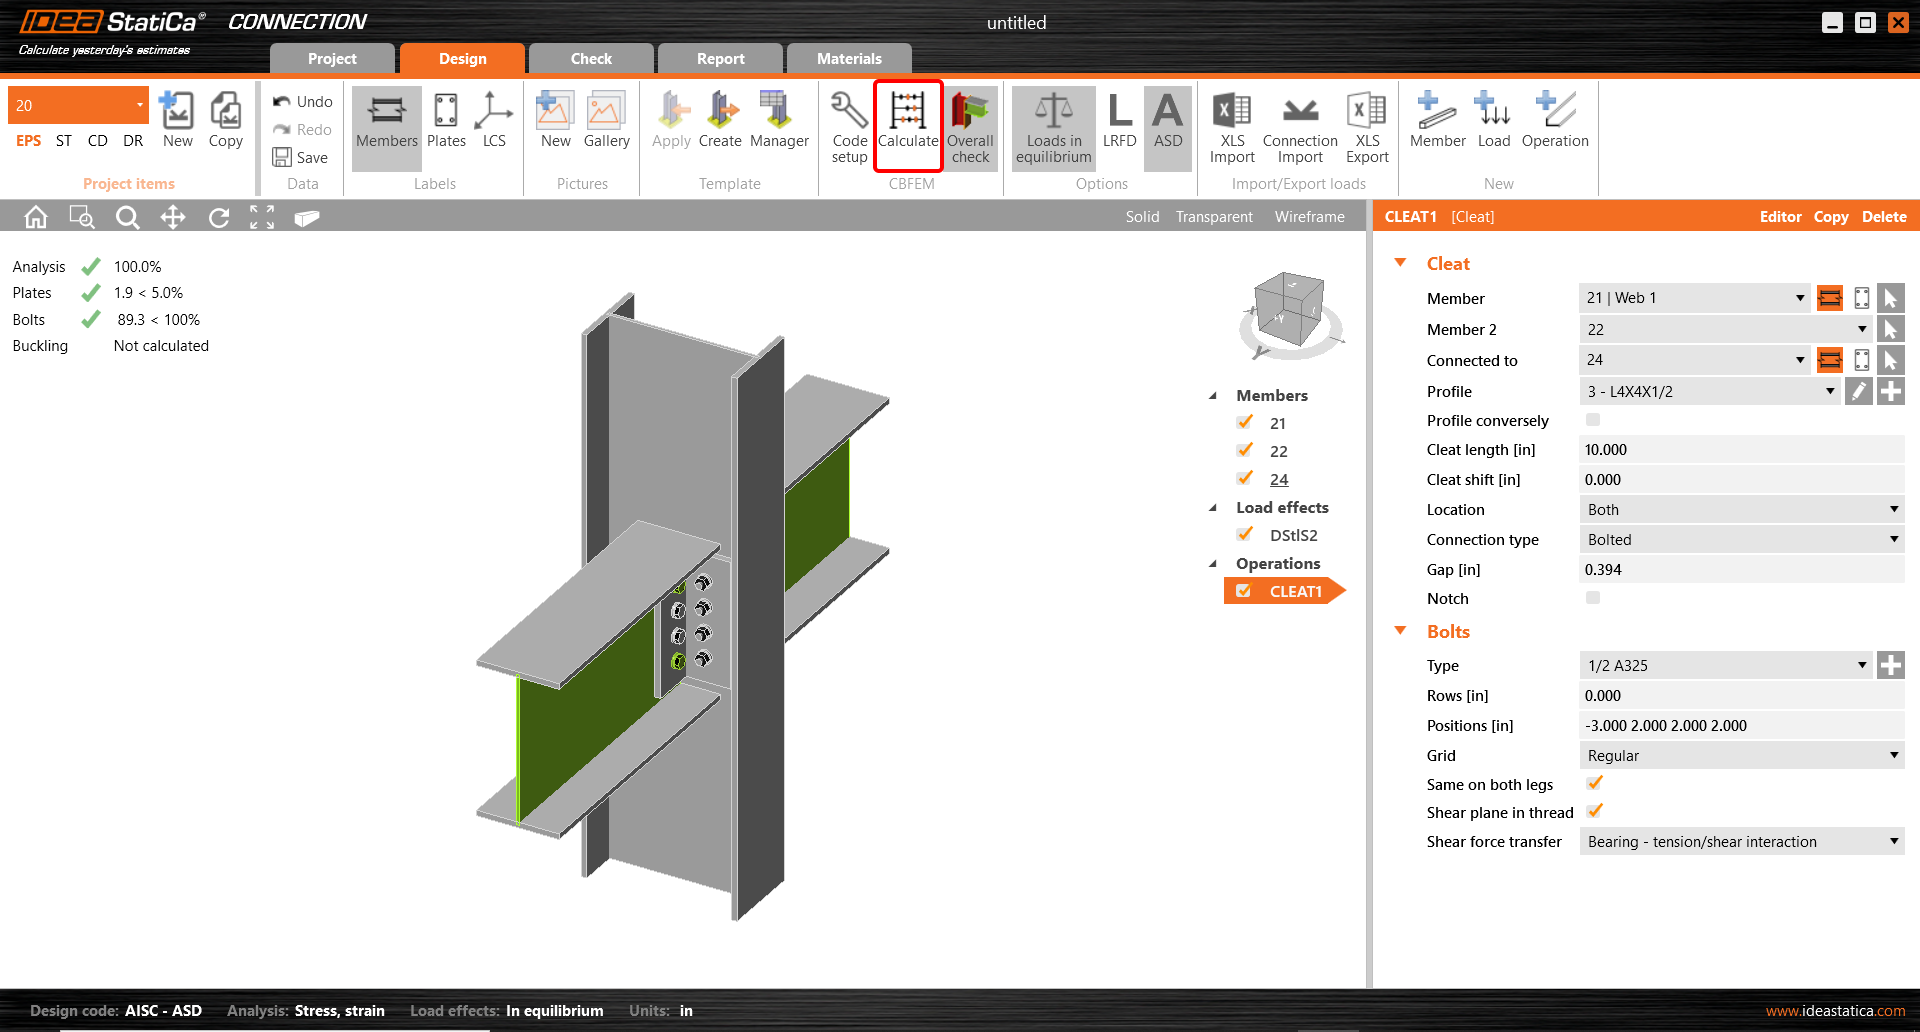
Activate Overall check, Equivalent stress, Mesh and Deformed from the ribbon to get a full picture of what is happening in the joint. Everything is displayed in the 3D window.

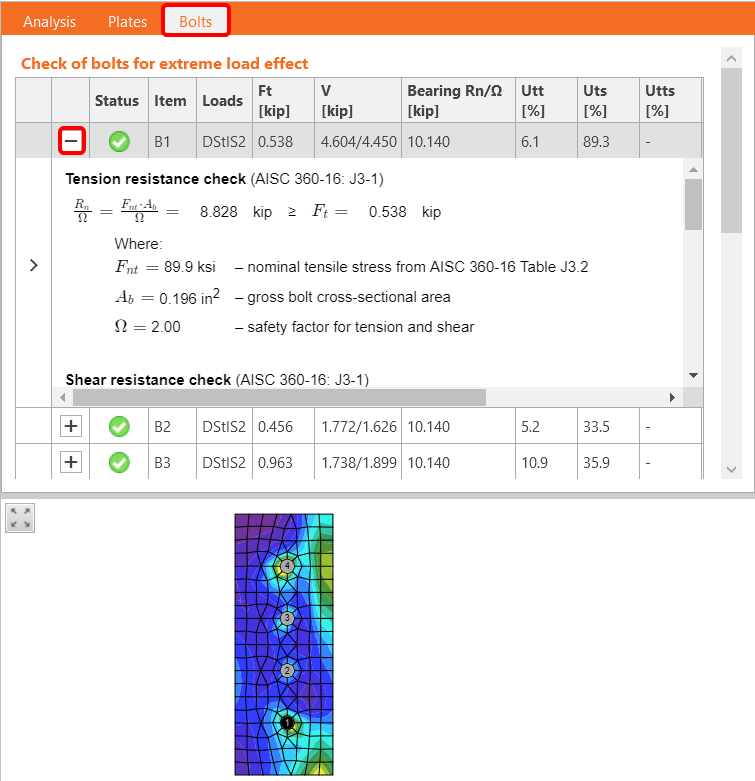
All values can be reviewed in detail in the tables and 2D windows. For example, to display the check of bolts, select the Bolts tab.
5 Report
At last, go to the tab Report. IDEA StatiCa offers a fully customizable report to print out or save in an editable format.

You have imported, designed, and code-checked a steel joint according to AISC.
6 Synchronize models
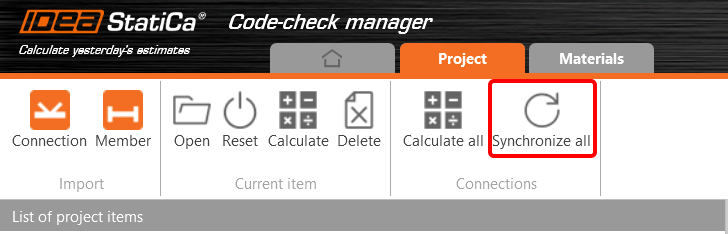
The Code-check manager is a BIM tool to export and synchronize connections from other programs. It is launched directly in the 3rd party applications via a command/icon.
Synchronize all - IDEA StatiCa detects changes in all already imported entities (changes in thickness, changes in cross-section, modification of properties of welds, bolts, etc.) and updates the project in IDEA StatiCa Connection.
Calculate - Synchronize and calculate the current item and provide a new set of results.
Calculate all - Synchronize and calculate all items and provide a new set of results.
Note
Kindly be aware that IDEA StatiCa syncs with a model of the 3rd party application, not the other way around.
Save the project in IDEA StatiCa and close the application Connection. All joints exported from the ETABS project to IDEA StatiCa are kept on the list inside ETABS.
Unlock the model and change the cross-section of member 22 from W12x30 to W12x26.

Run the analysis, select the export command in the upper ribbon, and in the Code-check manager, click on Synchronize.

In the next step, you can Open the joint in IDEA StatiCa Connection to explore the changes.
As you can see, the cross-section of the Member 22 has been changed, but all previous operations remained.

You have imported, designed, and code-checked a steel joint according to AISC.
Znane ograniczenia dla ETABS i SAP2000
Ograniczenia łącza BIM dla konstrukcji betonowych
Poniżej przedstawiono aktualne ograniczenia i uwagi dotyczące korzystania z łącza BIM ETABS/SAP2000 z IDEA StatiCa Checkbot i Detail 2D, wskazując potencjalne ograniczenia, typowe problemy oraz zalecane praktyki zapewniające dokładną analizę i projektowanie.
Ograniczenie: Import
Jeśli przypadek obciążenia ETABS zawiera kroki analizy, IDEA StatiCa Checkbot nie będzie w stanie uwzględnić wszystkich z nich.
- Zaleca się rozdzielenie przypadków obciążenia z krokami na indywidualne przypadki obciążenia przed importem.
Ograniczenie: Funkcja synchronizacji
Podczas synchronizacji modelu typy kombinacji obciążeń są resetowane.
- Użytkownik musi ponownie przypisać właściwe typy kombinacji obciążeń po każdej synchronizacji.
Ograniczenie: Tworzenie elementu Detail
Następujące ograniczenia obowiązują podczas tworzenia elementu Detail w Checkbot:
- Elementy Detail można tworzyć tylko dla elementów ściennych leżących w tej samej płaszczyźnie.
- Jeśli wybrane elementy nie są współpłaszczyznowe, wystąpi błąd i należy wybrać inny zestaw elementów.
Ograniczenie: Eksport Detail
Podczas eksportu elementu Detail obowiązują następujące ograniczenia (w Checkbot zostanie wyświetlone ostrzeżenie, gdy będzie to istotne):
- Równomiernie rozłożone obciążenia prostopadłe do płaszczyzny przyłożone do elementów 2D nie są przenoszone do Detail 2D.
- Elementy 2D nie zostaną scalone, jeśli mają różne grubości, materiały lub wartości obciążeń w płaszczyźnie.
- Obciążenia prostopadłe do płaszczyzny nie mogą być eksportowane. Ostrzeżenie pojawi się, jeśli całkowite obciążenie krawędziowe dla przypadku obciążenia przekroczy ±1 kN.
- Niepionomowe elementy 2D nie powinny być przenoszone do Detail 2D; aplikacja nie jest przeznaczona dla takich elementów.
Typowe problemy z przepływem pracy
- Skupione obciążenia punktowe mogą powodować niepowodzenie analizy nieliniowej. Dodaj urządzenie przekazujące obciążenie (np. płytę podporową), aby rozłożyć obciążenie.
- Gruba siatka ETABS lub SAP2000 (typowa dla modeli globalnych) może powodować koncentracje naprężeń i generować nierealistyczne skupione siły zarówno pod względem wartości, jak i położenia, dla potrzeb projektowania zbrojenia.
- Zalecenie: Zagęścić siatkę do 100 mm x 100 mm dla importowanych elementów ściennych.
- Gruba siatka może również powodować znaczące momenty w płaszczyźnie, których nie można dokładnie uwzględnić w IDEA StatiCa.
- Zalecenie: Ustawić sztywność prostopadłą do płaszczyzny importowanych elementów ściennych na niską wartość, aby otaczające elementy konstrukcyjne w modelu globalnym mogły odpowiednio przejmować i przenosić siły prostopadłe do płaszczyzny.
- Jeśli punktowe obciążenie krawędziowe powoduje rozciąganie na krawędzi (np. od obciążenia poziomego), analiza nieliniowa może zakończyć się niepowodzeniem.
- Zalecenie: Przesunąć obciążenie punktowe nieznacznie do wewnątrz, aby zapewnić właściwe zaangażowanie betonu.

Ograniczenia łącza BIM dla konstrukcji stalowych
Łącze działa obecnie dla szerokiej gamy połączeń/złączy. Należy jednak wziąć pod uwagę funkcjonalności, które nie są jeszcze obsługiwane:
Ograniczenie: Import obciążeń
Nie obsługujemy importu kombinacji obciążeń zawierających kombinacje obciążeń dodawane w sposób inny niż liniowy.
Nie obsługujemy odwoływania się do kombinacji obciążeń wewnątrz innej kombinacji obciążeń.
Ograniczenie: Jak uruchomić łącza SAP2000 i ETABS z IDEA StatiCa 22.1.
Problematyczne wersje:
- SAP2000 24.1.0
- ETABS 20.3.0
Opis problemu:
Nowa łatka SAP2000 24.1.0 nie współpracuje z najnowszą wersją IDEA 22.1. Po uruchomieniu Checkbot z menu wygląda to jak poniżej i nie można nic zrobić/kliknąć.
Rozwiązanie:
Dotyczy to zarówno SAP2000, jak i ETABS (najnowsze wersje). Obejście polega na:
1. Zlokalizowaniu pliku konfiguracyjnego (odpowiednio SAP2000.exe.config lub ETABS.exe.config) w
C:\Program Files\Computers and Structures\SAP2000 24\
lub
C:\Program Files\Computers and Structures\ETABS 20\
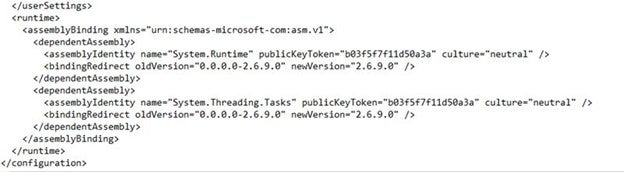
2. Usunięciu następujących wierszy z końca pliku i zapisaniu go (wymagane uprawnienia administratora).

Alternatywnie można skopiować plik na pulpit, edytować go tam i skopiować z powrotem do oryginalnego folderu.
Tak powinien wyglądać plik (jego dolna część) po prawidłowym usunięciu powiązania zestawu:
3. Następnie możliwe jest uruchomienie Checkbot.
Ograniczenie: Równowaga
Aby zapewnić równowagę w węzłach, należy ustawić End Length Offsets na 0:


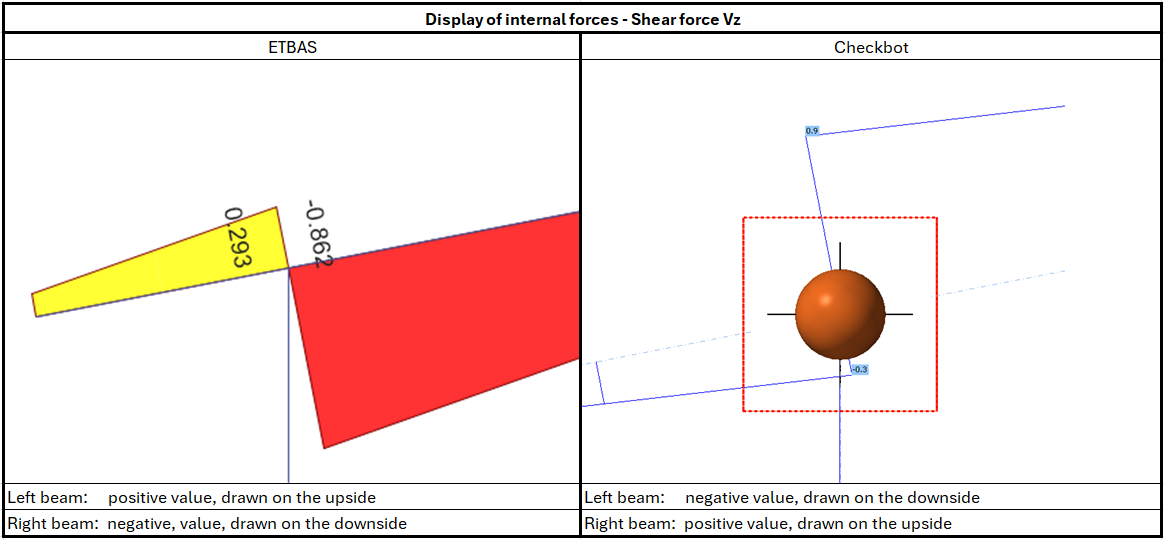
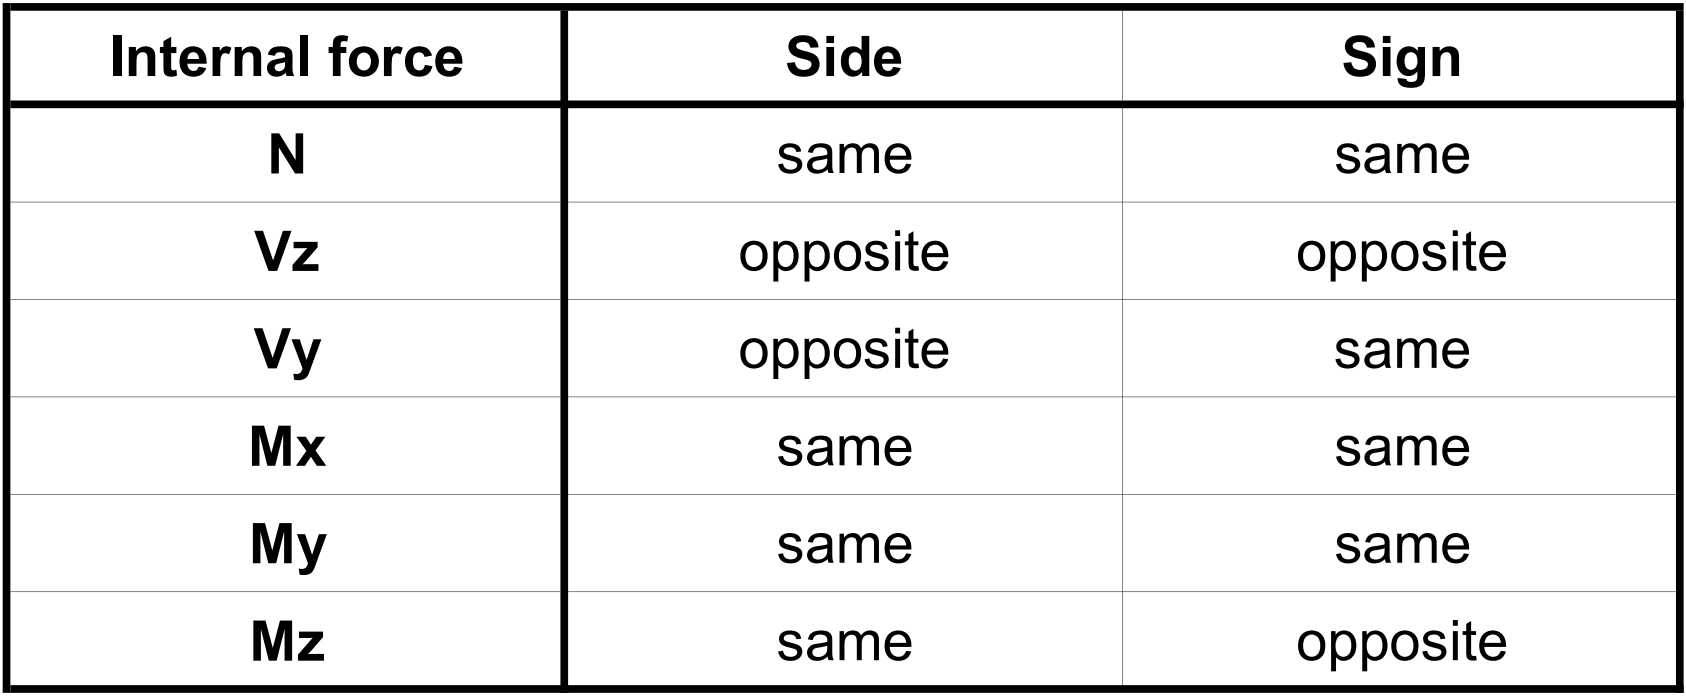
Ograniczenie: Konwencja znaków dla sił wewnętrznych
Ze względu na różne konwencje znaków w ETABS i w Checkbot, siły wewnętrzne są wyświetlane w odmienny sposób. Efekty obciążeń są stosowane prawidłowo, jednak siły wewnętrzne mogą być wyświetlane z przeciwnym znakiem i rysowane po drugiej stronie belki.
Ograniczenie: Więcej wersji SAP2000 lub ETABS zainstalowanych na komputerze
API ETABS i SAP2000 korzysta z biblioteki COM, która musi być zarejestrowana w rejestrze systemowym. Po zainstalowaniu nowej wersji, podczas instalacji COM dla tej wersji jest rejestrowany automatycznie. W związku z tym próba uruchomienia łącza Checkbot dla starszej wersji nie powiedzie się.
Aby przełączać się między tymi dwiema wersjami, należy:
1) Uruchomić jako administrator plik „UnregisterSAP2000.exe" lub „UnregisterETABS.exe" w folderze z nowszą wersją.
2) Następnie uruchomić jako administrator plik „RegisterSAP2000.exe" lub „RegisterETABS.exe" w folderze ze starszą wersją.