Full functionalities of Detail 3D
Introduction
Detail 3D is essentially an extension of the current established IDEA StatiCa Detail application. It adds a new Model type 3D and with this comes the implementation of a method for calculating stress fields in 3D space called 3D CSFM. Calculations and checks are implemented for the Ultimate Limit State.
Before going into the description of the functionalities of Detail 3D it will be good to point out the existence of Theoretical background, where you can read more technical details about the individual model entities and the calculations themselves.
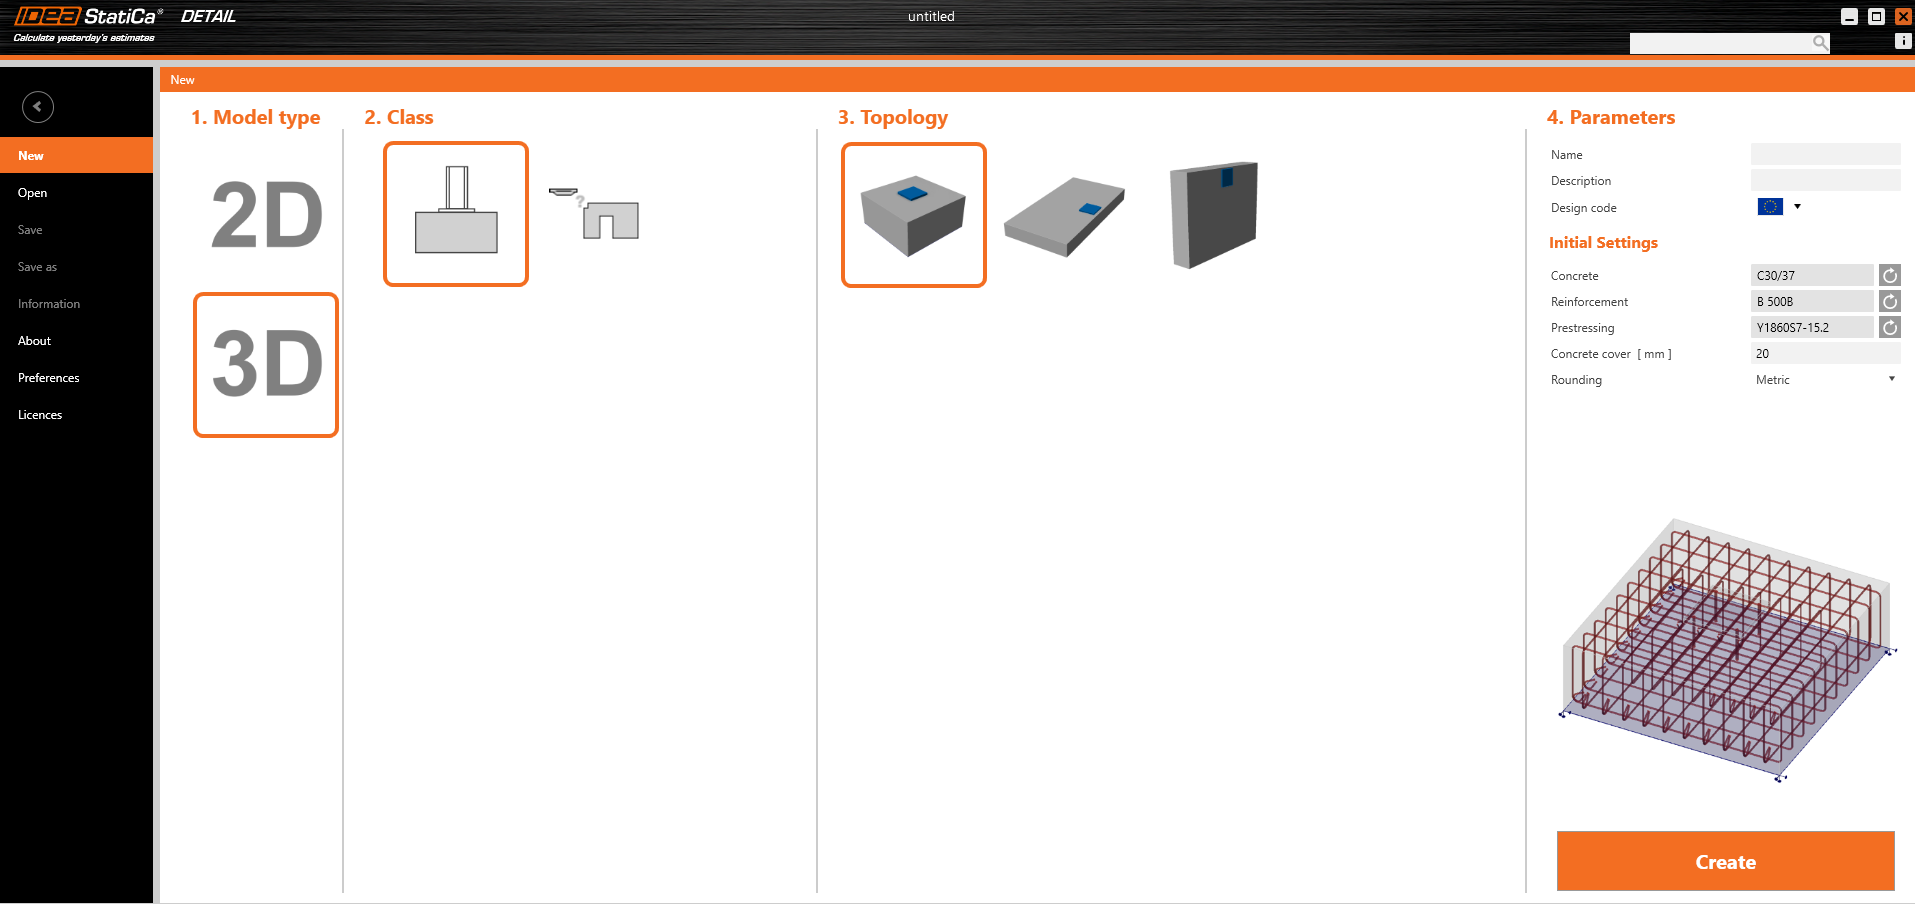
In the first step, the user can select a new Model type on the initial screen (in the wizard), where several templates are available, and of course, the option to enter a model from scratch.
As for 2D models, you can edit the Initial settings in the right part, such as Design code, Materials, and Concrete cover.
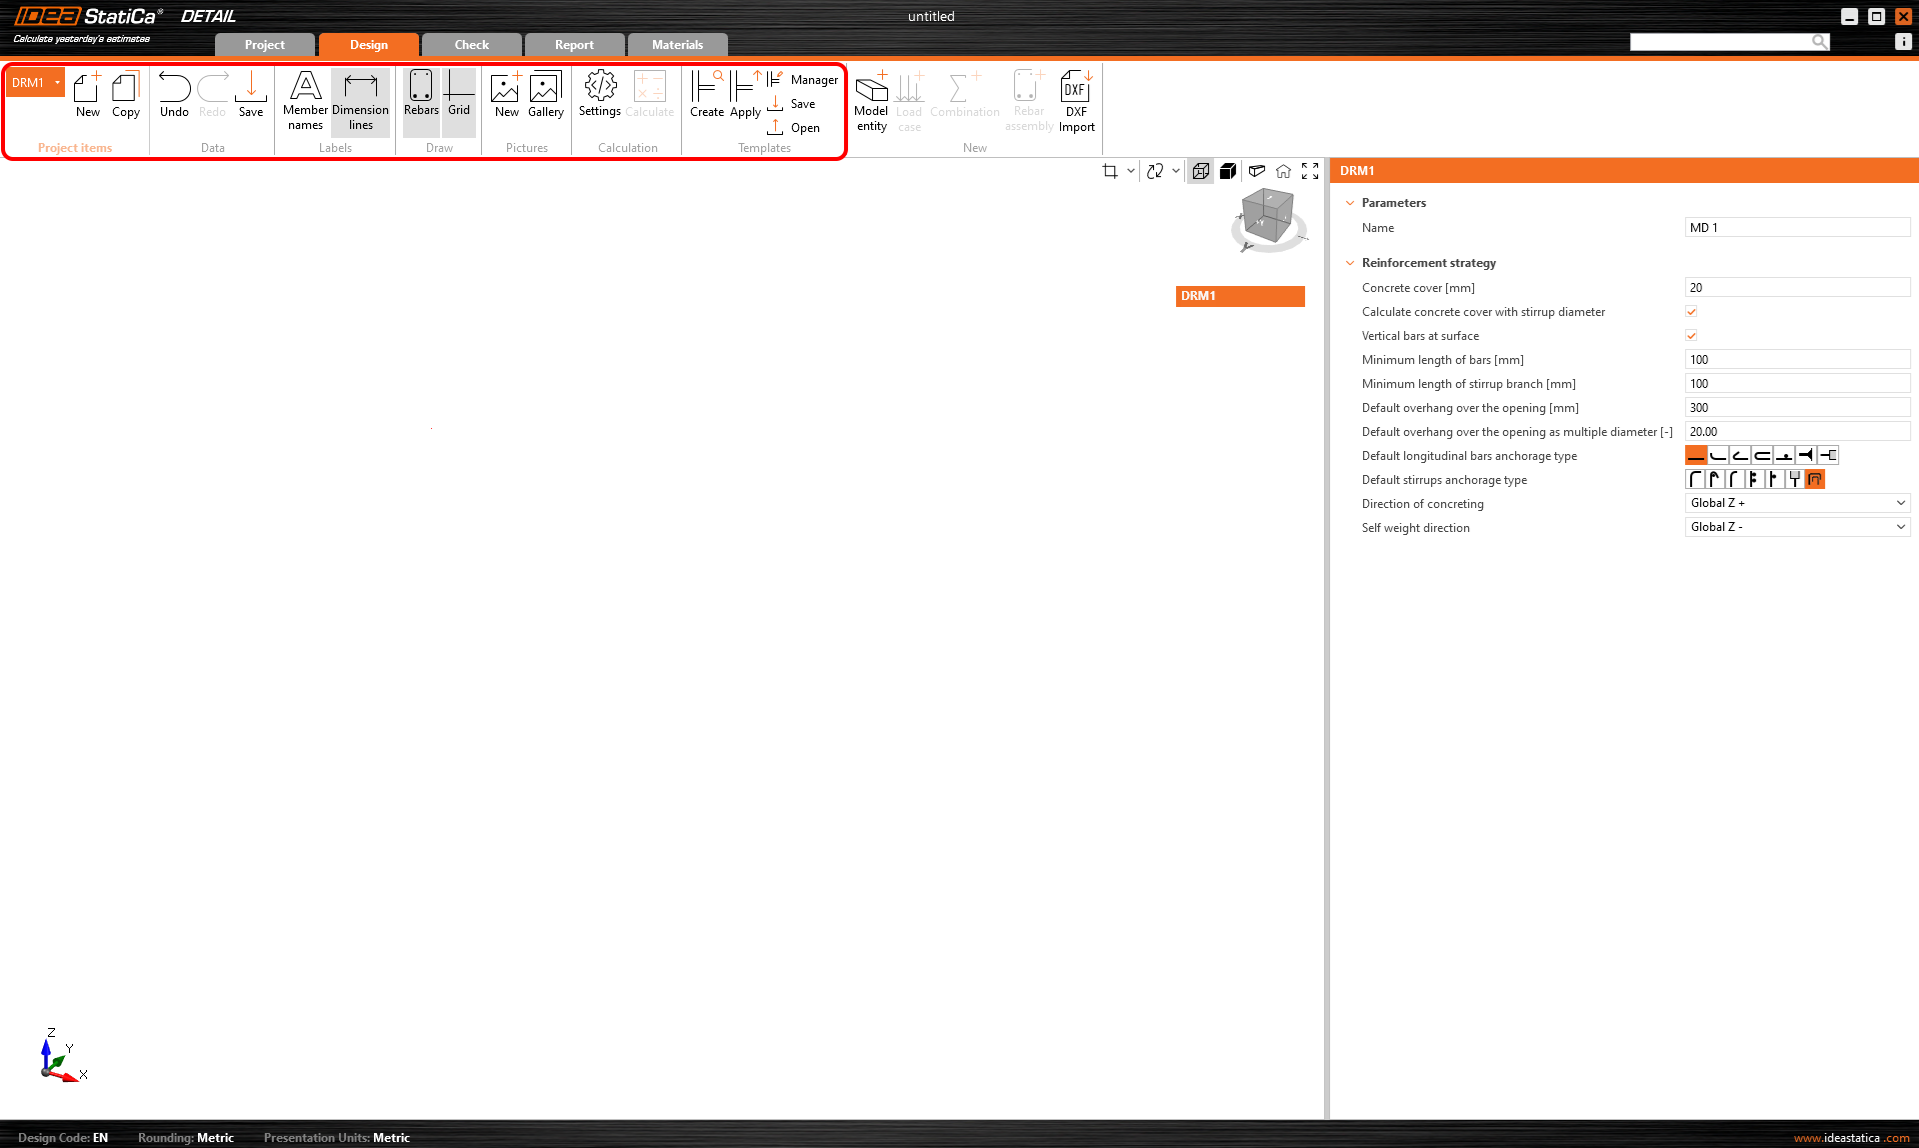
After creating a blank model or a model from a template, options familiar to the 2D modeling environment are available.
Options for working with multiple Project items can be found in the top ribbon, as well as the now standard Undo/Redo buttons, Labels view options, Gallery controls, calculation settings, and template management controls.
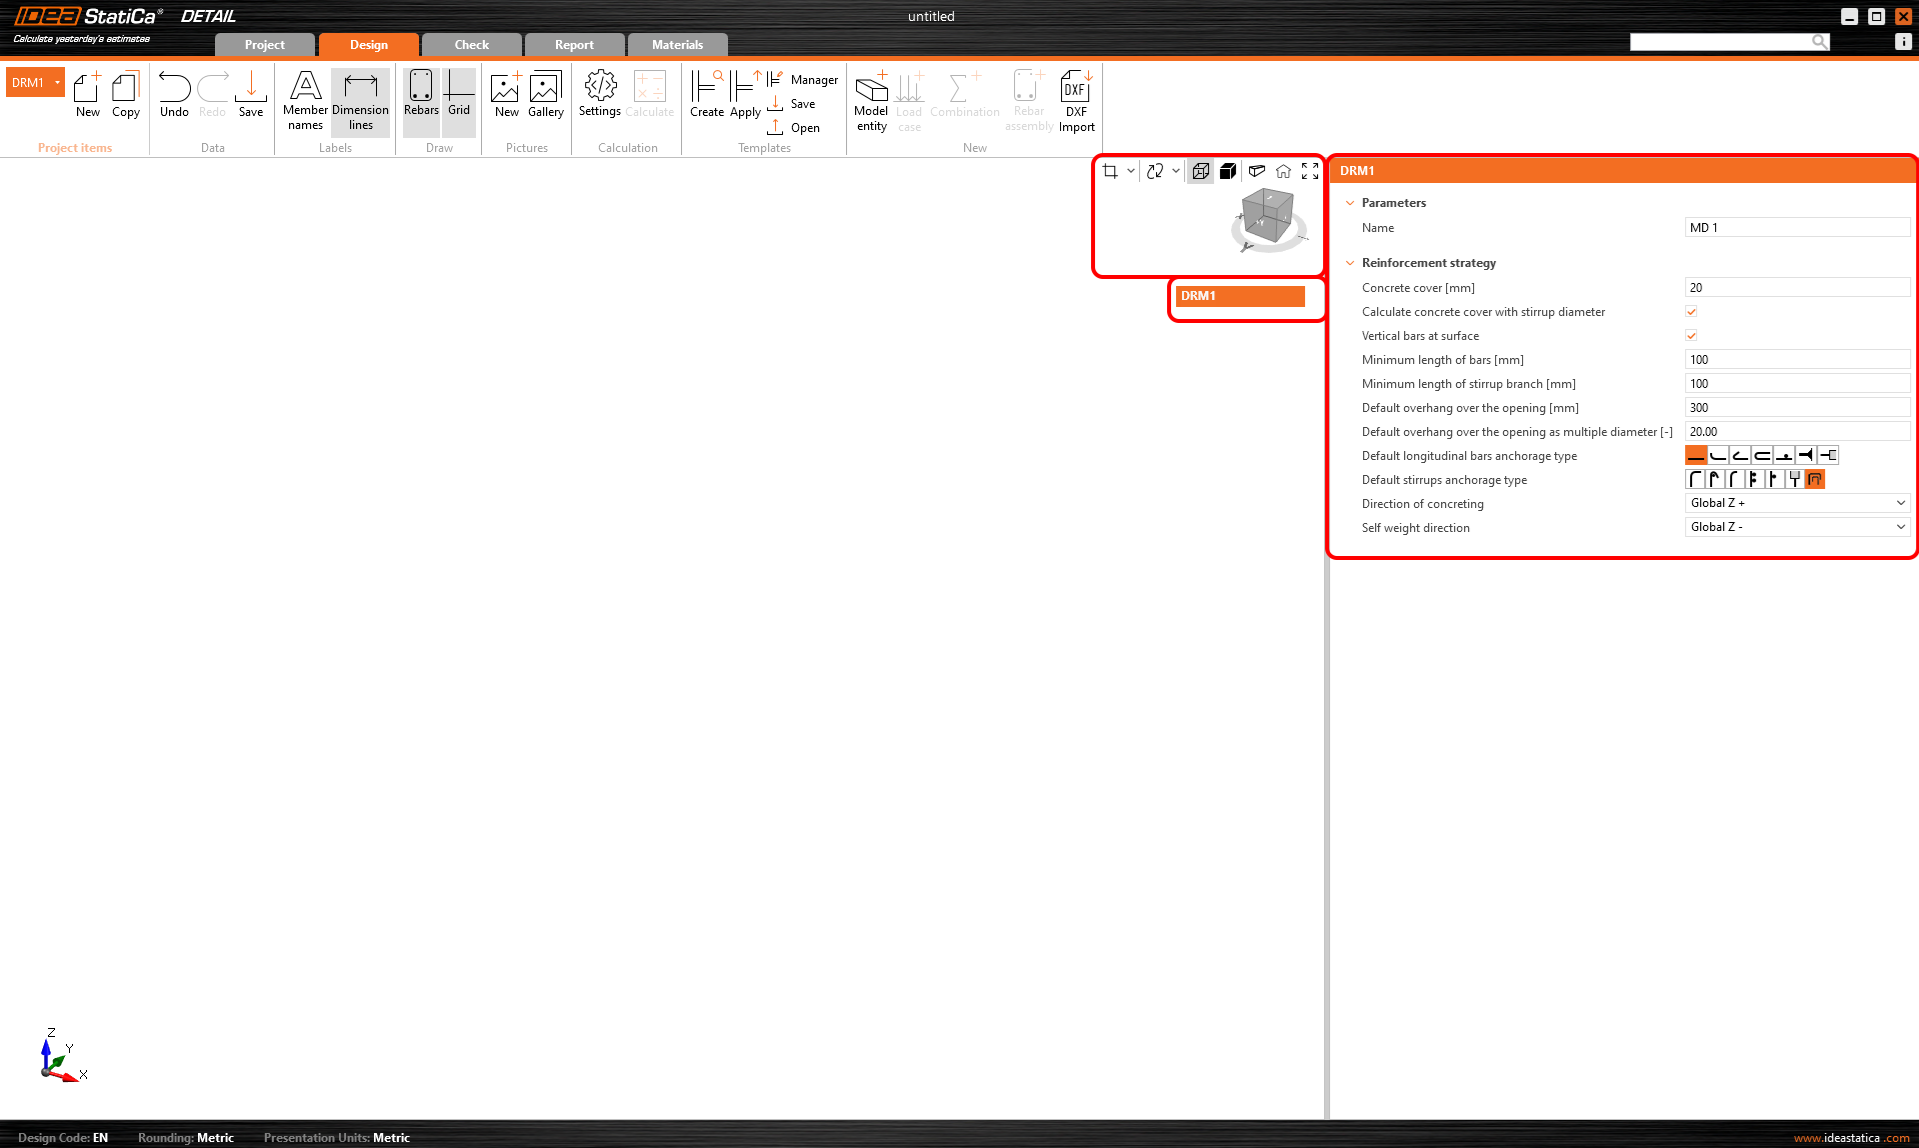
It also initializes the tree, whose first item, called by default DRM1, contains the default settings for the actual Project Item. Above the tree, you can find tools for manipulating the model.
Modelling
Many brand new tools and model entities have been added to the new 3D environment in IDEA StatiCa Detail. In the following section, we will go through all the options available in version 24.1 together.
Model Entities
We include the following in the Model entity category in the Detail application:
- Members
- Supports
- Load transfer devices
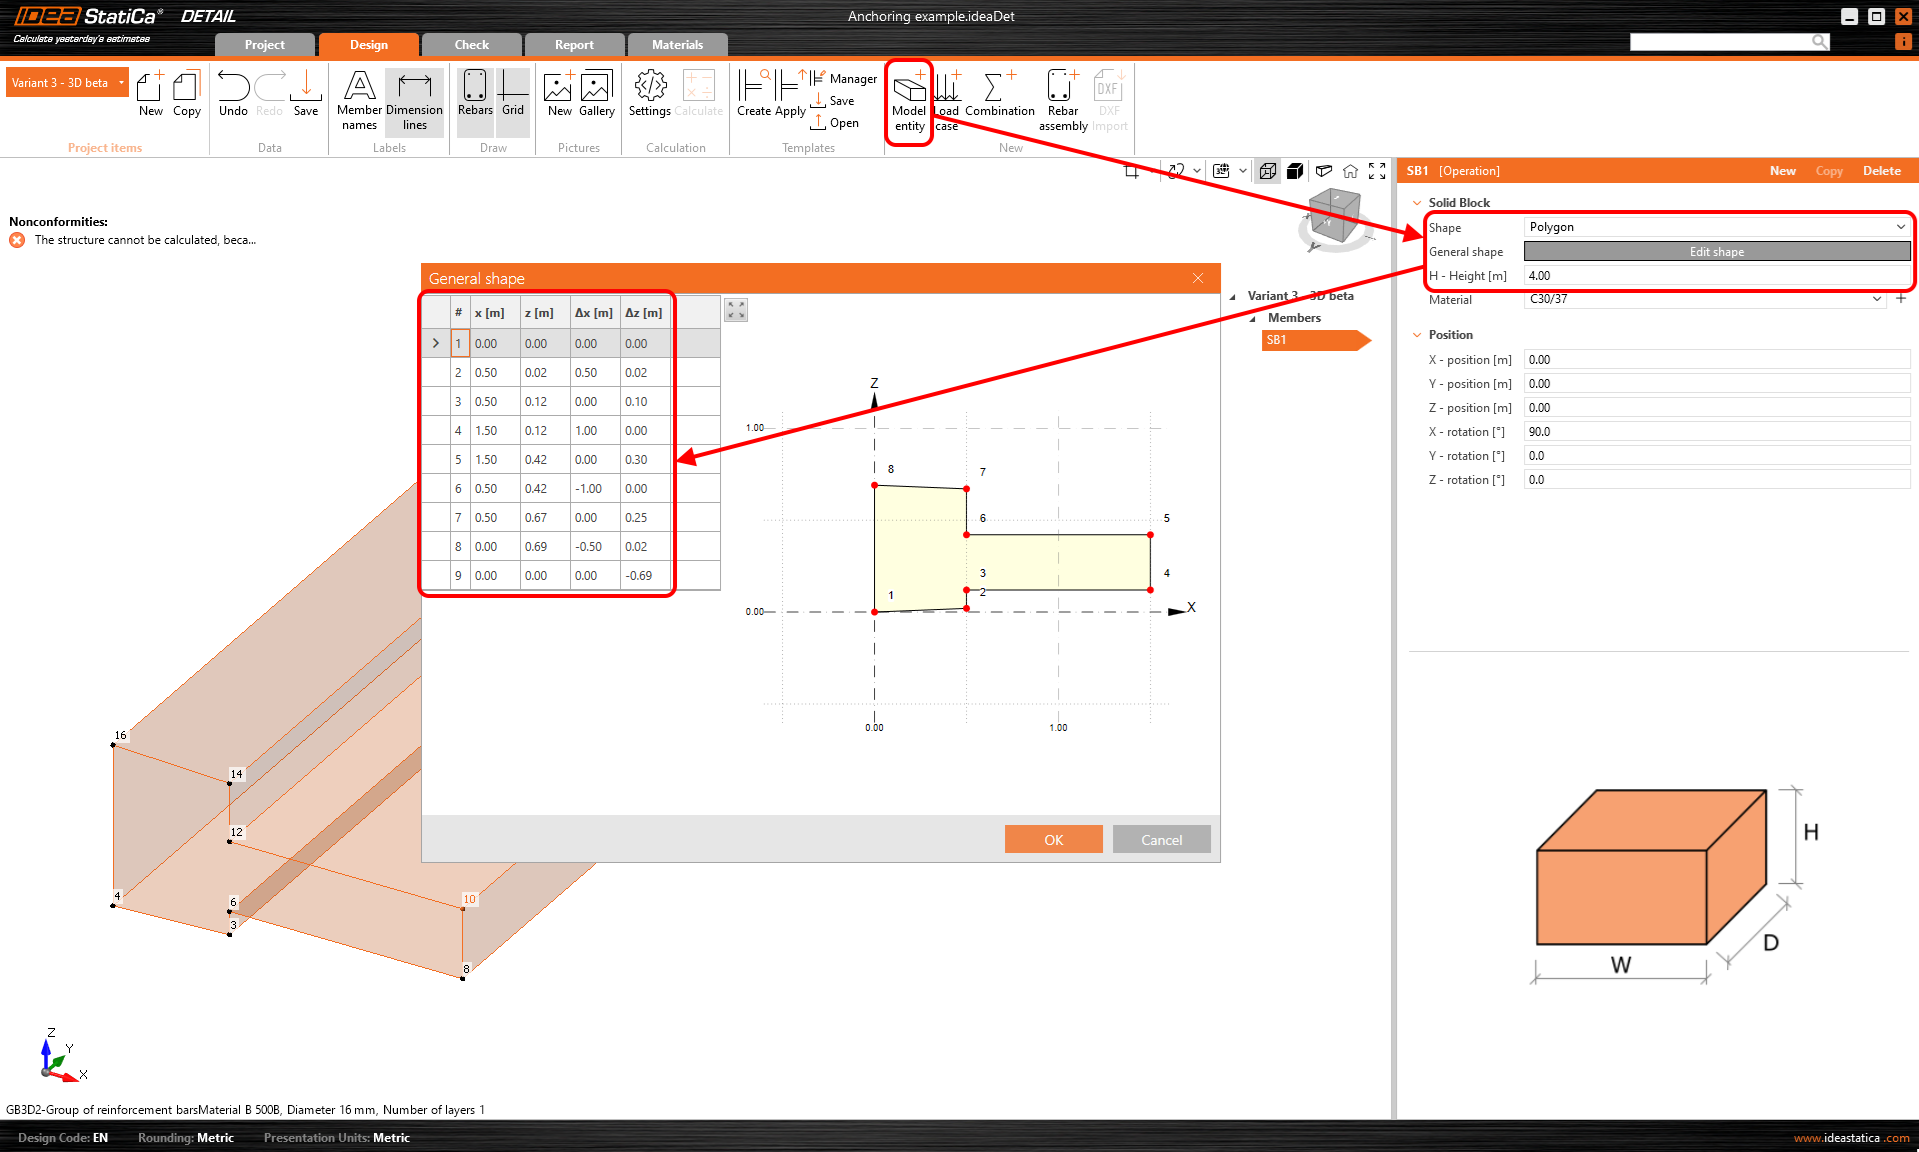
In version 24.1, only one Member can be input, which can be defined as a Rectangle or Polygon shape. A rectangular shape is defined by three dimensions, while for the Polygon option, the shape in 2D space is entered into a table using coordinates, which can then be extracted into space. To define the general shape of a polygon, individual coordinates can be filled in the table, or a copy-paste from a spreadsheet program (such as Microsoft Excel) can be used.
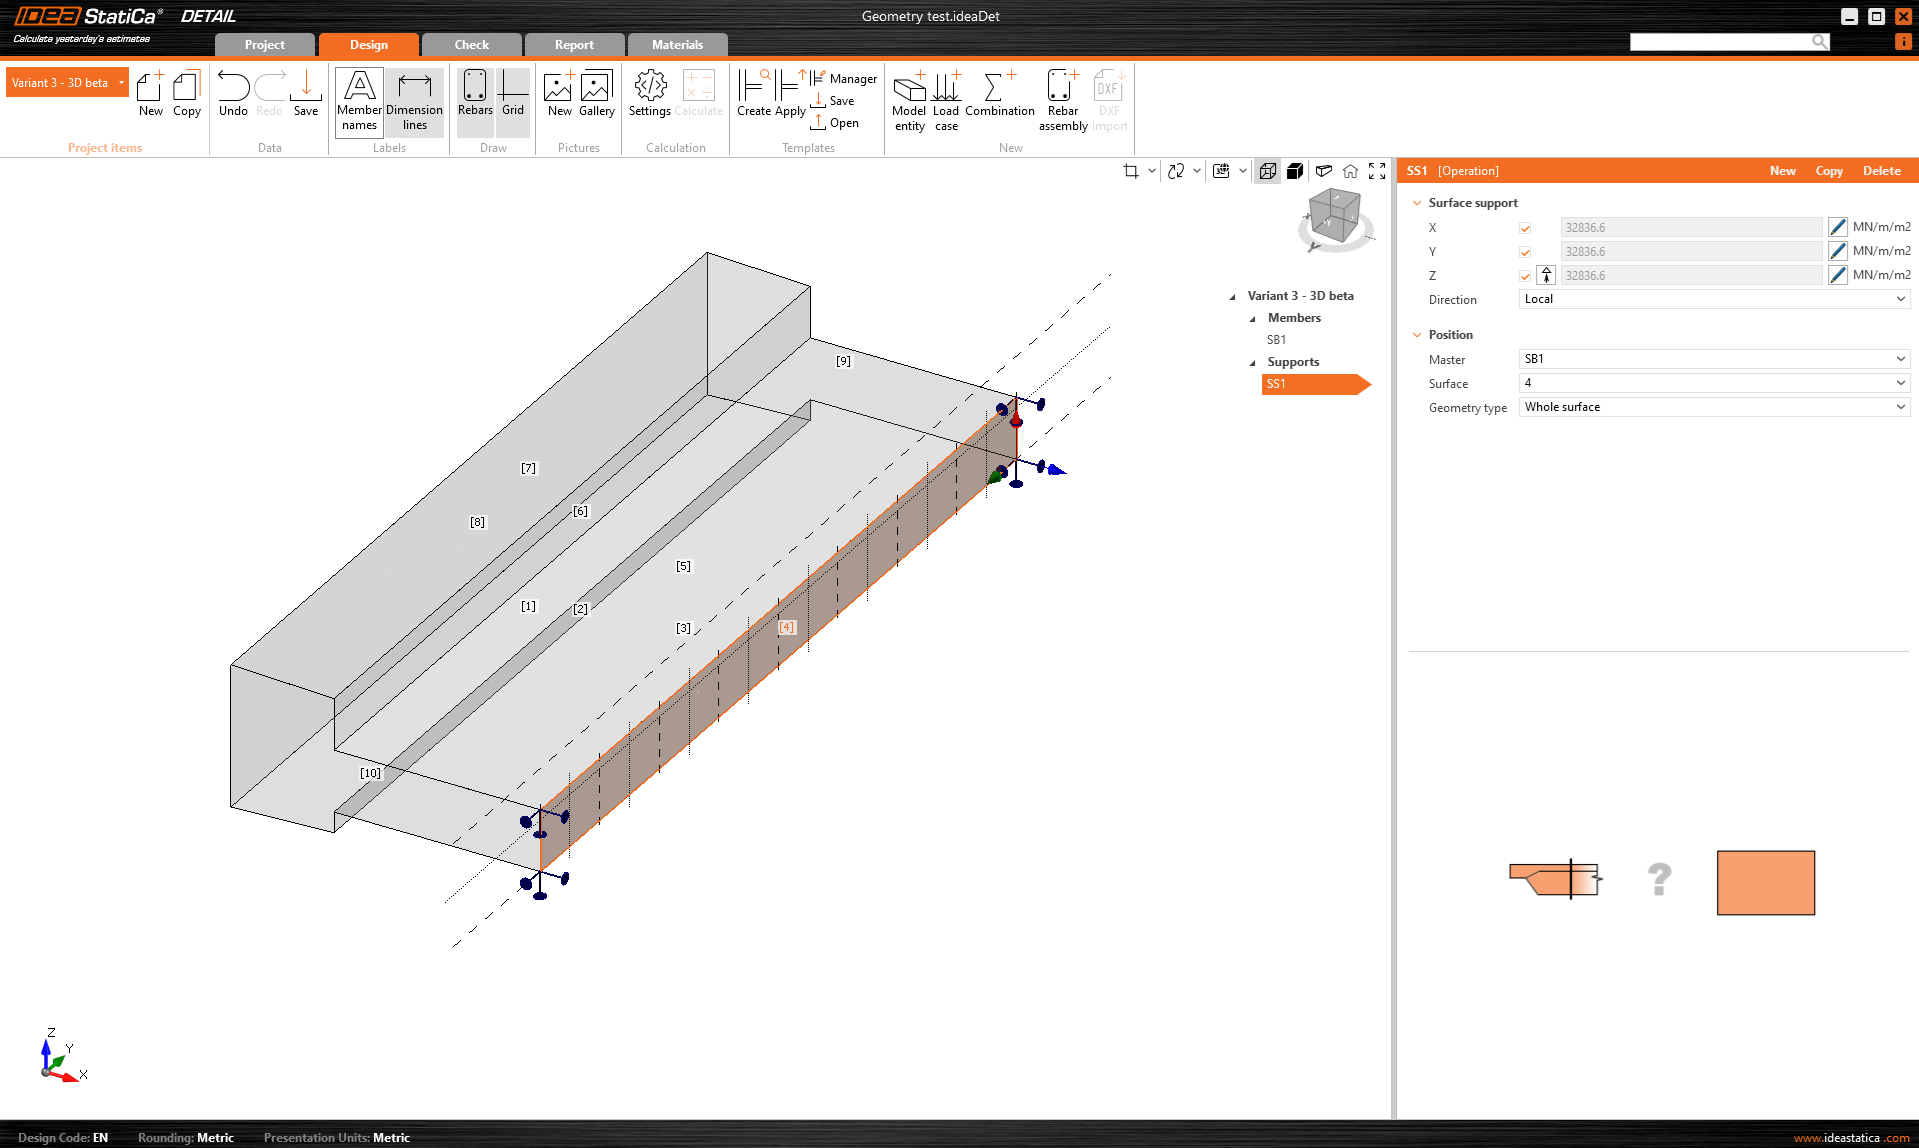
Surface support is used to support the model. This type of support can be specified in two ways - two Geometry types.
- Whole surface
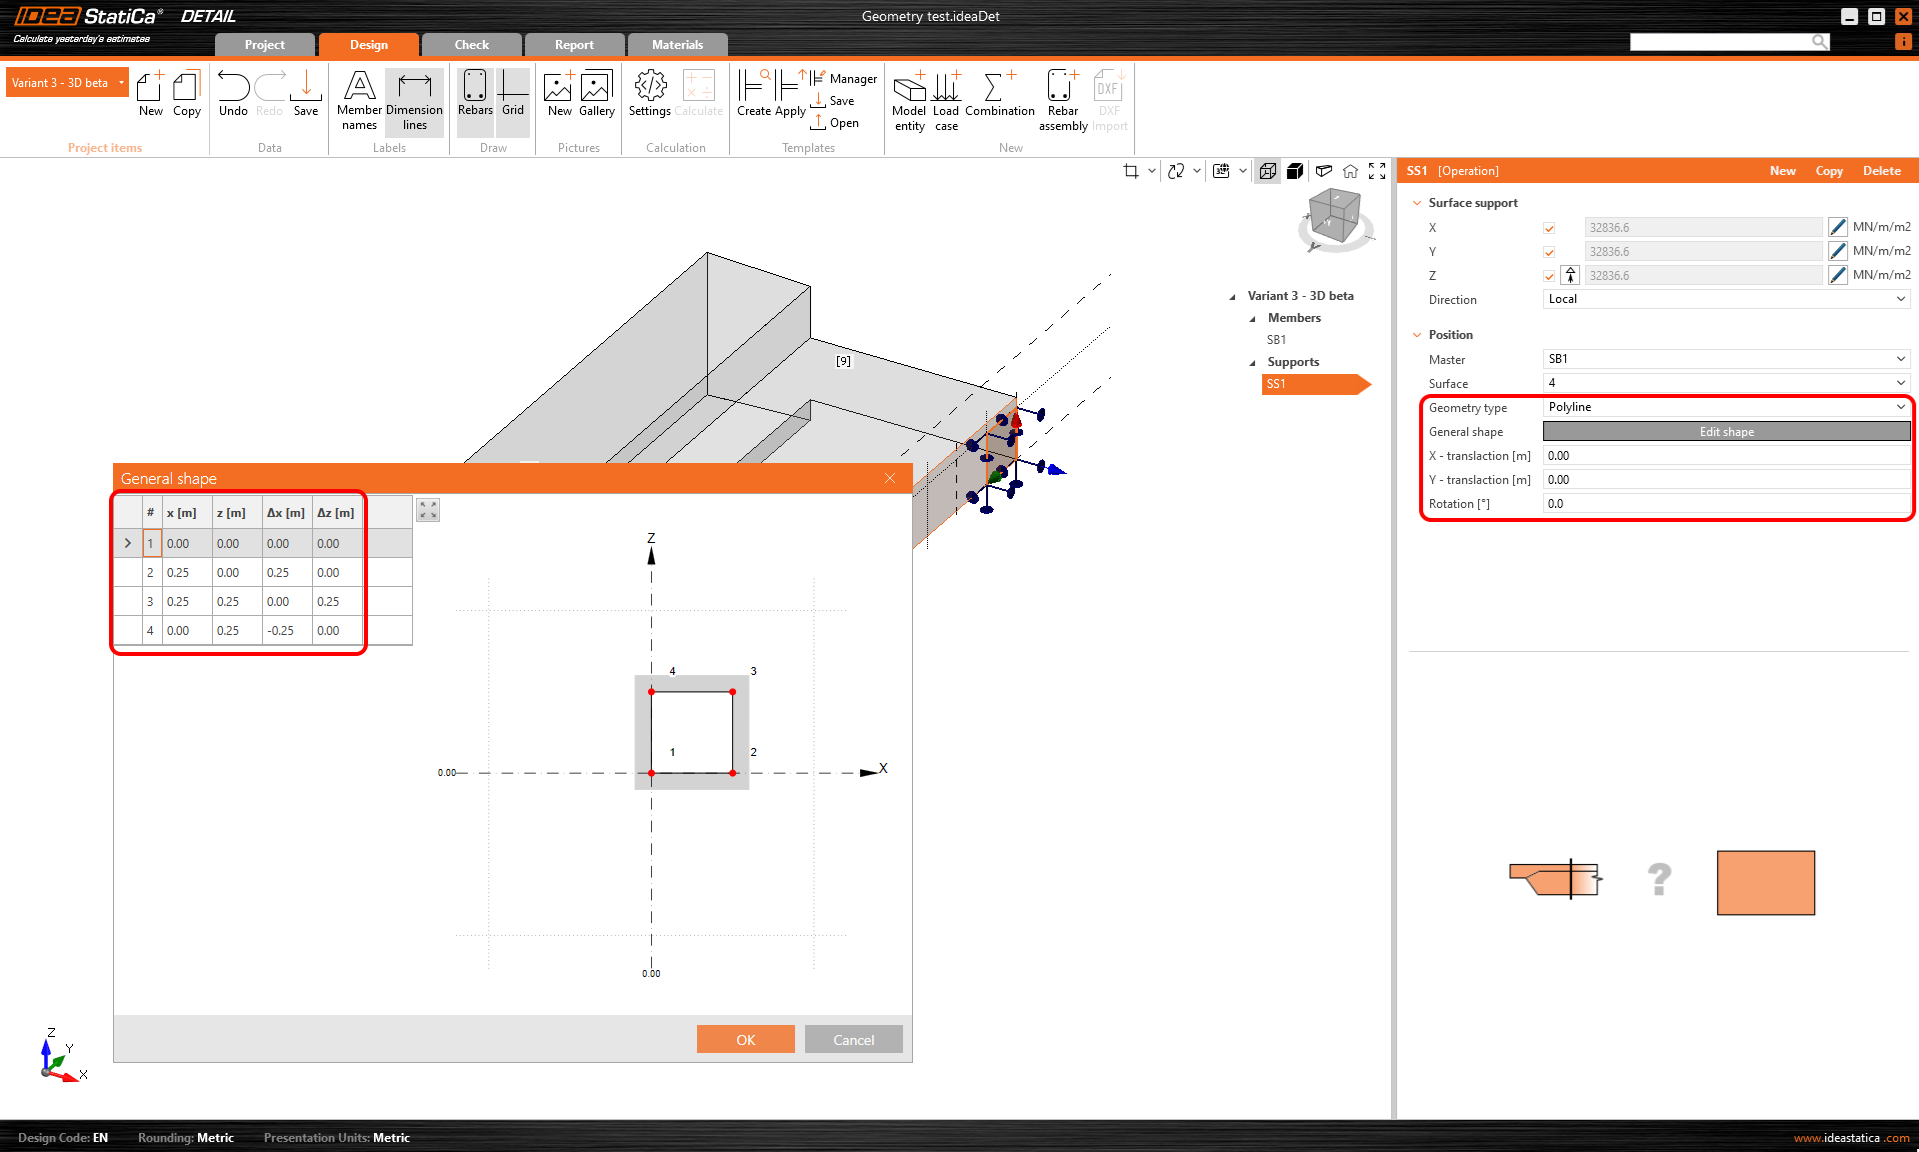
- Polyline
In both cases, you need to choose a reference surface and of course, define degrees of freedom. The support can be defined as elastic and the Compression-only type can be used for a direction perpendicular to the specified surface. In the following figure, we can see the support input on the Whole surface number 4 and the Compression-only option turned off.
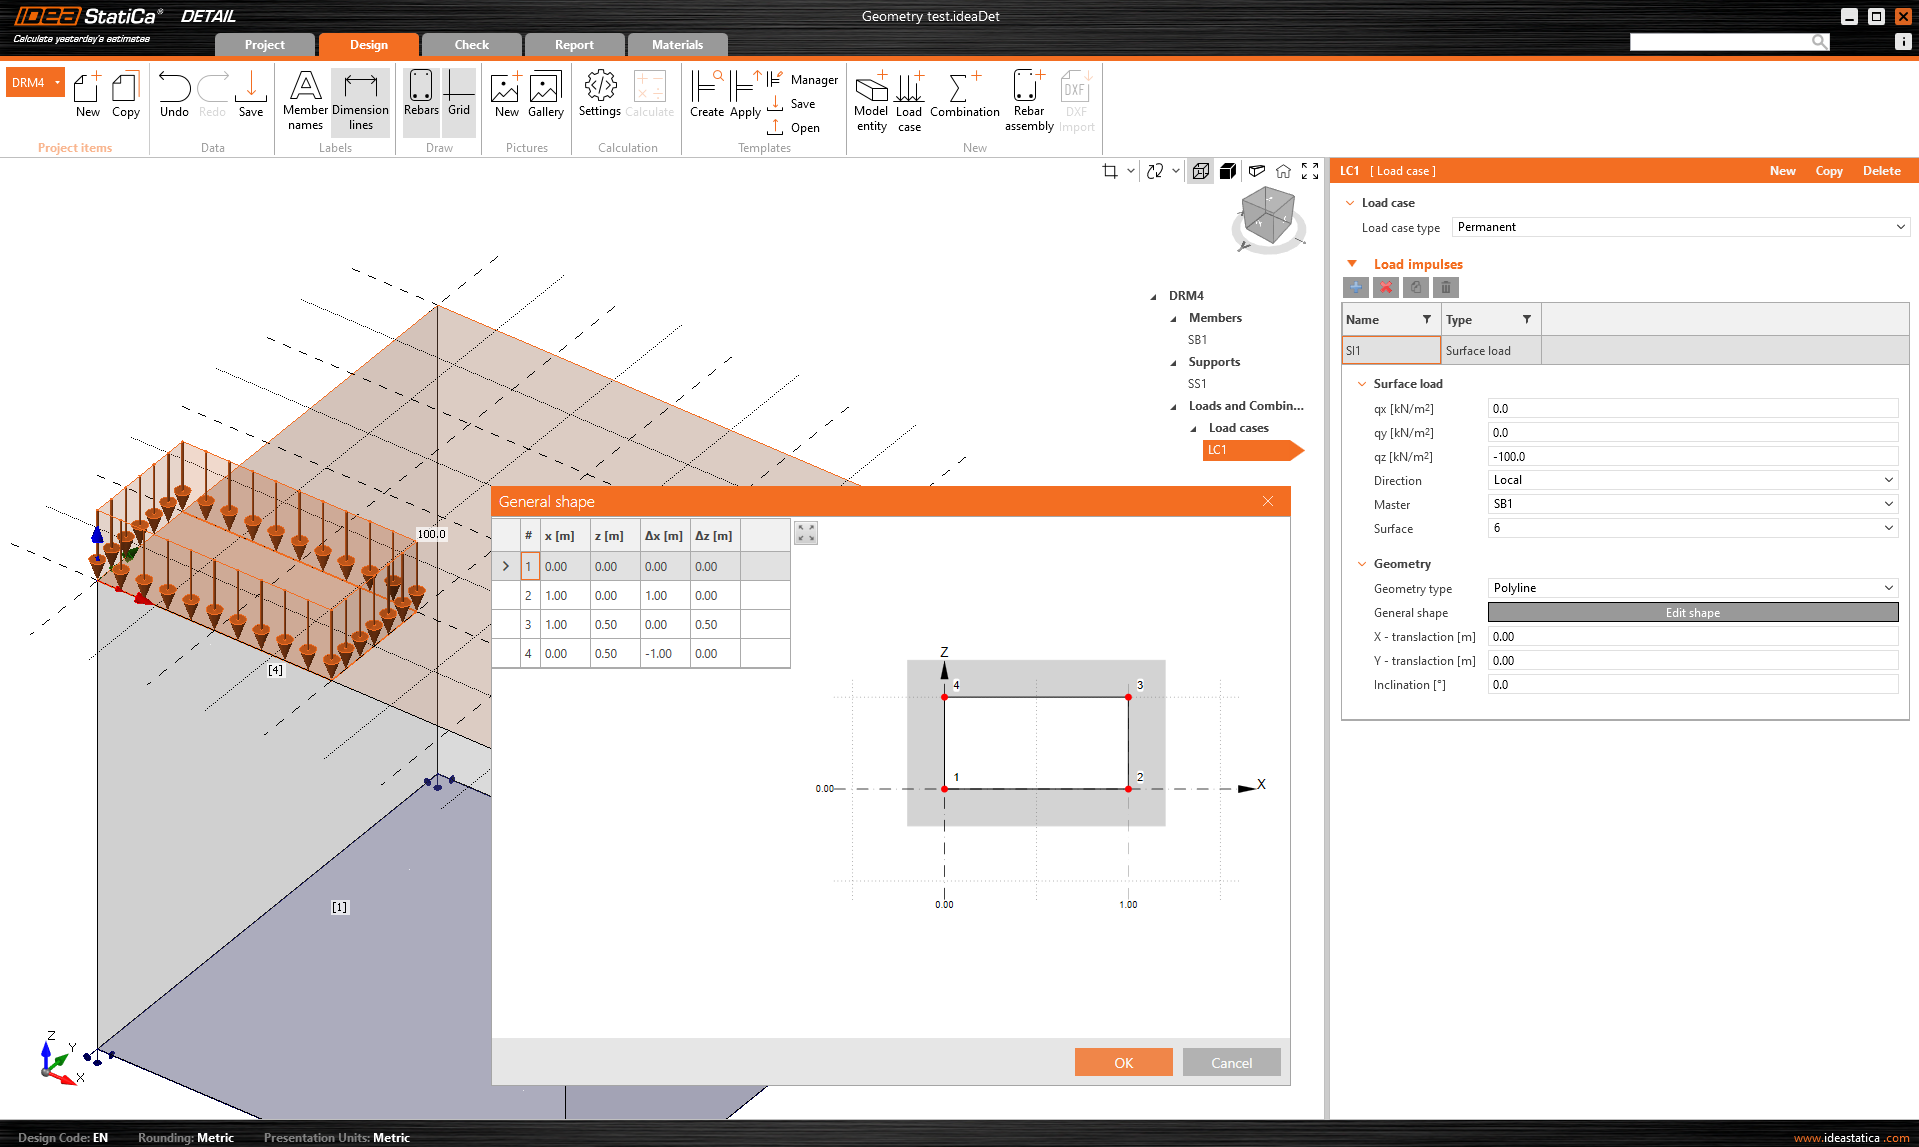
For the second option of polyline input, the same table is available as for Members input. Again, you can use the copy-paste functionality or enter the coordinates manually. The entered shape can be moved along the reference surface using X and Y coordinates or rotated by entering an angle.
Note that it is possible to specify a polyline so that the origin of the coordinates is at the center of gravity of the desired shape. The position will then be referenced by the X and Y coordinates to that center of gravity.
Lastaufnahmemittel in 3D Detail
Lastaufnahmemittel
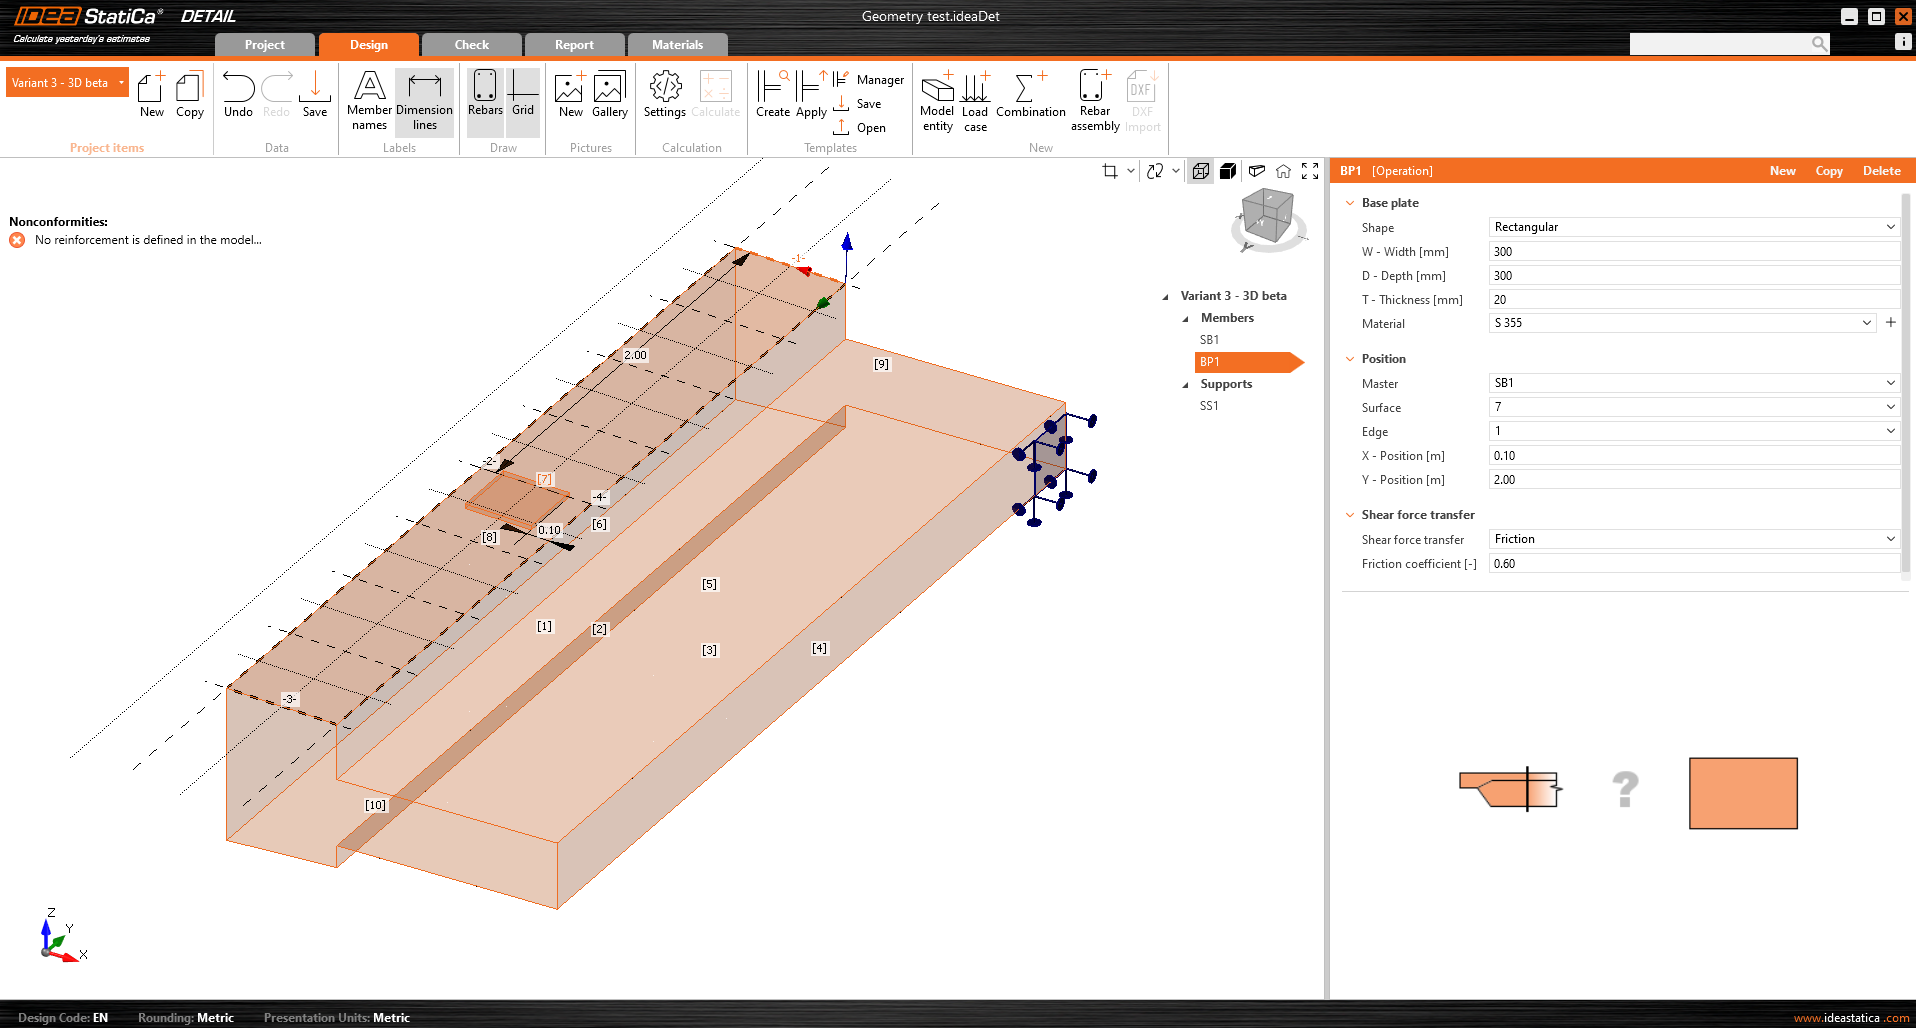
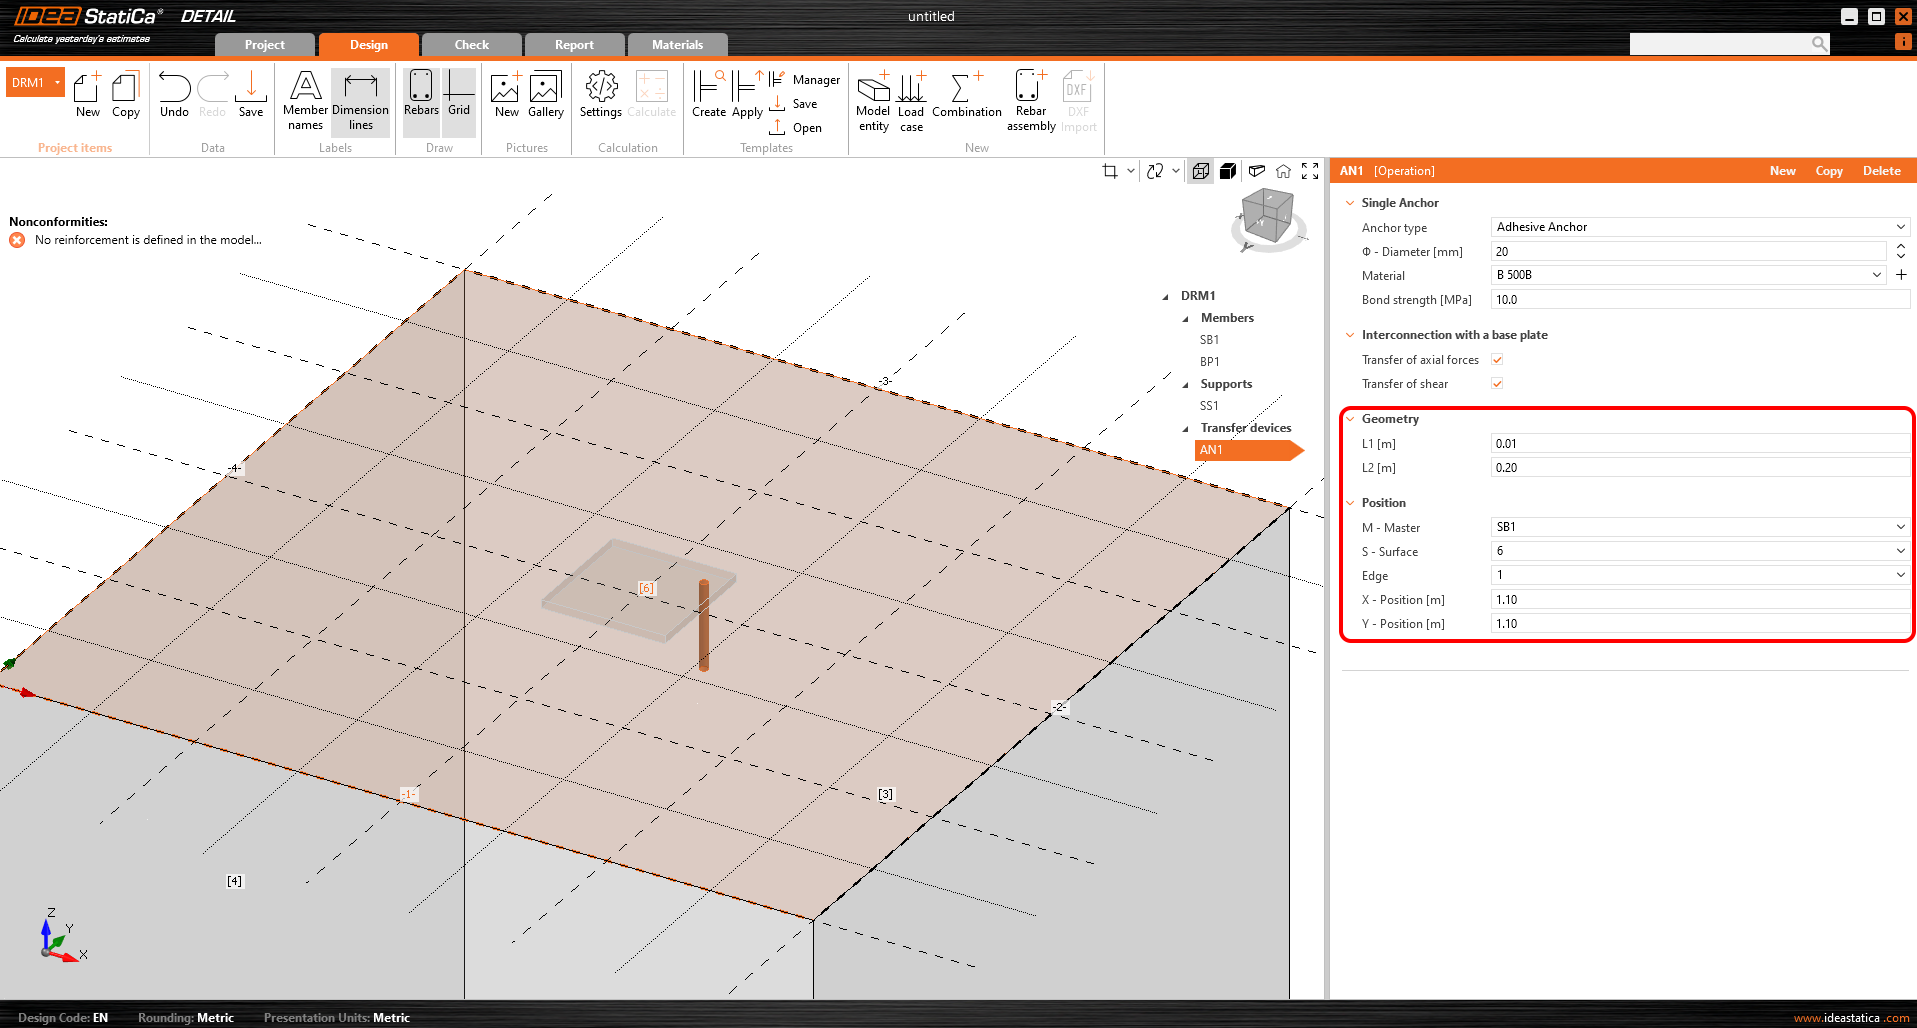
Lastaufnahmemittel bestehen aus zwei Teilen: der Grundplatte und dem Einzelanker. Beginnen wir mit der Grundplatte. Um die Position zu bestimmen, müssen eine Bezugsfläche und eine Kante ausgewählt werden. Diese definieren den Ursprung der Koordinaten, von denen aus die X- und Y-Abstände gemessen werden. Es gibt zwei Optionen für die Formdefinition: Rechteck und Polygon.
Die Grundplatte ist mit dem Betonelement durch einen Kontakt verbunden, der Druckspannungen und auf Wunsch auch Scherspannungen überträgt. Es gibt drei Scherübertragungsmechanismen, die ausgewählt werden können:
- durch Reibung
- durch Dübel
- durch Scherfahne
Die Software erlaubt es nicht, diese Scherübertragungsmechanismen zu kombinieren.
Für die Option durch Reibung muss der Bemessungswert des Reibungskoeffizienten eingegeben werden. Für die Option durch Scherfahne muss das Stahlprofil, einschließlich Geometrie und Position, eingegeben werden.
Die Grundplatte kann entweder eine Punktlast oder eine Gruppe von Kräften übertragen. Bei einer Punktlast kann das Modell mit sechs Schnittgrößen (Fx, Fy, Fz, Mx, My und Mz) an einer beliebigen Stelle der Grundplatte belastet werden. Bei einer Gruppe von Kräften kann der Benutzer die Positionen, Intensitäten und Richtungen der Kräfte in eine Tabelle eingeben, die eine allgemeine Positionierung auf der Grundplatte ermöglicht.
Ein zweites Lasteinleitungsgerät, der Einzelanker, kann hinzugefügt und mit der Grundplatte verbunden werden, um z. B. eine mit vier Ankern verankerte Grundplatte der Säule zu erzeugen (siehe Abbildung unten). Es ist auch möglich, einzelne Dübel ohne Grundplatte zu modellieren.
Weitere Informationen über die Verbindung mit der Grundplatte finden Sie im Abschnitt Theoretischer Hintergrund.
Die Anker beziehen sich in Lage und Geometrie auf die Oberfläche und den Rand des Blocks, einschließlich der Bestimmung der relativen Lage wie bei der Grundplatte. Selbstverständlich ist es möglich, die Länge des Dübels im Beton und die Länge über der Betonoberfläche anzugeben.
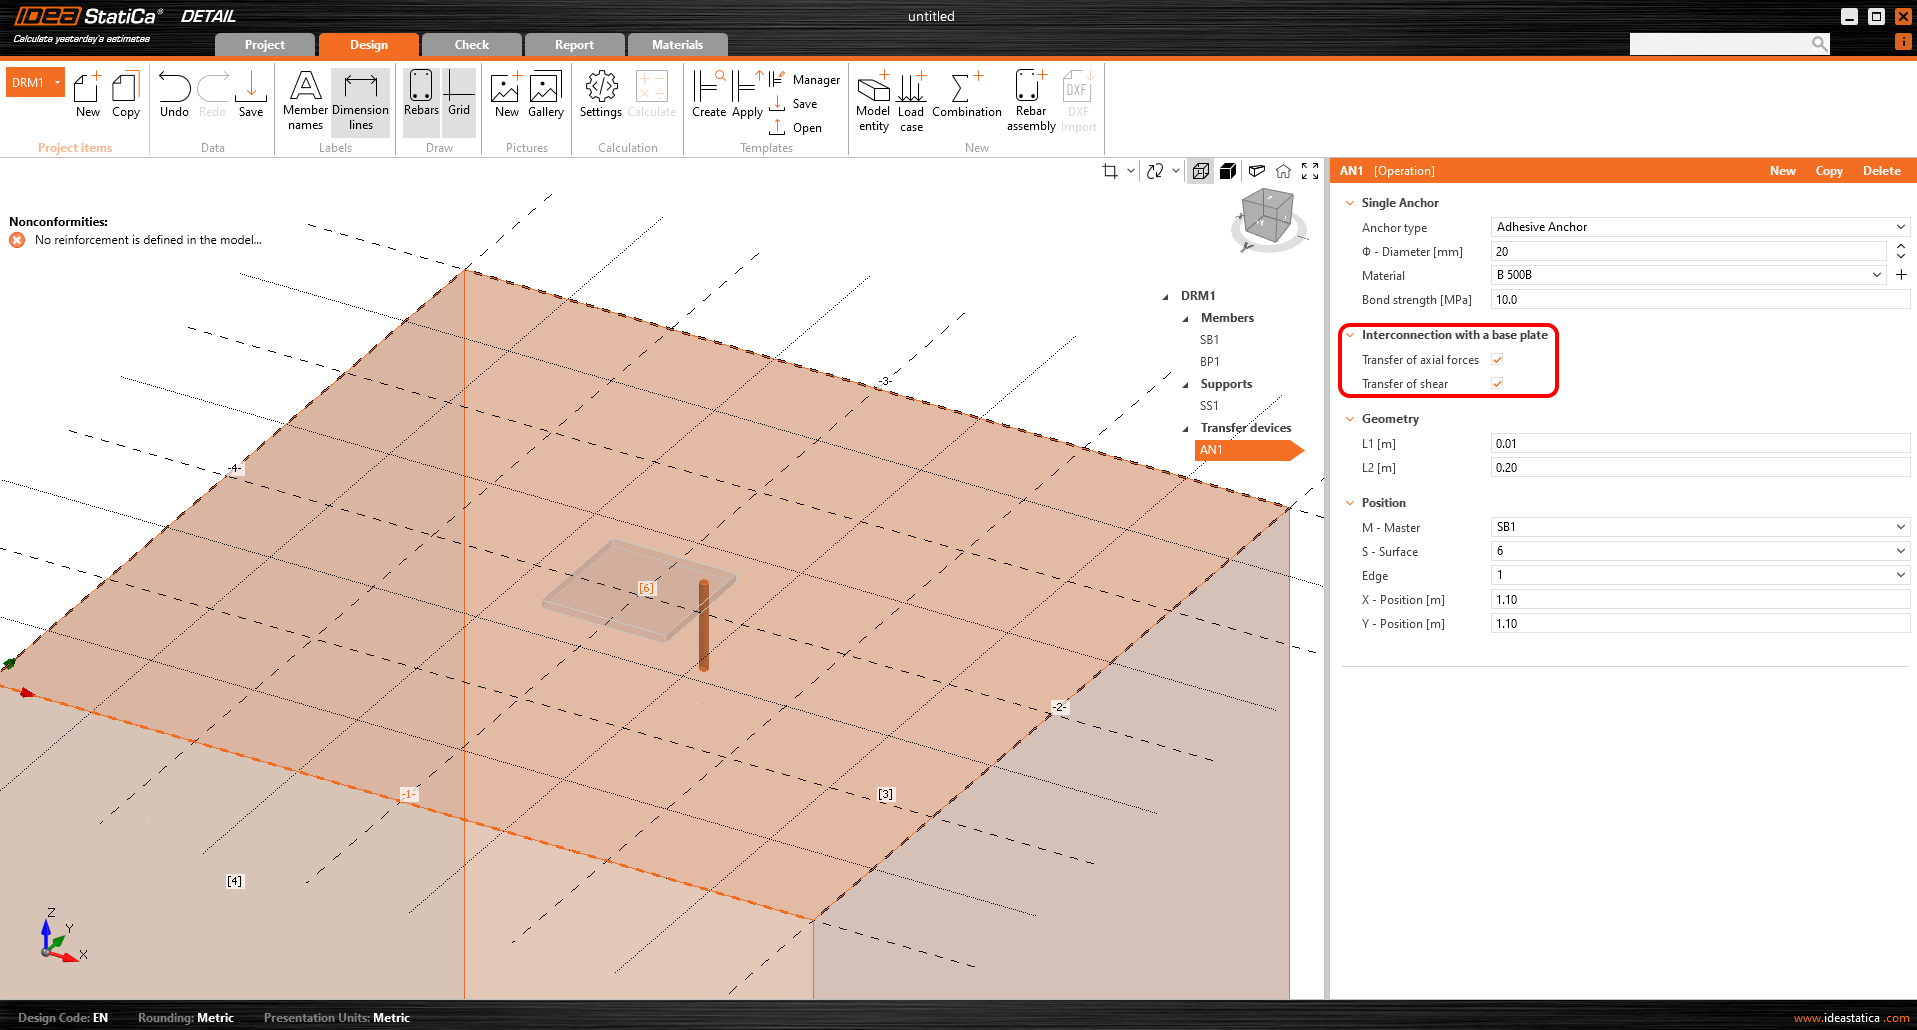
Die Dübel sind in zwei Varianten ausgeführt:
- Ortbeton - Bewehrung
- Klebeanker
Für die Ortbetonbewehrung wird die Verbundfestigkeit nach EN 1992-1-1, Kap. 8.4.2 verwendet. 8.4.2. Darüber hinaus ist es möglich, die Verankerungsart für diesen Dübeltyp wie für die konventionelle Bewehrung festzulegen.
Bei Klebeankern ist es möglich, die Verbundfestigkeit direkt einzugeben, die der Benutzer aus dem technischen Datenblatt des verwendeten Klebemörtels entnehmen kann. Beachten Sie, dass die Eingabe des Bemessungswertes der Verbundfestigkeit erforderlich ist.
Eine ausführliche Beschreibung des Verhaltens der Verbindung zwischen Dübel und Bodenplatte ist im Abschnitt Theoretischer Hintergrund beschrieben.
Loading and Combinations
Loading
Load cases can be defined in the same way as for 2D reinforced concrete elements. This means that each load case can be assigned either Permanent or Variable load type. The Permanent load cases are applied to the model first, after a successful calculation the Variable load cases are applied.
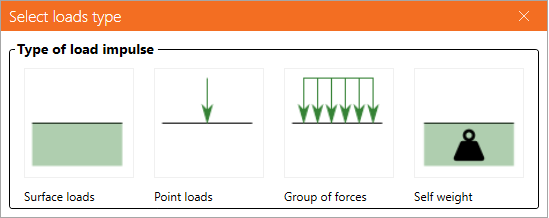
A total of 4 types of load pulses can be added to each load case.
- Surface loads
- Point loads
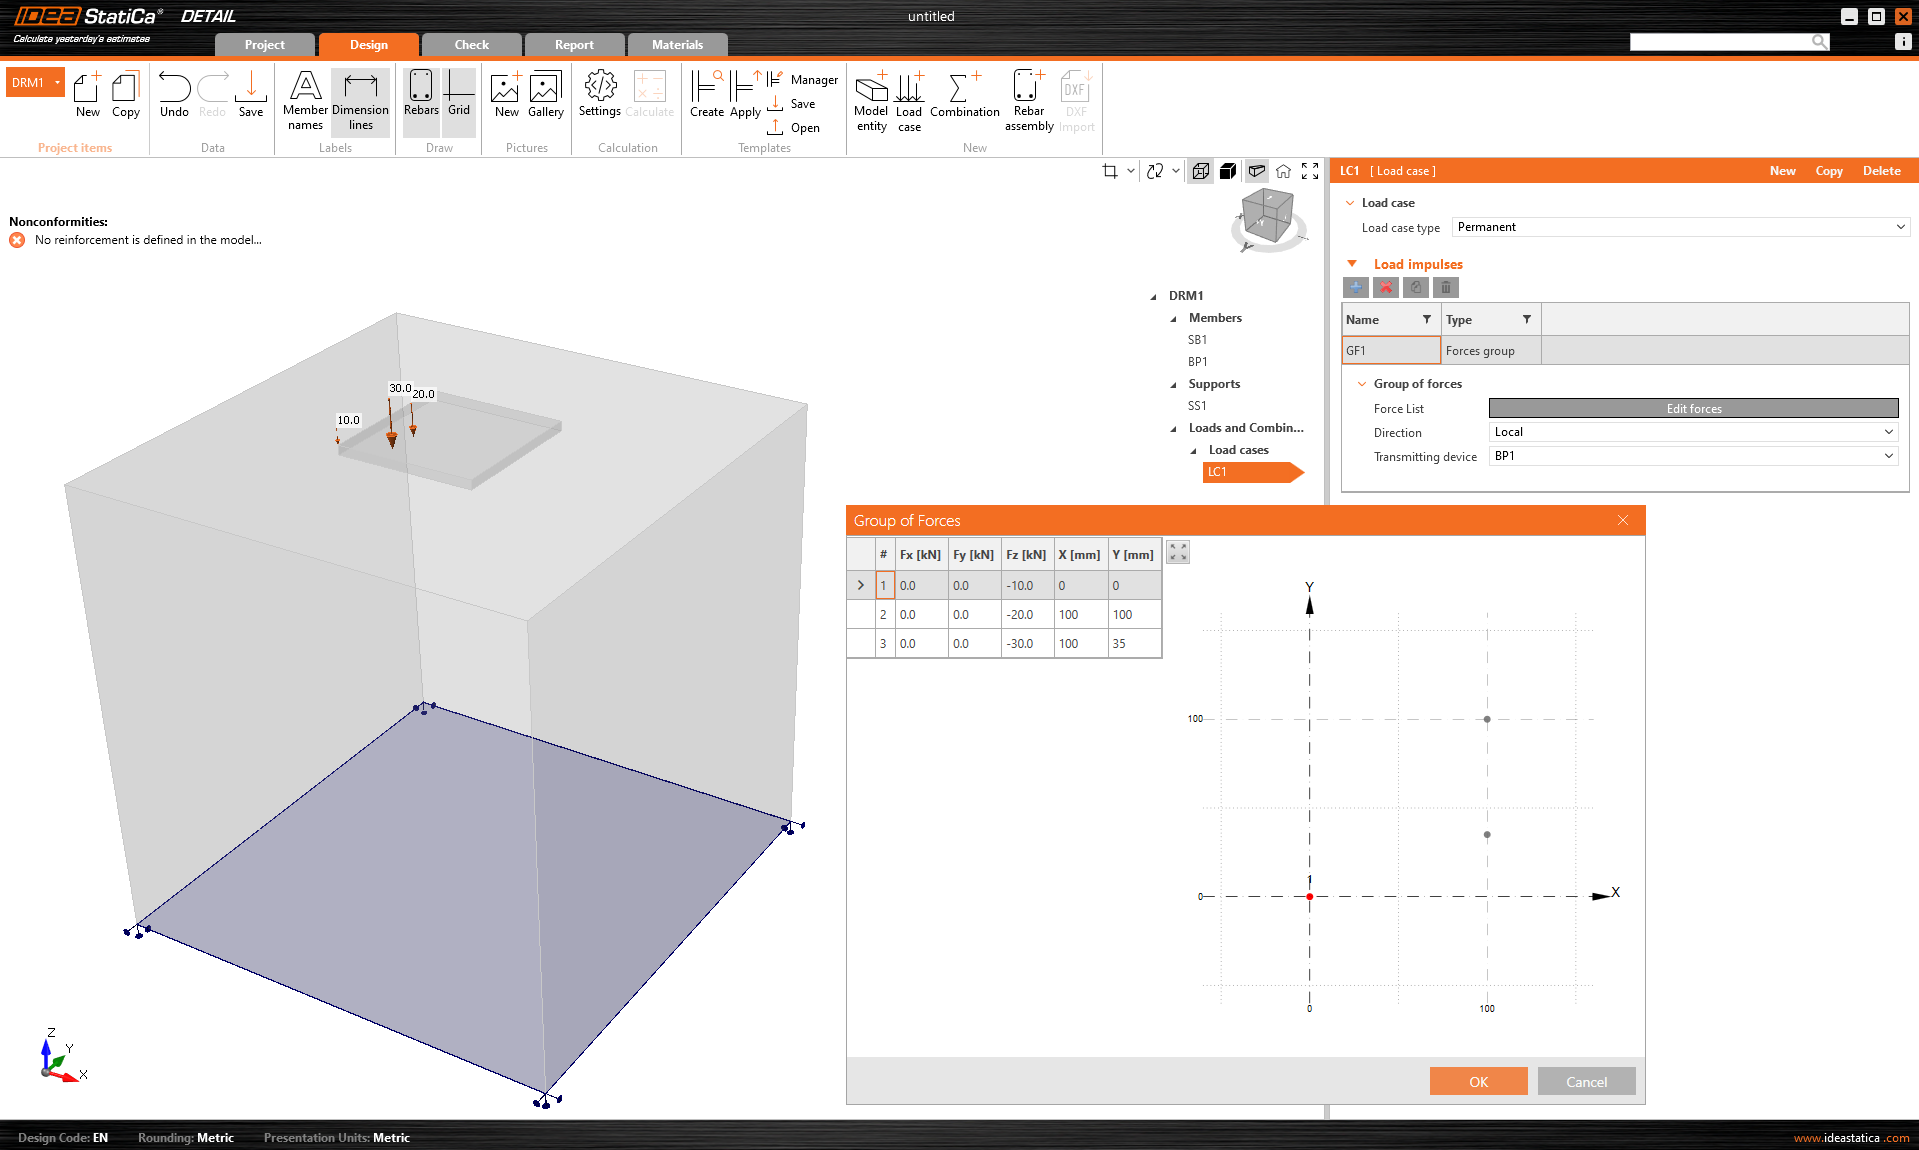
- Group of forces
- Self Weight
The definition of Surface loads is identical to the definition of Surface support. This means it is possible to specify it in two ways - Whole surface and Polyline. In the case of Surface loads, of course, the load intensity in the three general directions is entered instead of the surface stiffness.
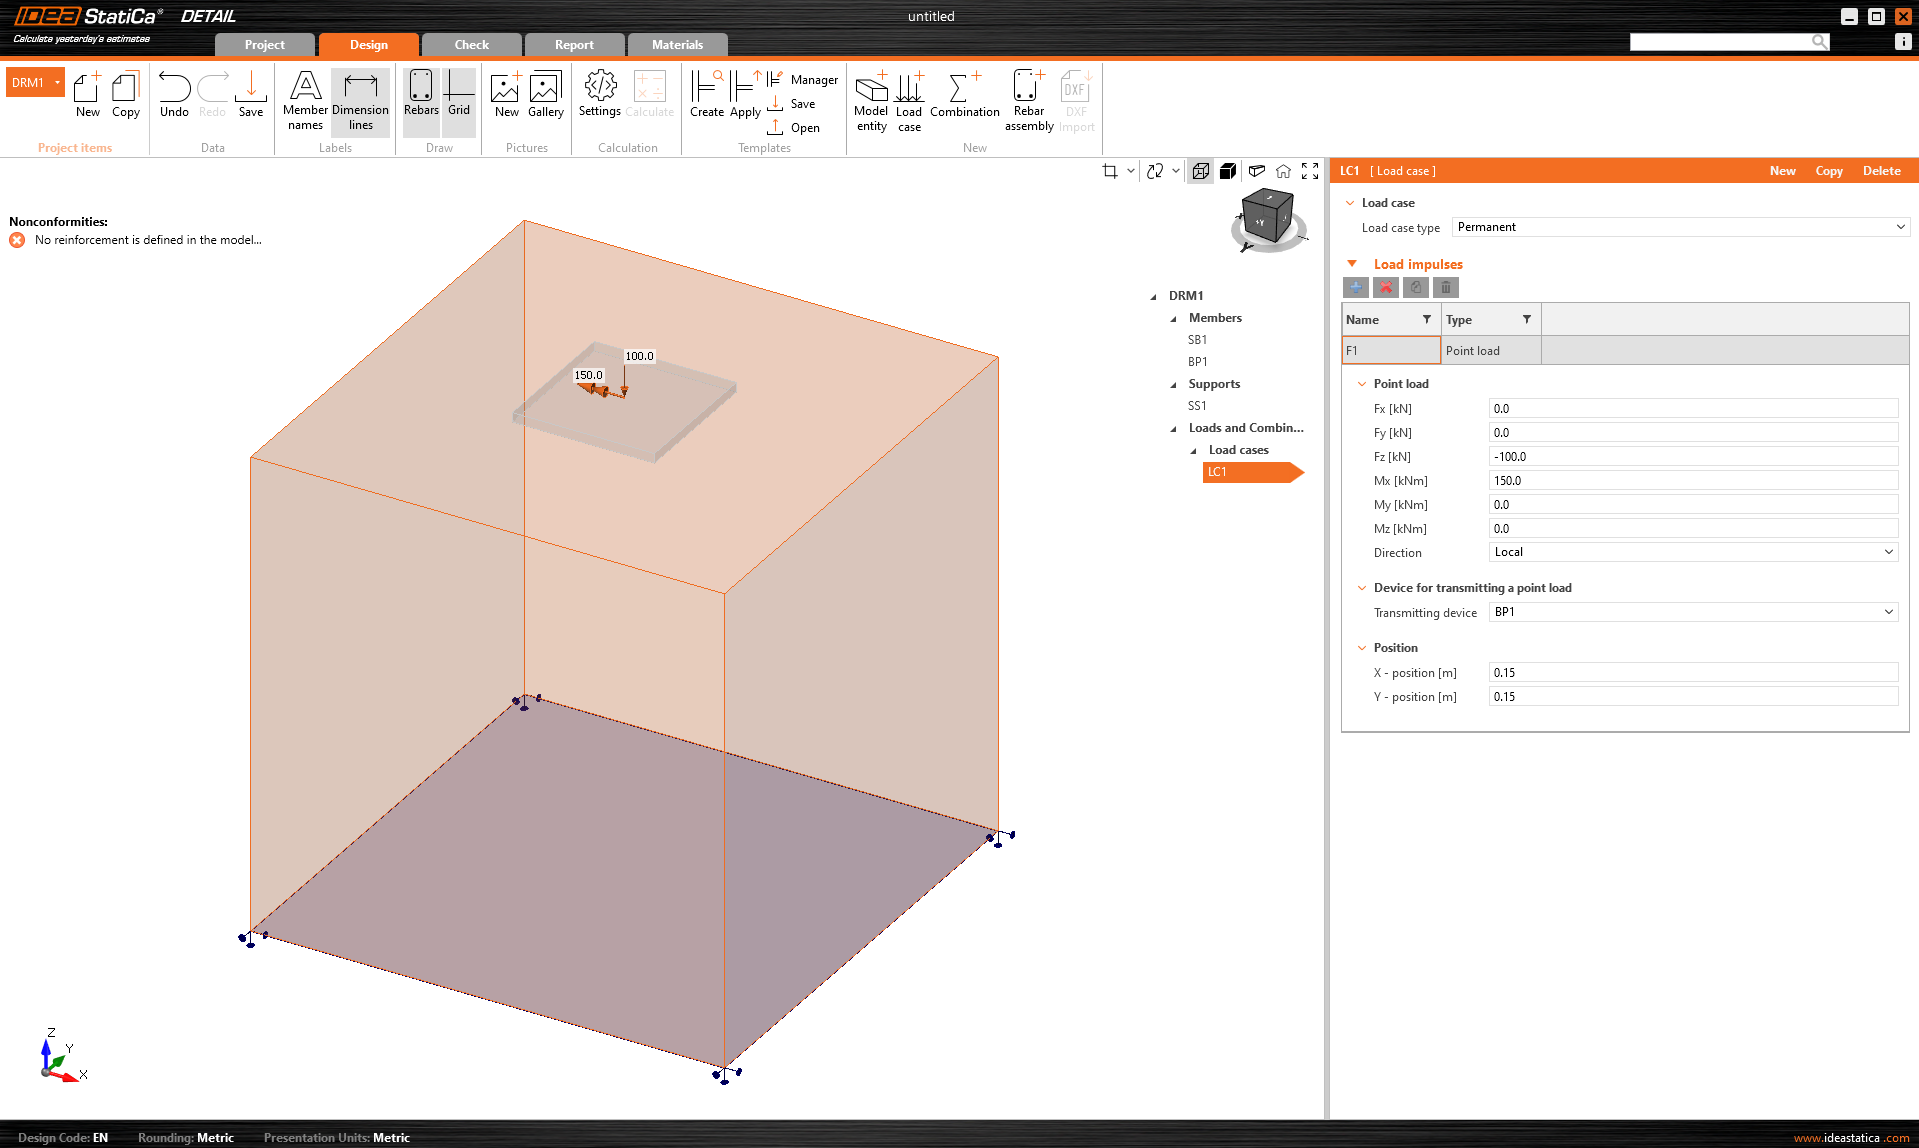
As mentioned above, using Point loads you can load the Bearing plate with six internal forces Fx, Fy, Fz, Mx, My, and Mz in the general position. The right-hand rule is used for the definition of bending moments.
Group of forces is a load entity that allows you to specify forces in three directions anywhere on the model using a table. It can be referenced to the Bearing plate or the surface of a concrete block. For tabular input, it is again possible to use the copy-paste functionality from the spreadsheet program.
As the last loading impulse, the self-weight is available in the application. This impulse should be included in every model. For example, concrete foundations loaded with a bending moment will not so easily overturn.
Combinations
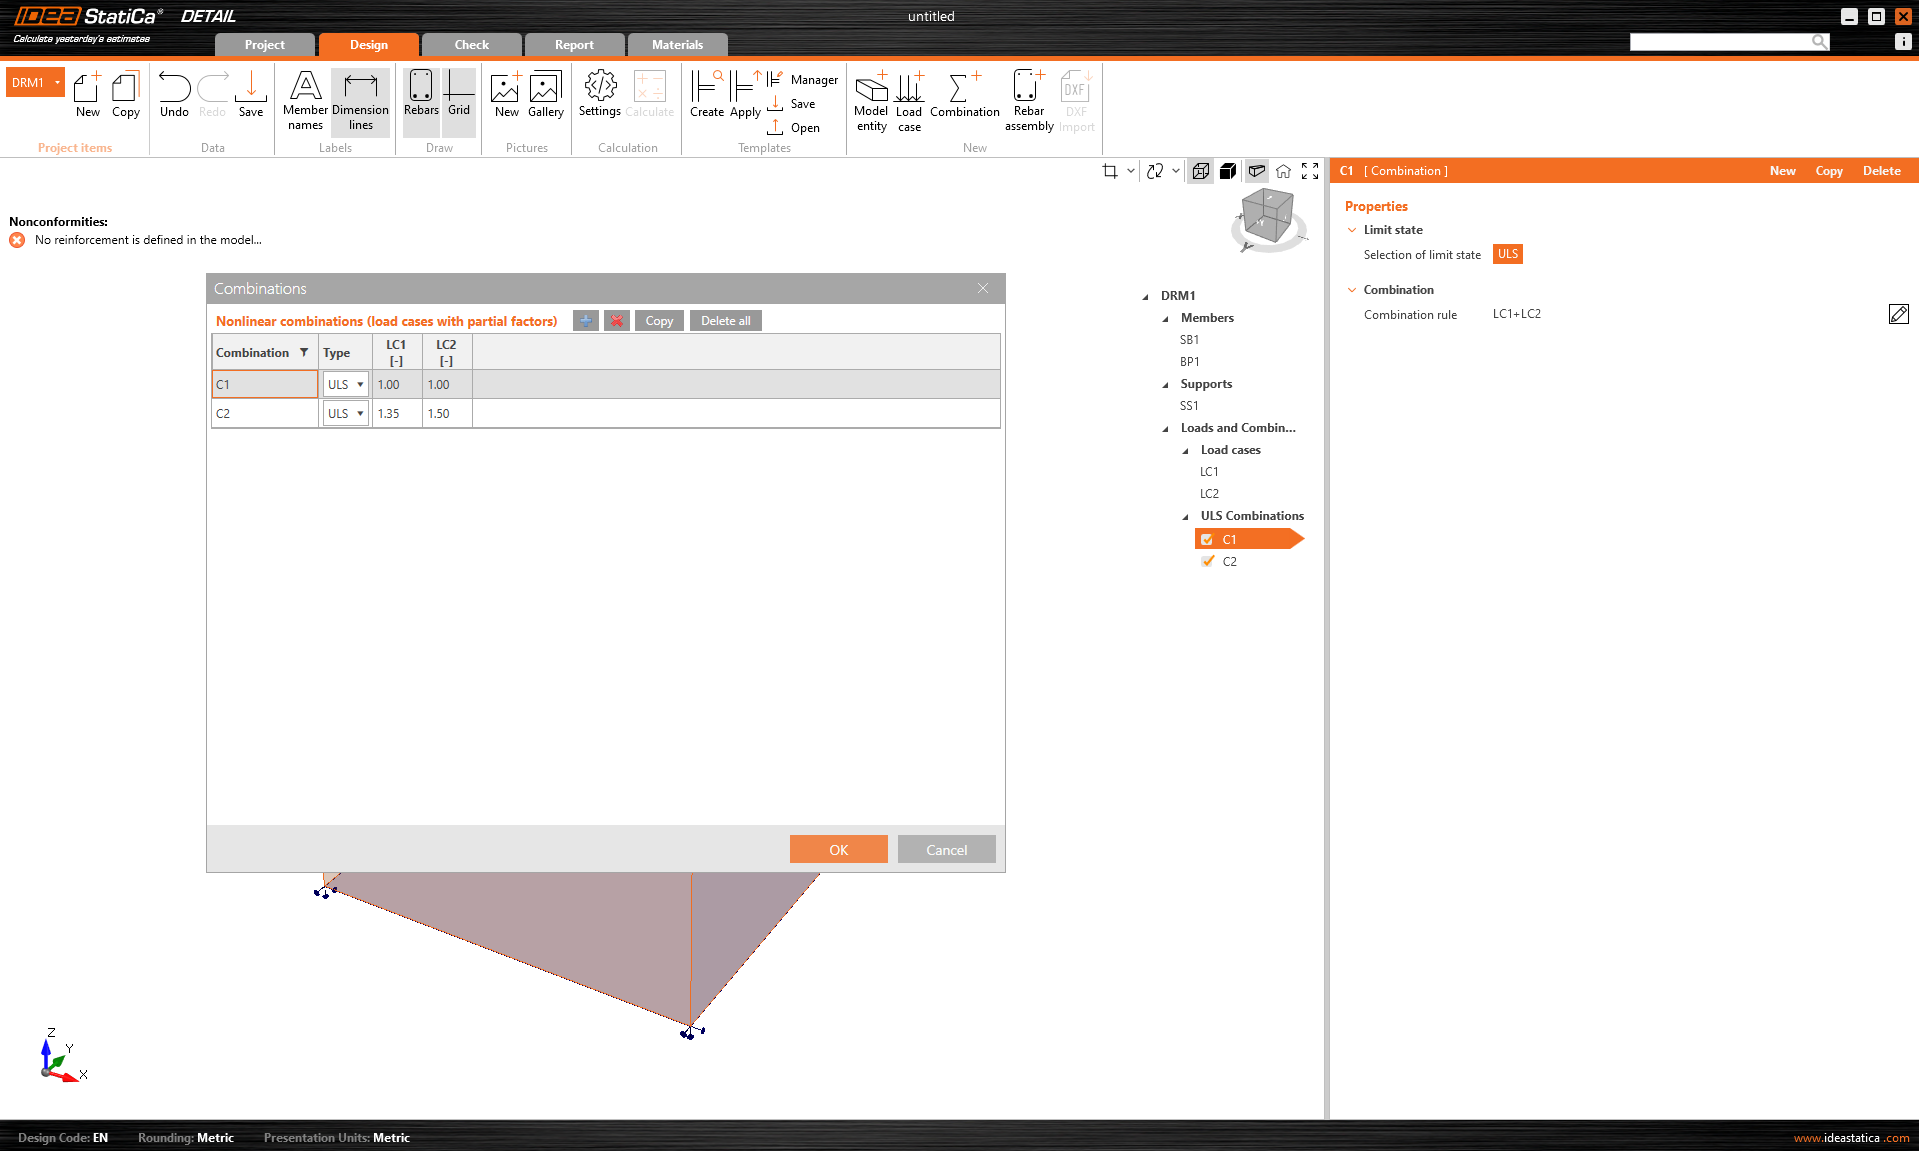
Because the analysis in IDEA StatiCa Detail is non-linear, so-called non-linear combinations are used. This means that individual load cases are not calculated and the results are not then added together. On the contrary, load cases of the same load type are added together before the calculation, of course with the respective coefficients defined in the combinations, and the individual combinations are then calculated. This is why the existence of at least one combination is a prerequisite for starting the calculation.
As described at the beginning of the article, the calculation is now defined in the application only for ULS. This logically implies that only combinations for ULS can be defined.
Reinforcement
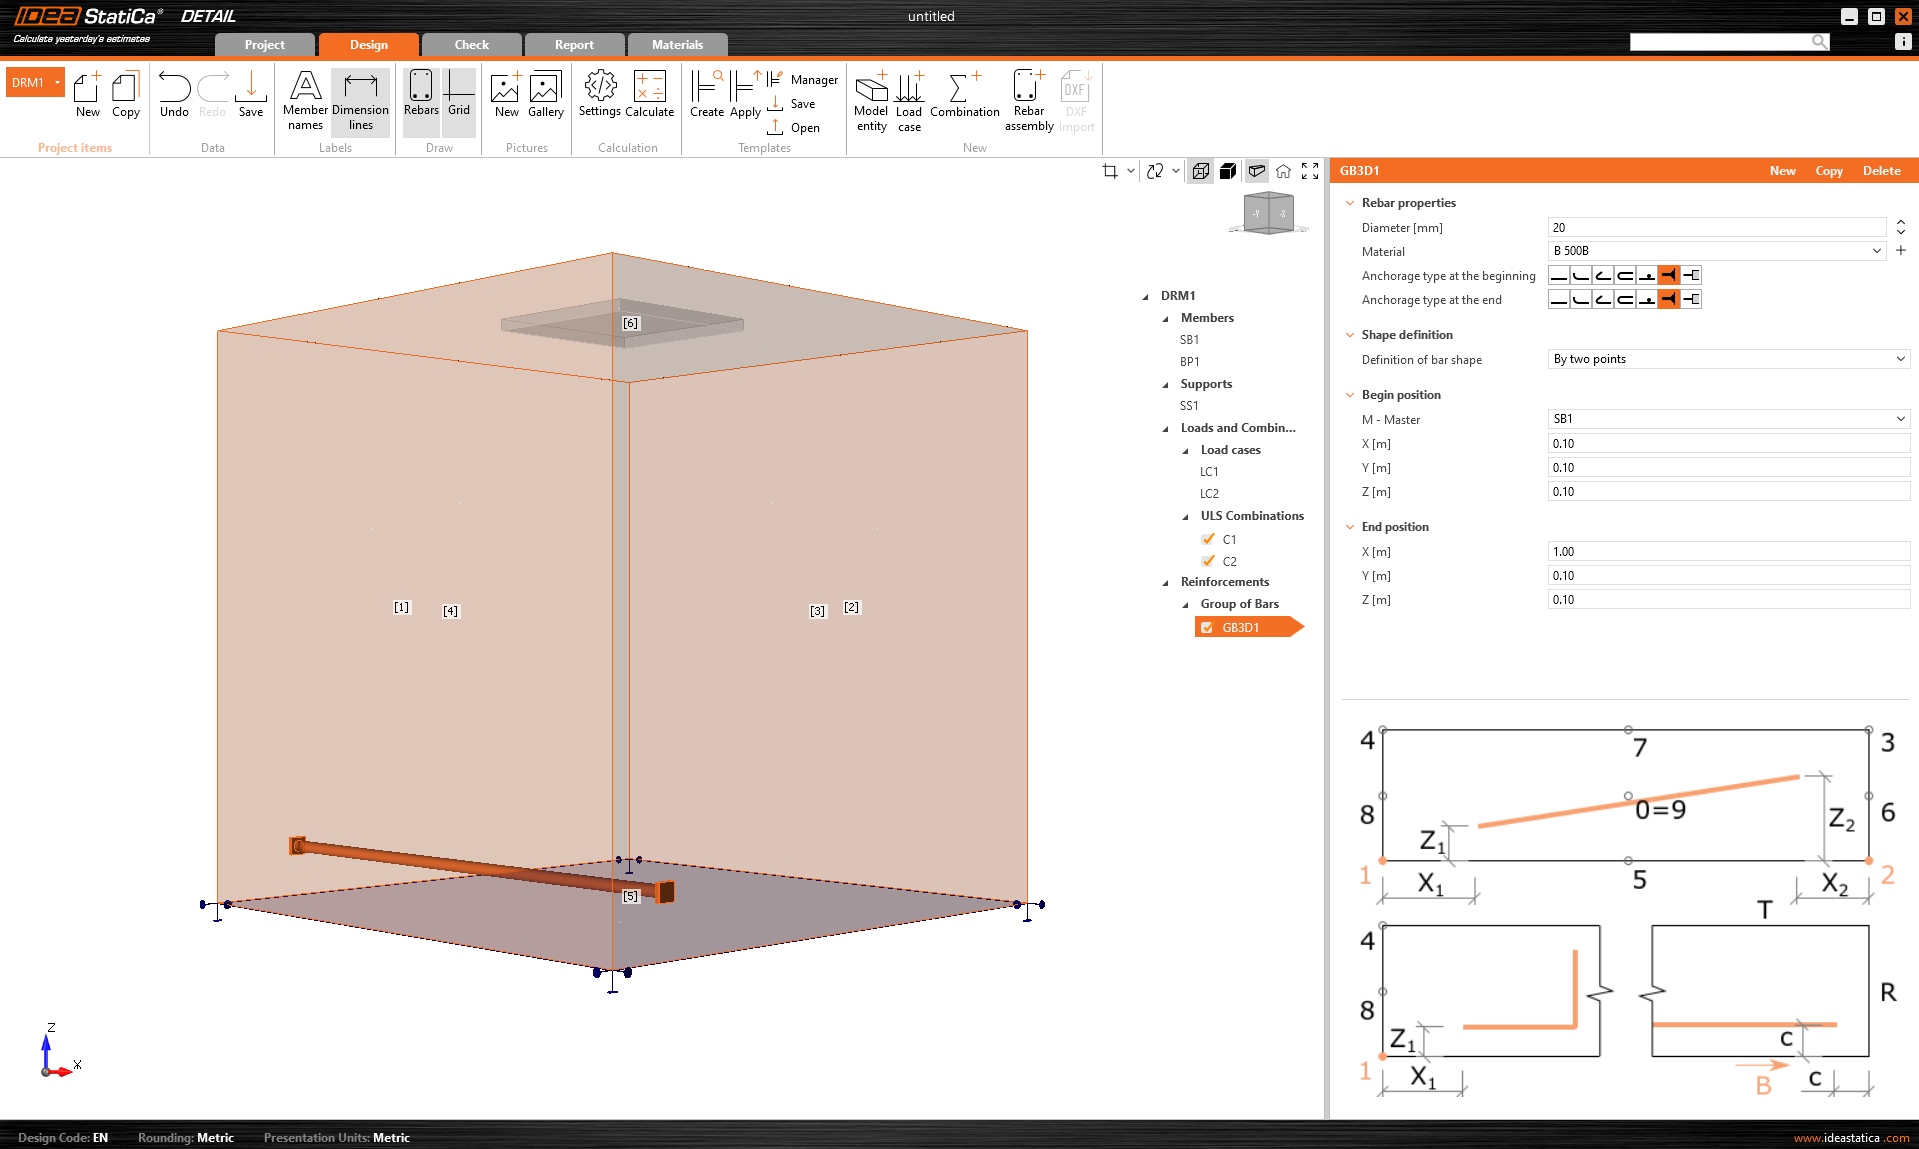
The model can be reinforced with Group of bars 3D. This reinforcement type contains many options, which we will go through in the following text. Thus, 4 types of Definitions of bar shape can be specified:
- By two points
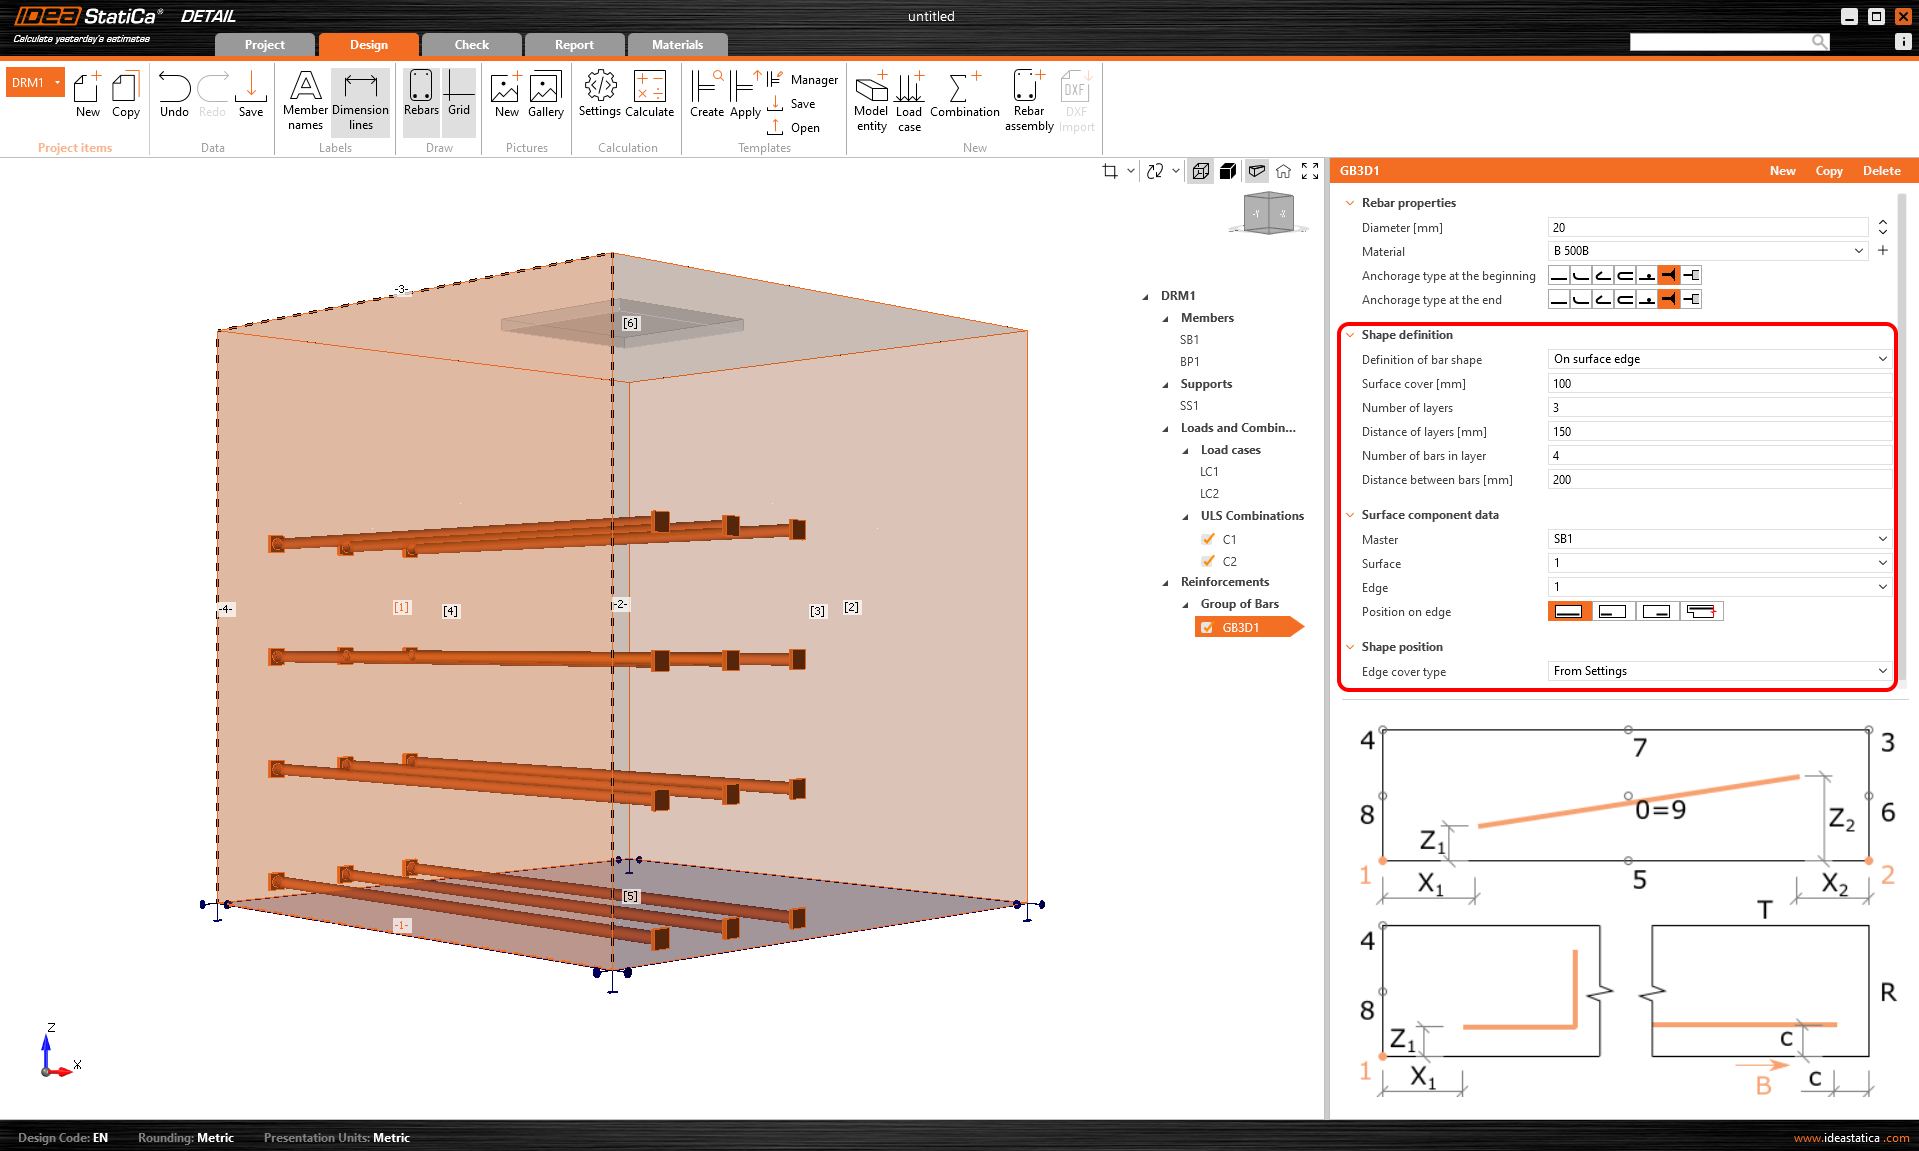
- On surface edge
- On surface edge on more edges
- On polyline
For each of these elements you can of course specify the diameter and material including the Anchorage type at the beginning and at the end of the bars.
Shape definition of the bar By two points is self-explanatory. You need to input two sets of cartesian coordinates X, Y, Z.
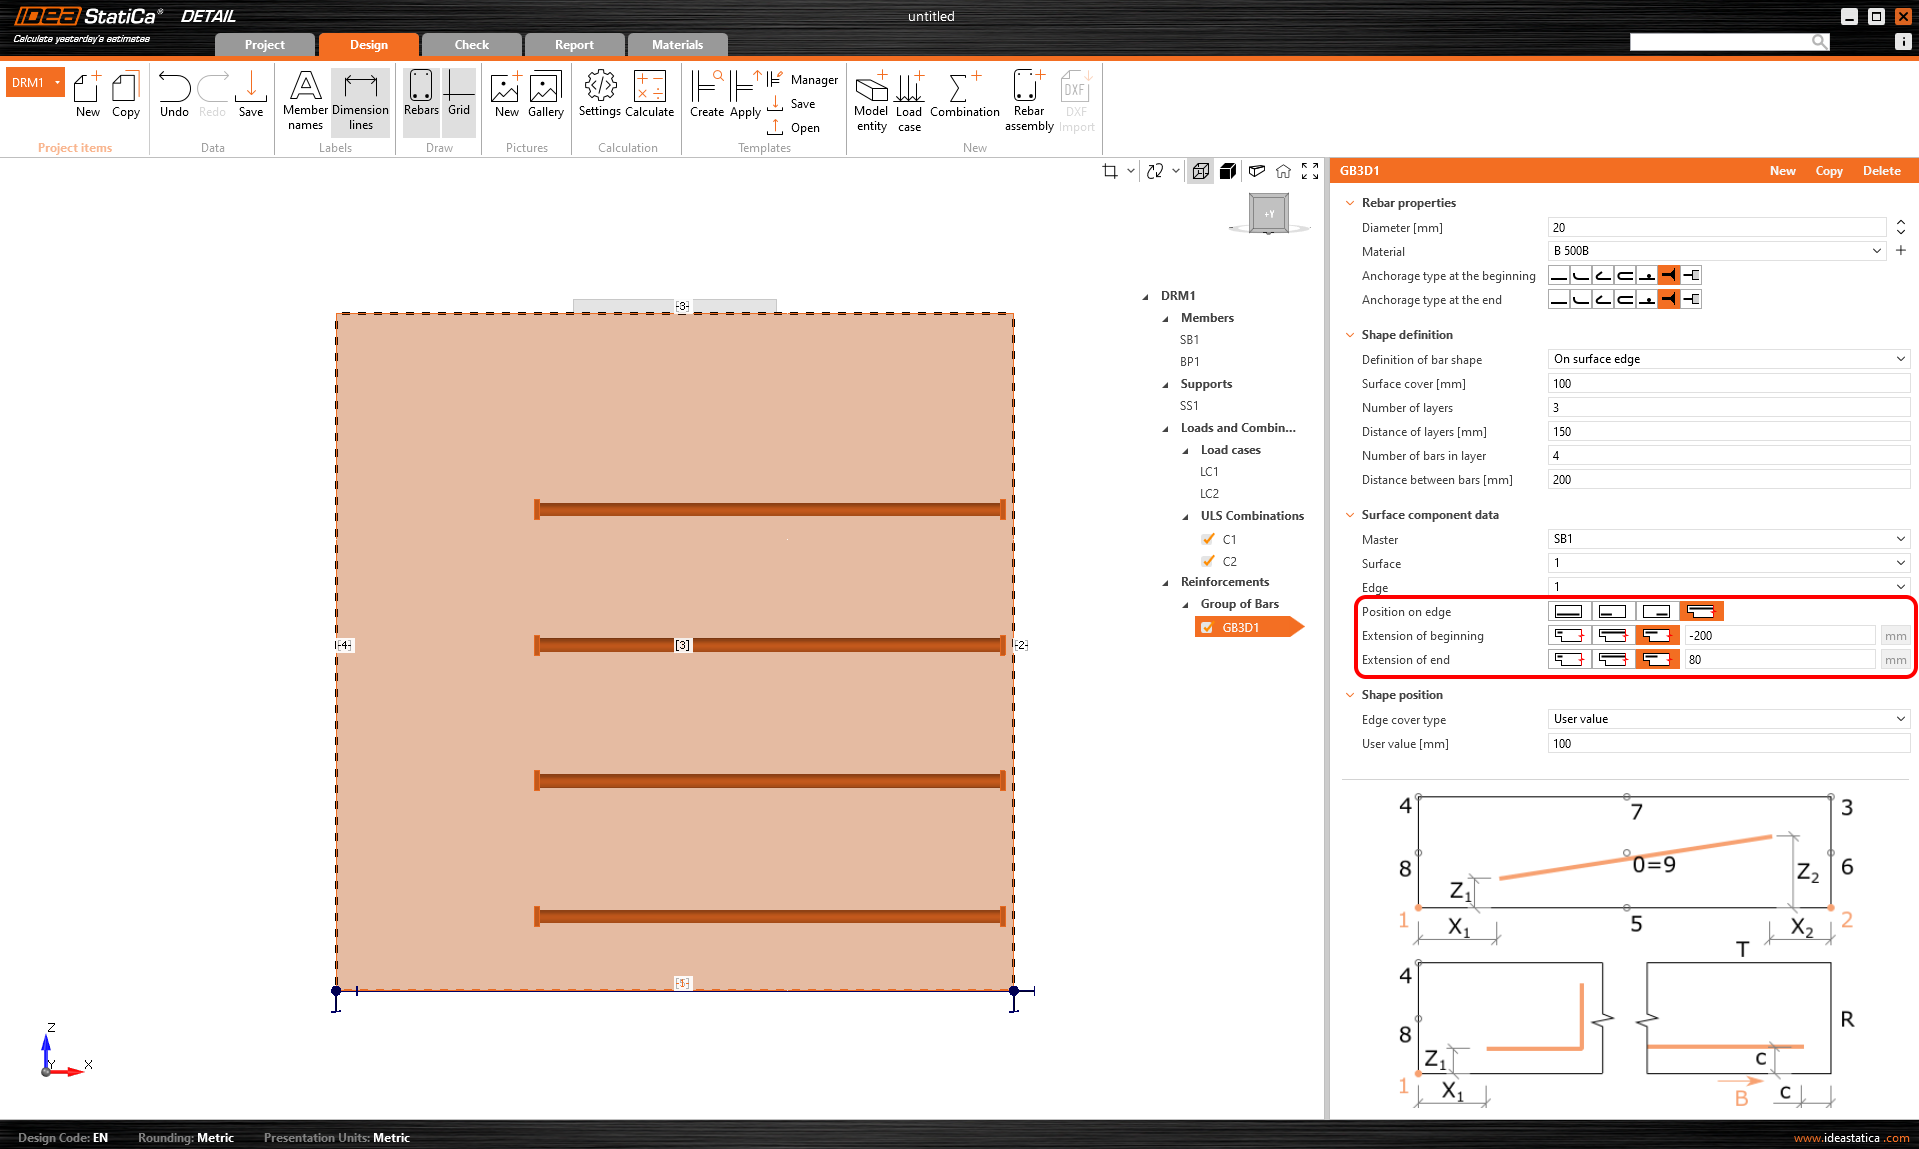
Definition On surface edge offers a lot of controls to position rebars to the required location. You can input reinforcement bars in more layers with more rebars in one layer with specified distances between bars in and between layers. Of course, it is also necessary to specify the reference surface and edge. Next, you must specify Surface cover, which defines the distance from the reference surface (from surface [1] in the figure below) and Edge cover, which defines the distance of the inserts from the side surfaces (from surfaces [4], [5], and [2] in the figure below), can be specified as From settings or User input. The default cover value (From settings) for the active Project item can be found in the first item of the tree (by default called DRM1) item of the tree. This was defined at the beginning of this article. The edge cover can be set as a unique value for each Group of bars.
Lastly, Position on edge can be edited for this type of entry. For example, as shown in the figure below, it is possible to specify the reinforcement so that the User-defined Edge cover is applied only to the bottom surface [5]. The side surfaces are controlled by the Extension of the beginning and end.
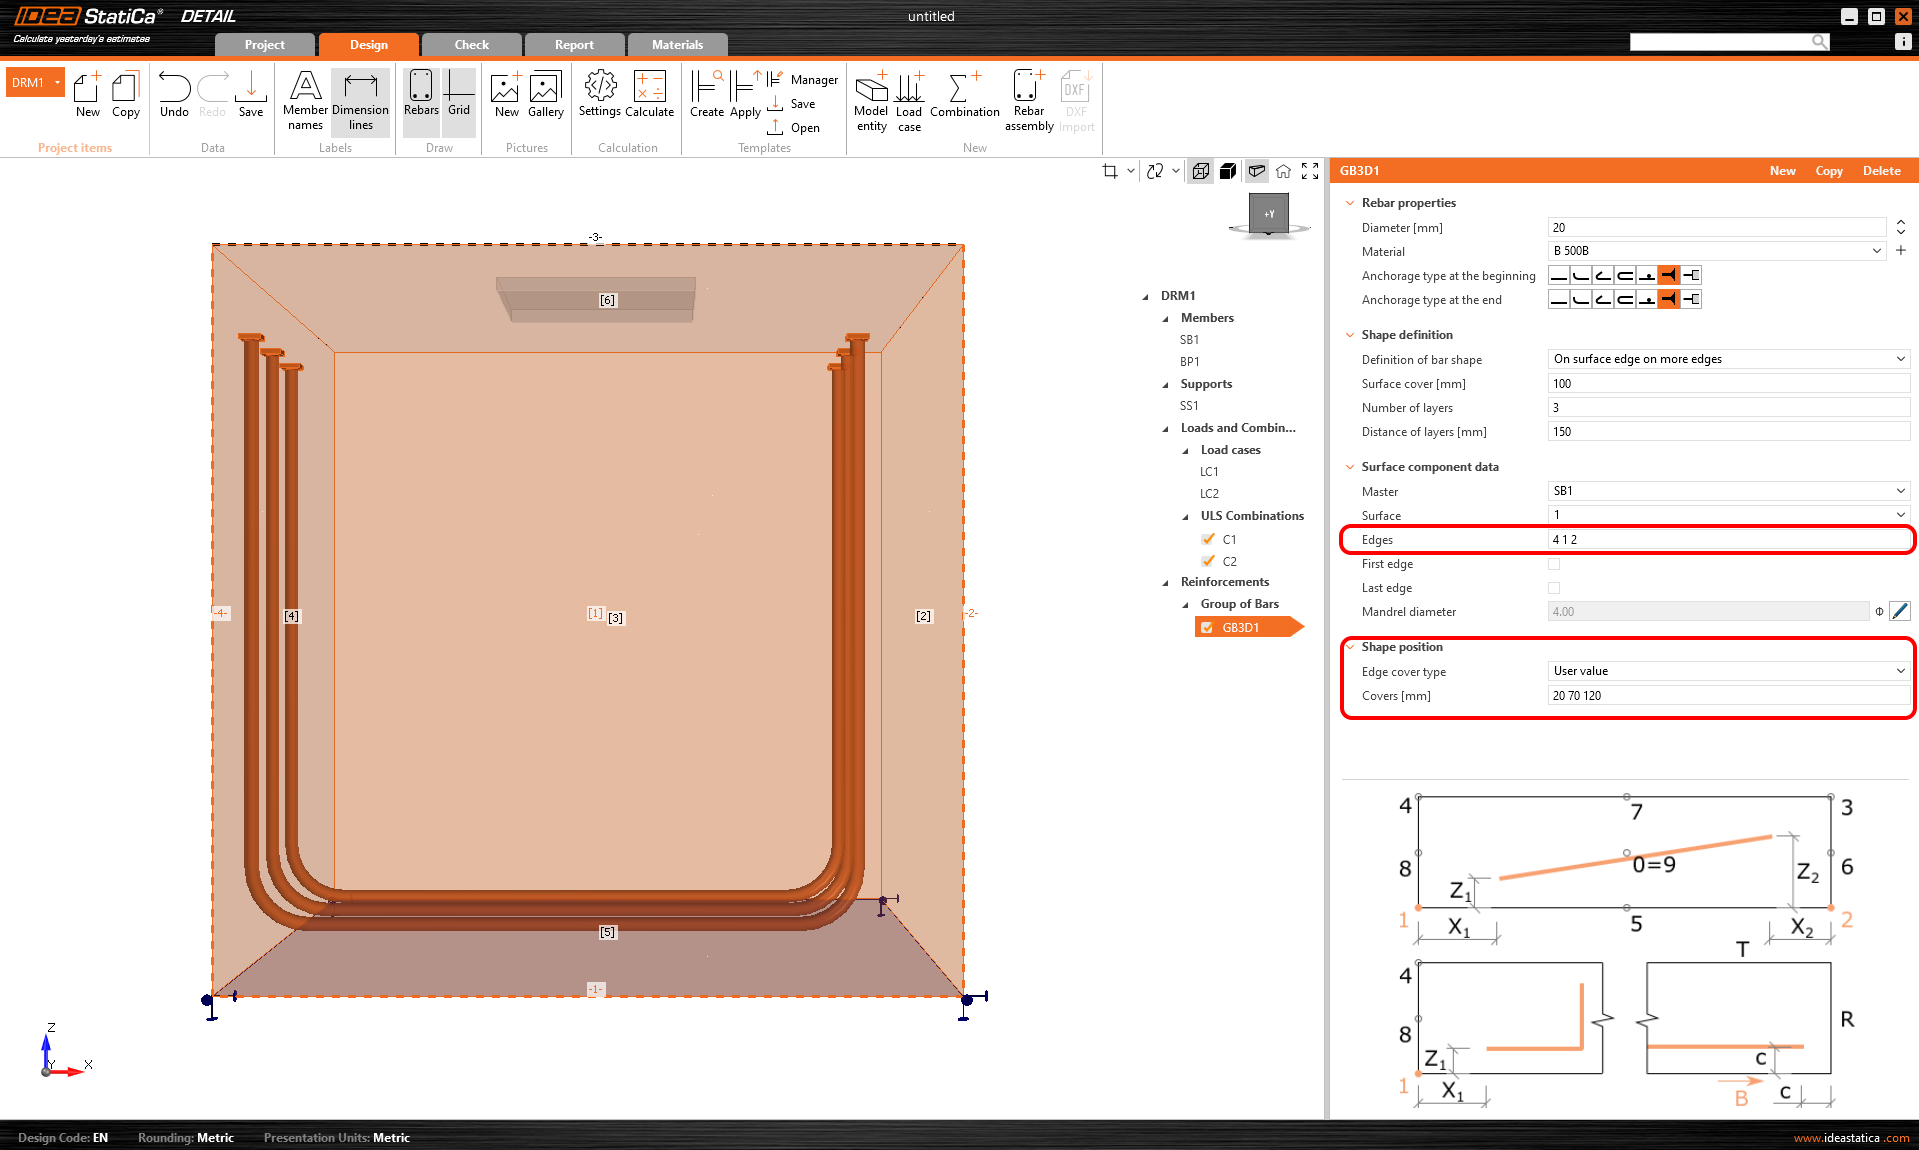
Another type of definition is On surface endge on more edges. Here it is possible to specify a list of edges or surfaces on which the reinforcement will be placed, together with a list of cover layers for each surface as shown in the following figure.
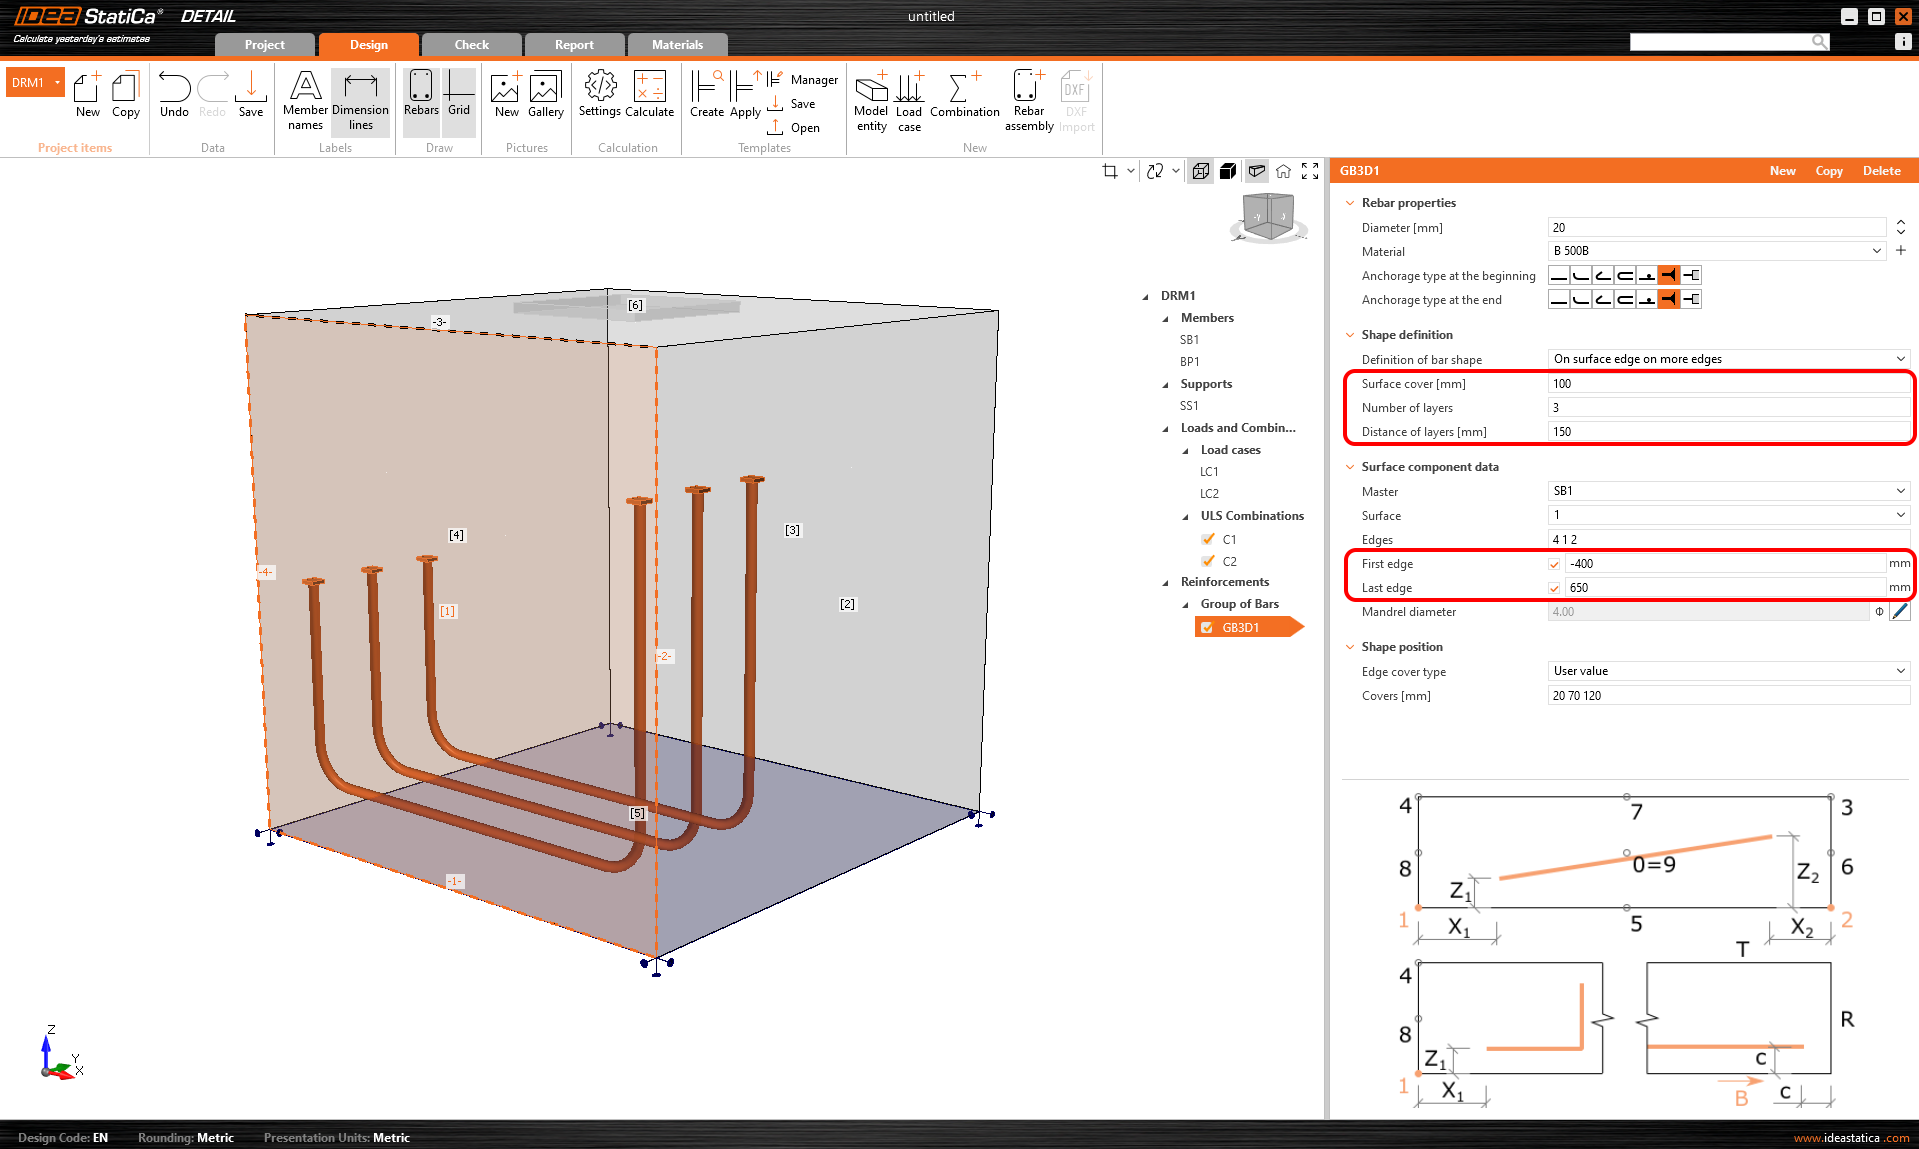
The cover can also be specified using the From settings option, as with the previous one. Again, it is possible to offset the reinforcement from the reference surface using the Surface cover and specify the Number and Distance of layers. It is also possible to lengthen or shorten the ends from the First edge and Last edge.
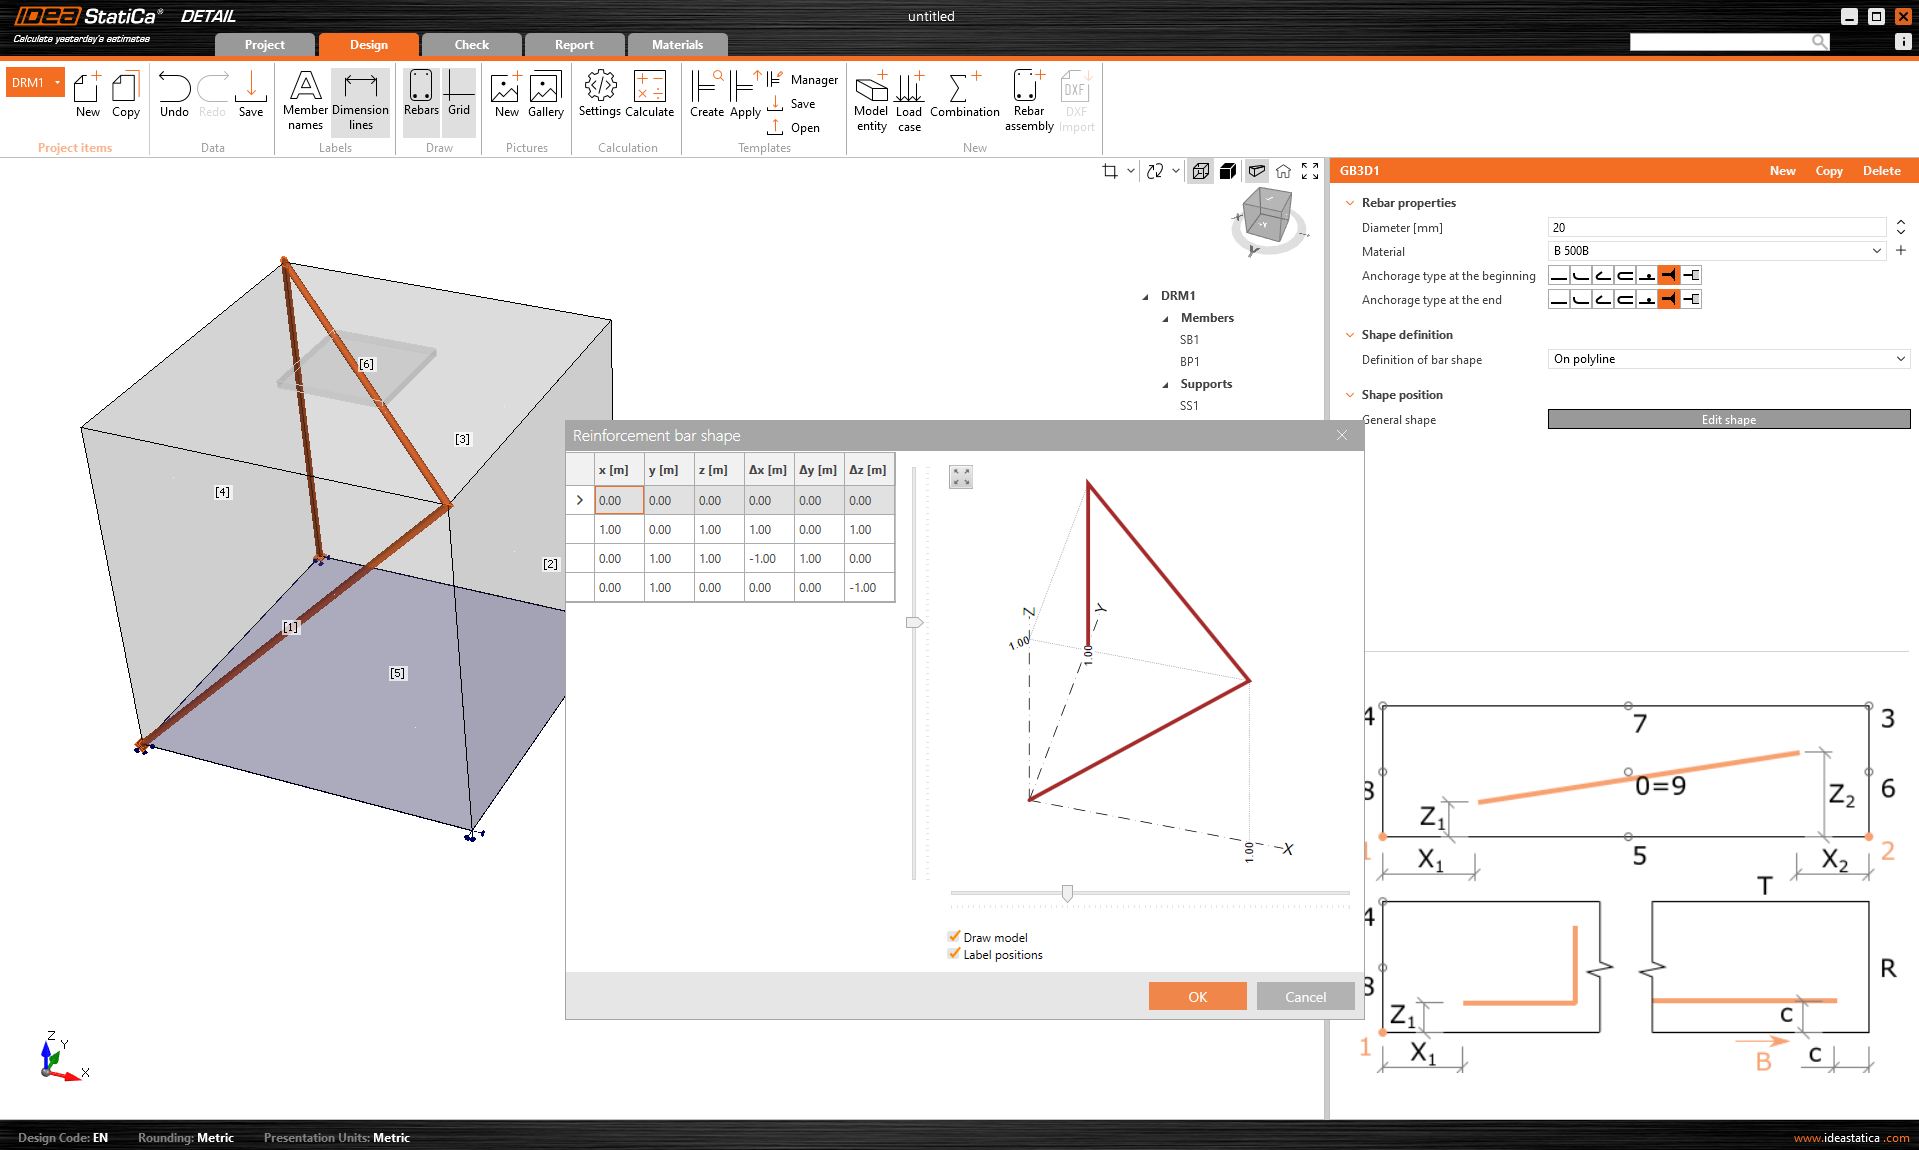
The last way of defining the reinforcement is On polyline. As in the model entities mentioned above, the reinforcement can be specified using a list of coordinates copied from a spreadsheet program. In this case, a 3D scene with the reinforcement displayed is additionally available for better orientation, allowing rotations around two axes.
Import from the Connection application
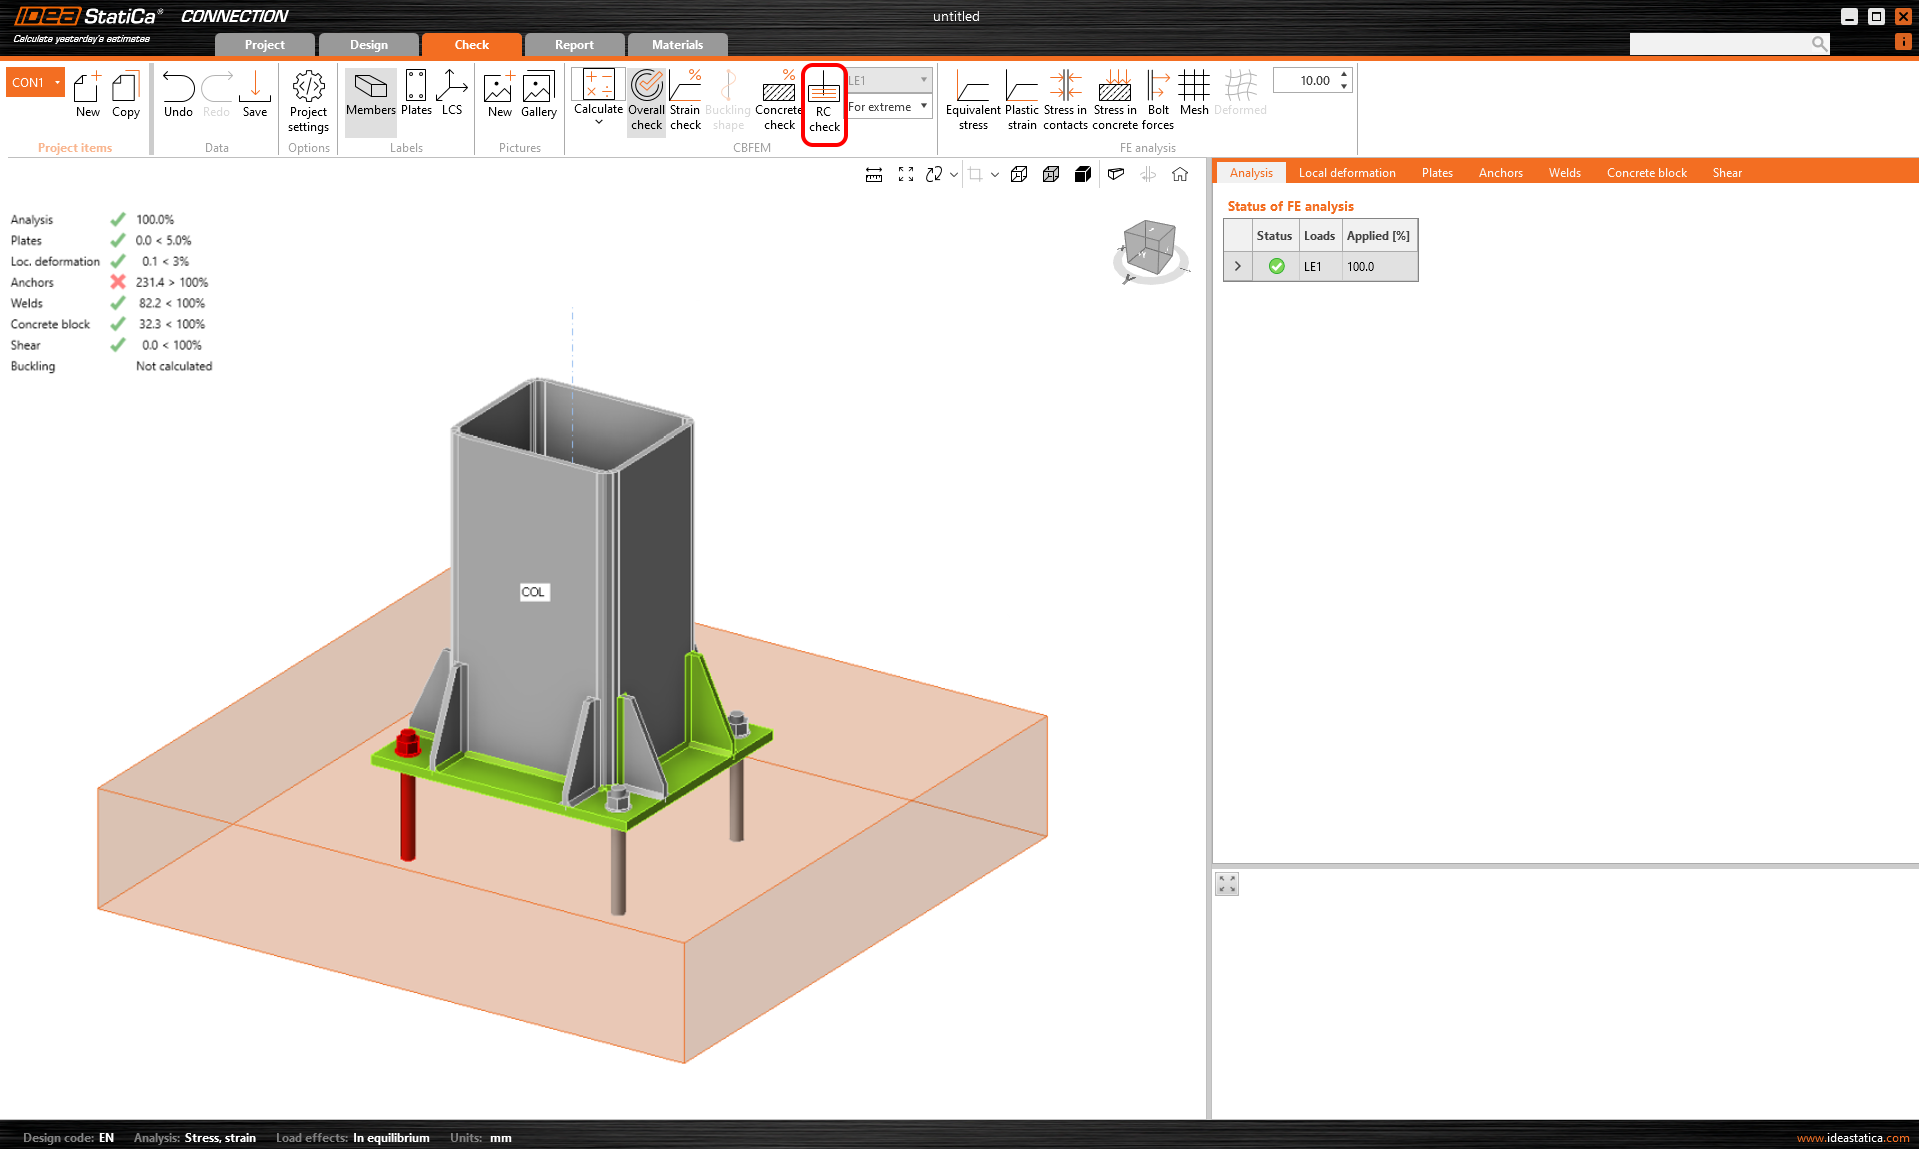
For cases of anchoring into a concrete block, the model can be imported from the Connection application. After calculating the model, you may find, for example, that the anchors or concrete block are not satisfactory according to the calculations available in the Connection application for plain concrete. In this case, click on the RC Check button, which can be found in the top ribbon in the Check tab.
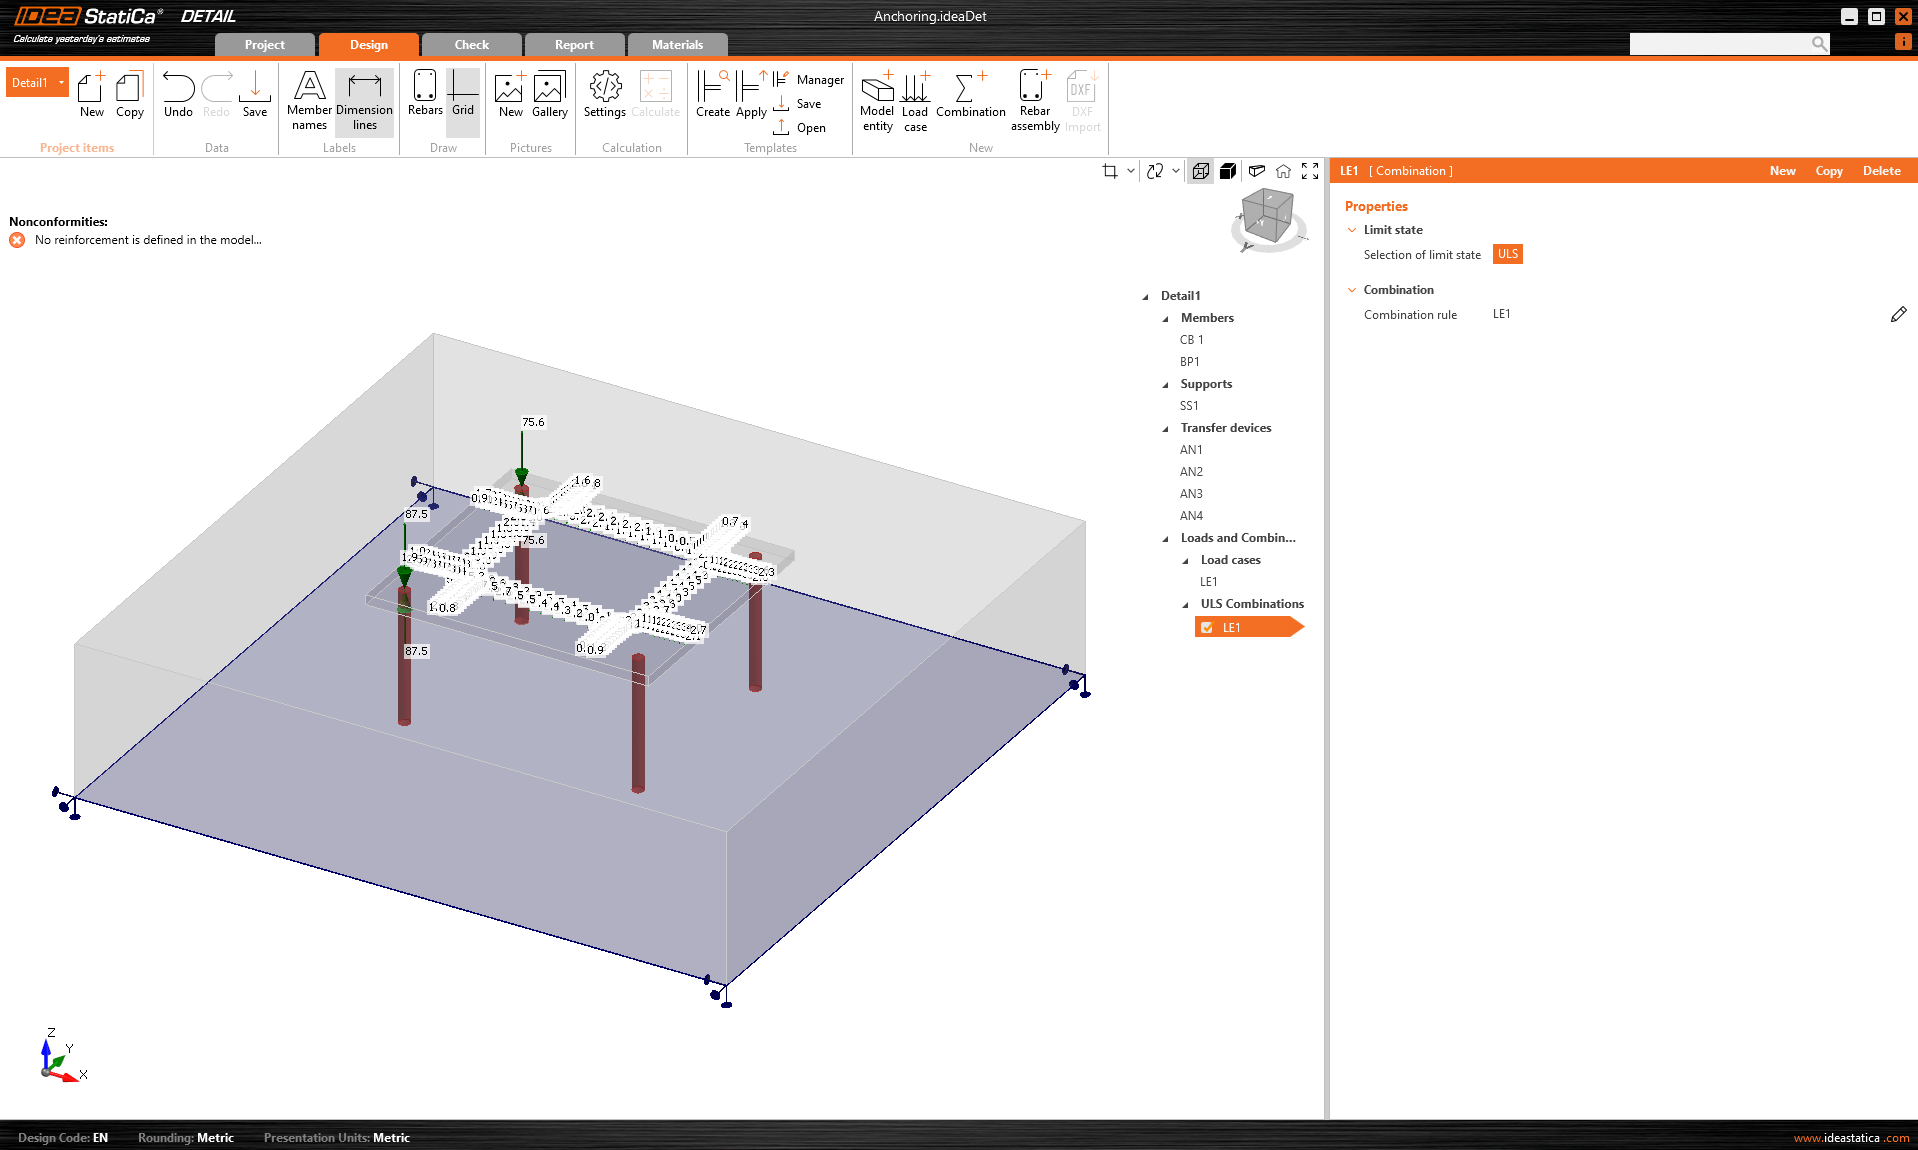
This will open the Detail application, where the concrete block will be imported, including the Base plate and Anchors. The biggest benefit, however, is that it imports the loads in the form of forces acting from the welds on the Base plate.
A thorough explanation of imported forces acting on the base plate or anchors, which are shown in the figure below can be found in the Theoretical background. There you will learn, for example, why two opposing forces are imported to the drawn anchors, how and when the anchors are connected to the base plate, or, for example, what results you can expect from the application and under what conditions.
Then just add the required reinforcement using the tools mentioned above and calculate the model. Don't forget to check the Design Bond strength. It is also a good idea to check that the specified load will not overturn the concrete block. Overturning can be prevented by self-weight or sufficient compressive normal force. If the resultant vertical force is positive (the block will be lifted off the support), the calculation will also fail. Since the concrete does not act in tension, the cover between the bottom reinforcement and the support will be peeled off.
Results
The display of the results is very similar to 2D Detail. However, there are some major differences, especially when it comes to results on concrete. In the following section, we will go through all the available results, focusing on the differences mentioned. In the check tab you can view a total of 4 types of results:
- Summary
- Strength
- Anchorage
- Auxiliary
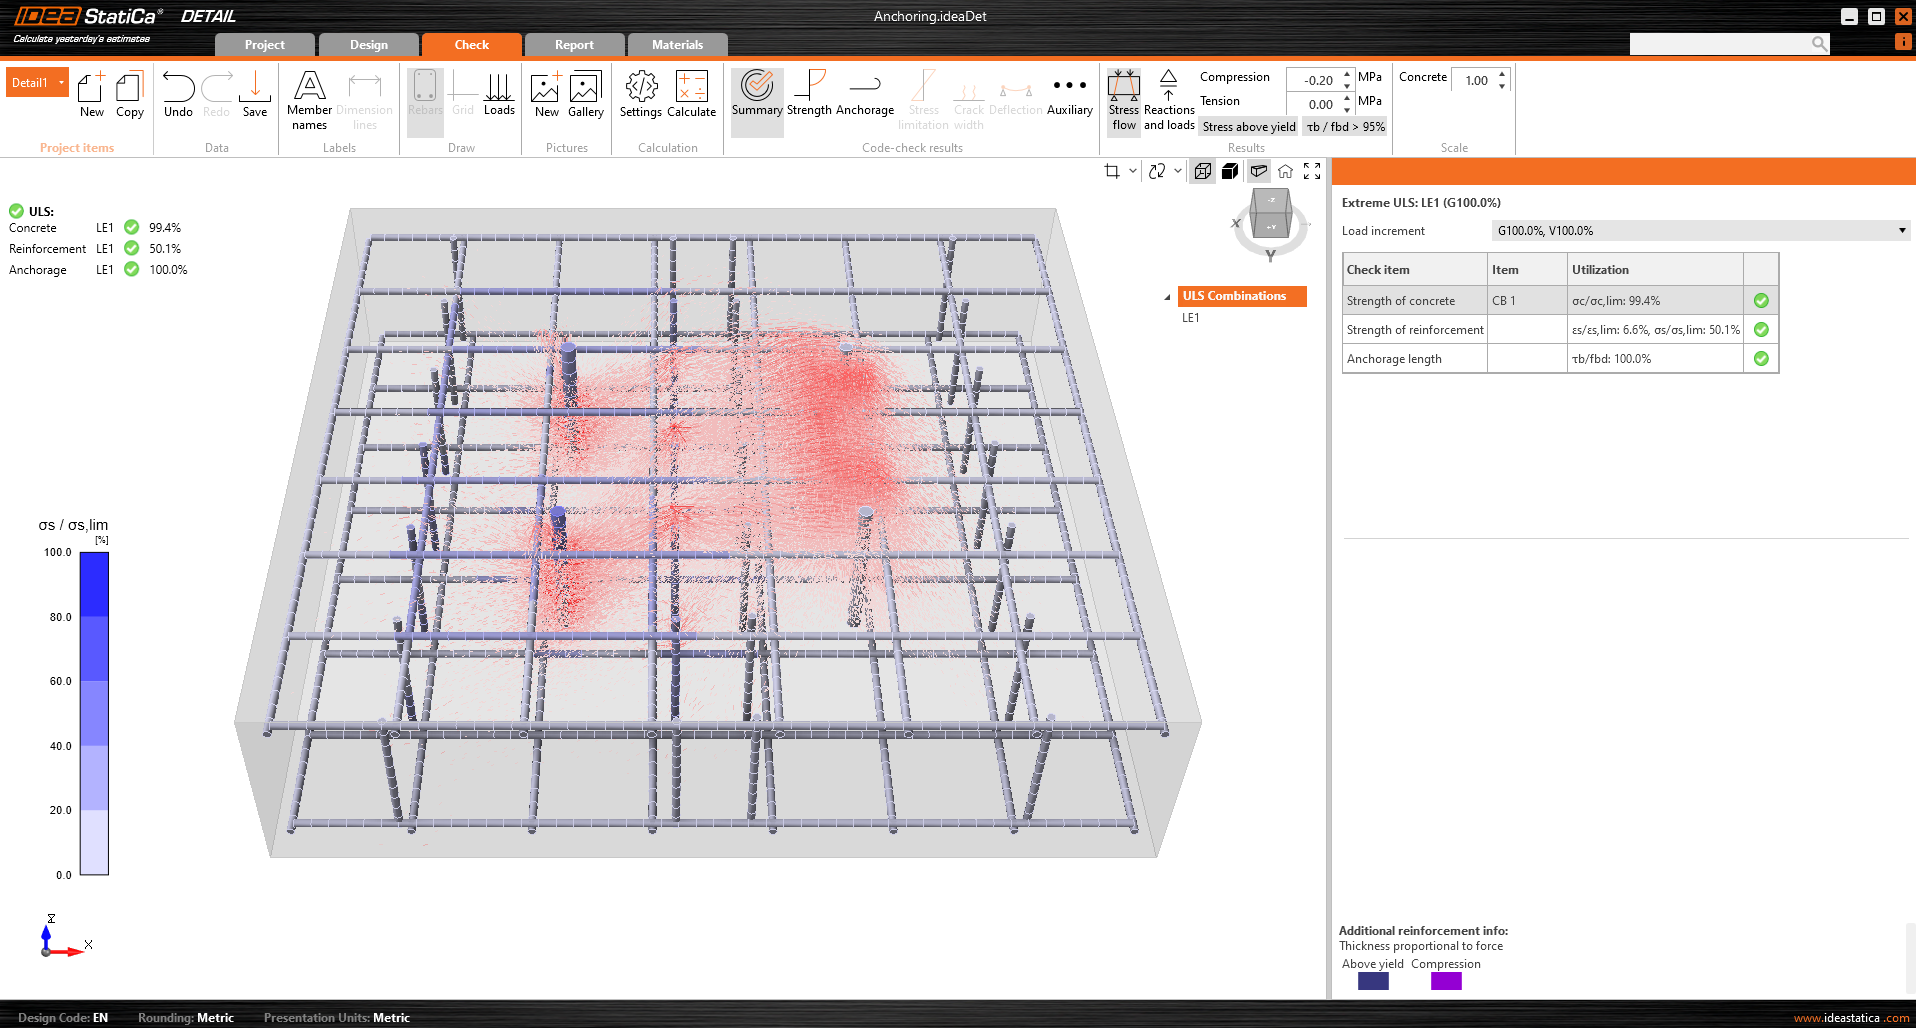
Stress flow in Summary results shows you the vectors of compression principal stresses in concrete and utilization of the reinforcement to give you a basic overview.
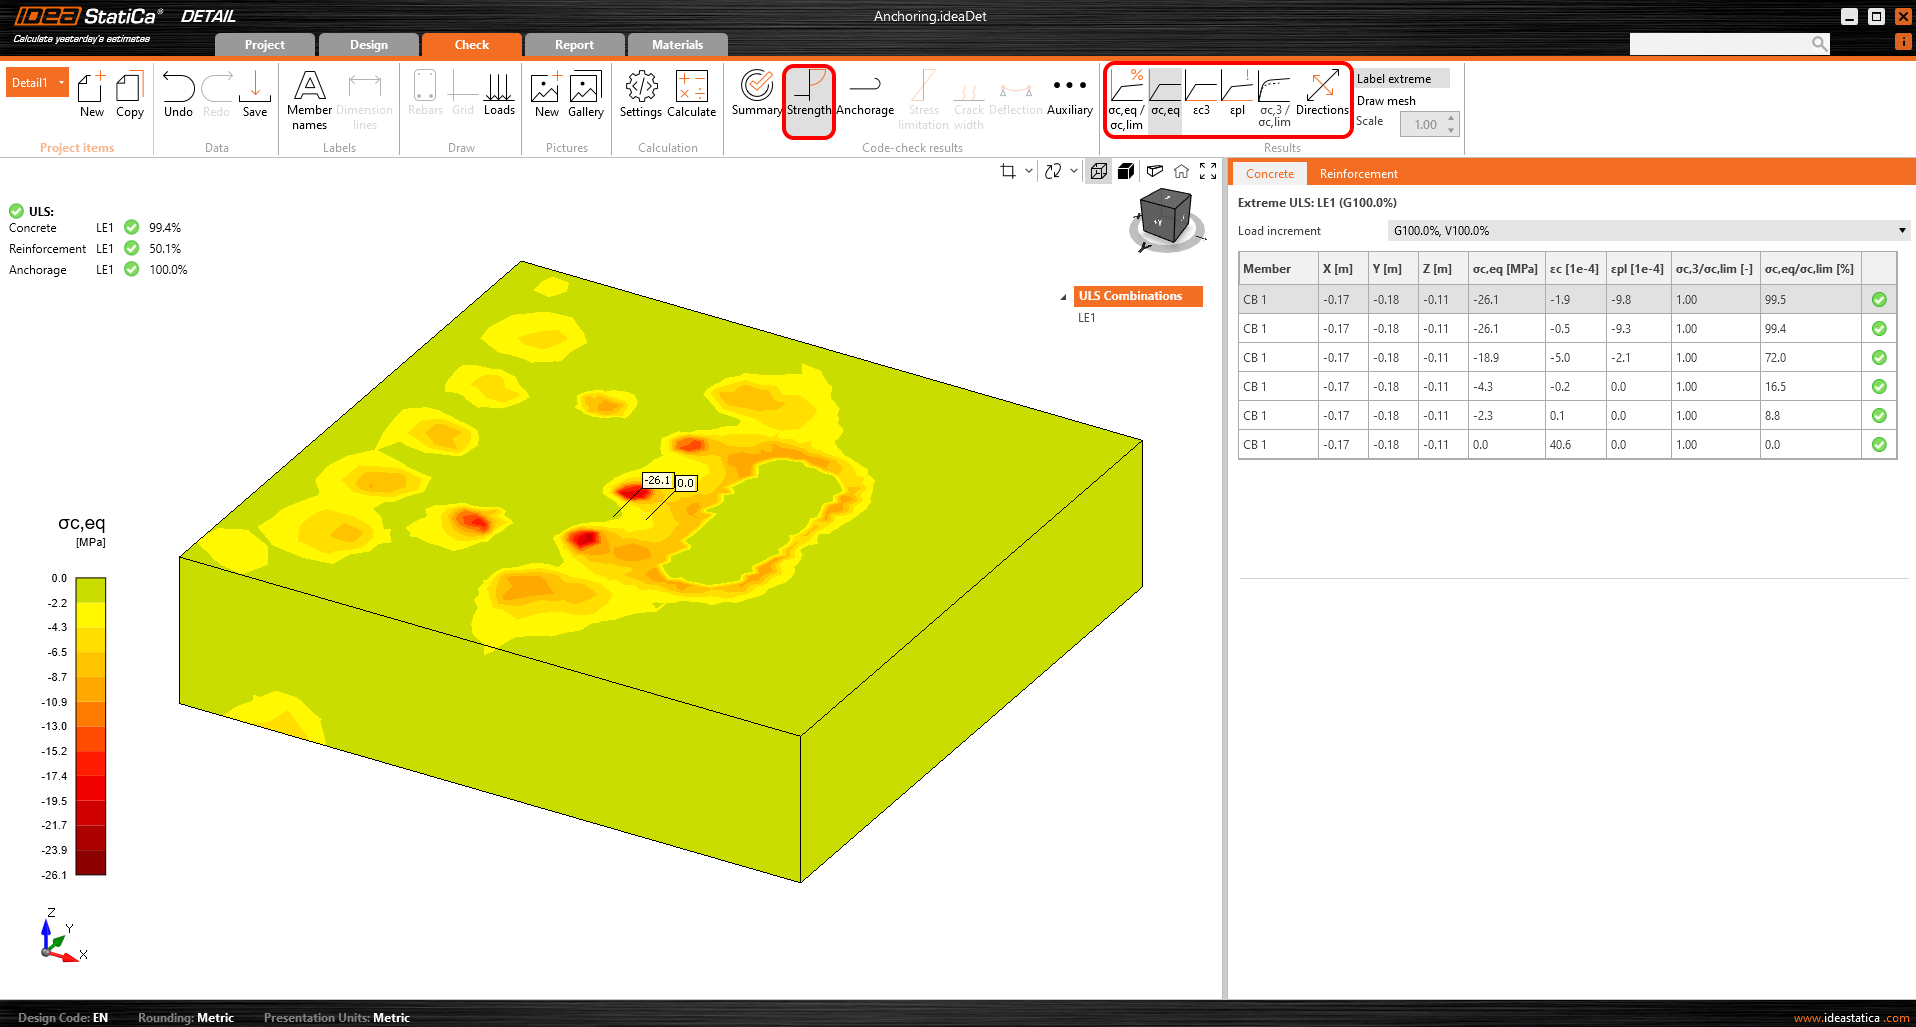
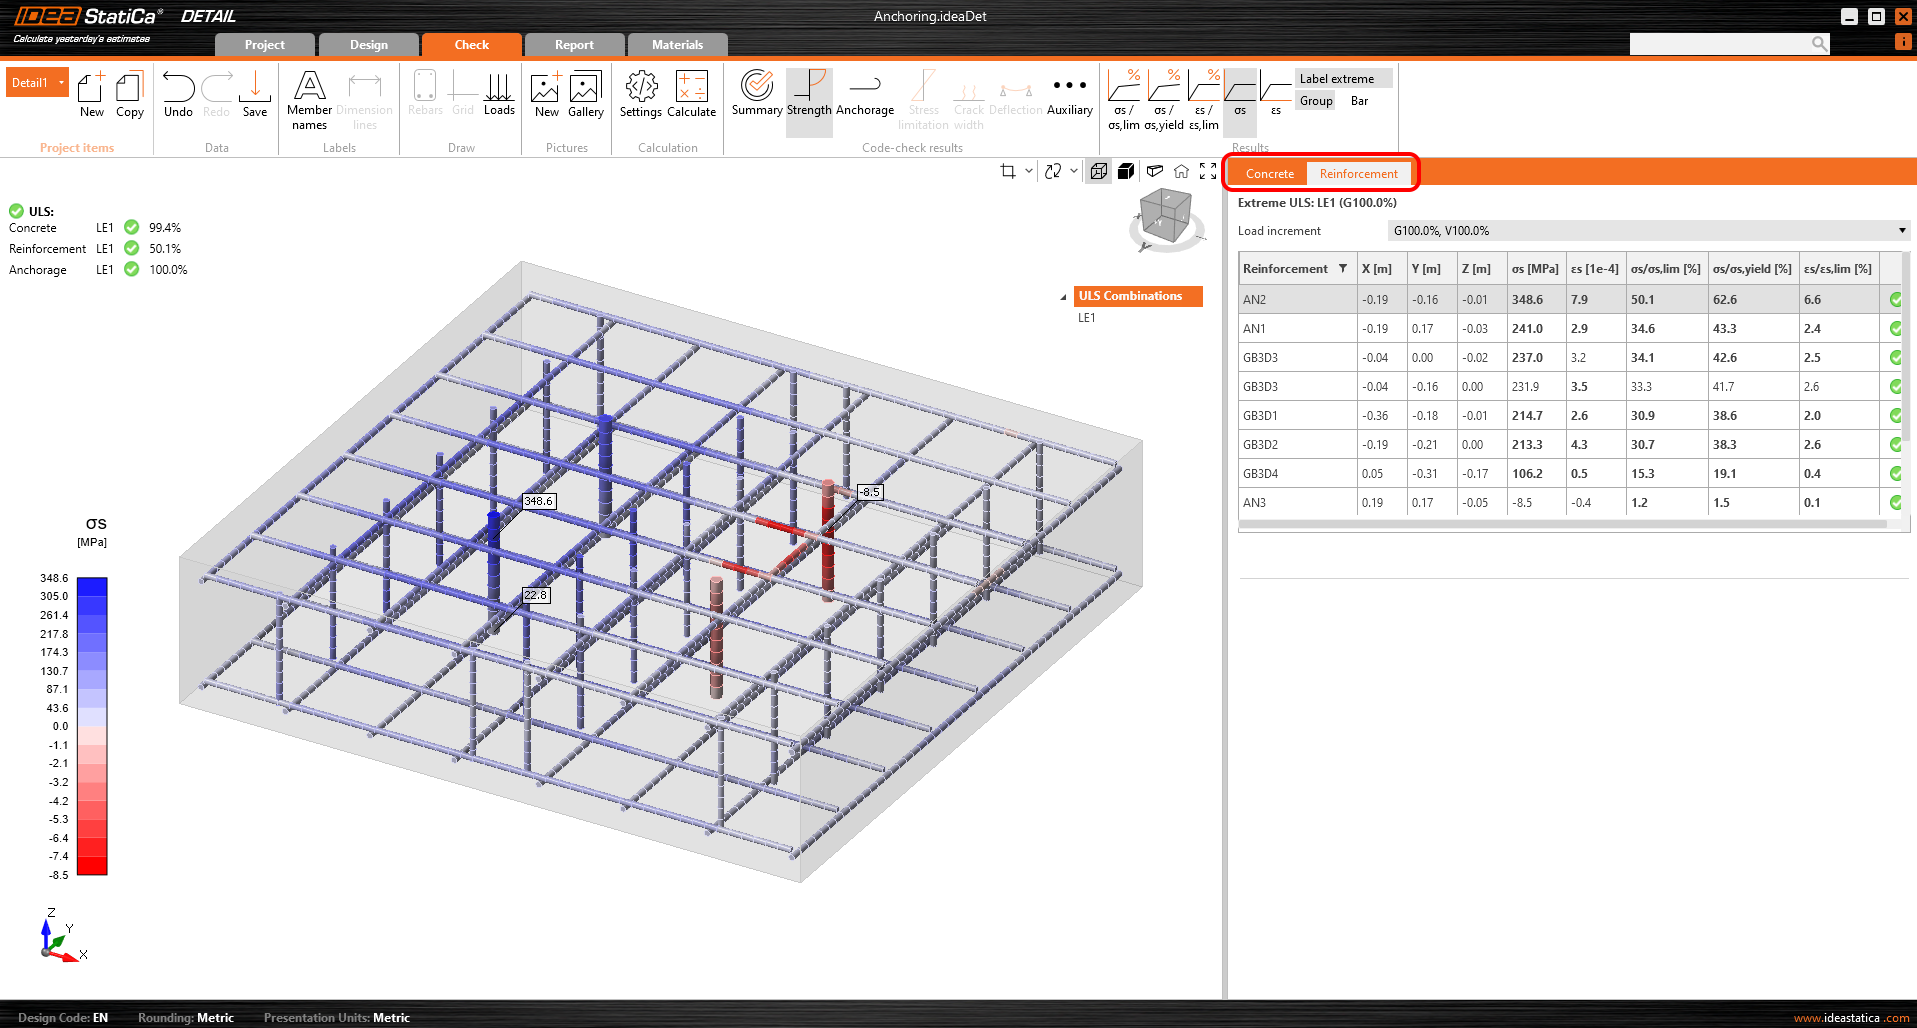
In the Strength check you can display the redistribution of stresses and strains for reinforcement and concrete. In the top ribbon in the Results toolbar, you can control what will be displayed. It is also possible to display, the ratios σc,eq/σlim, and ε/εlim as well as the plastic strain, the level of triaxiality σc3/σlim, and the direction of principal stress for concrete. All results in the Strength are related to the Ultimate Limit State.
Materials can be switched in properties.
You may notice that the Equivalent Principal stress σc,eq is zero just below the compressed base plate. Please read the Theoretical background where the σc,eq is defined. Or you can go through this verification article, where this phenomenon is explained and verified using a well-known tri-axial test.
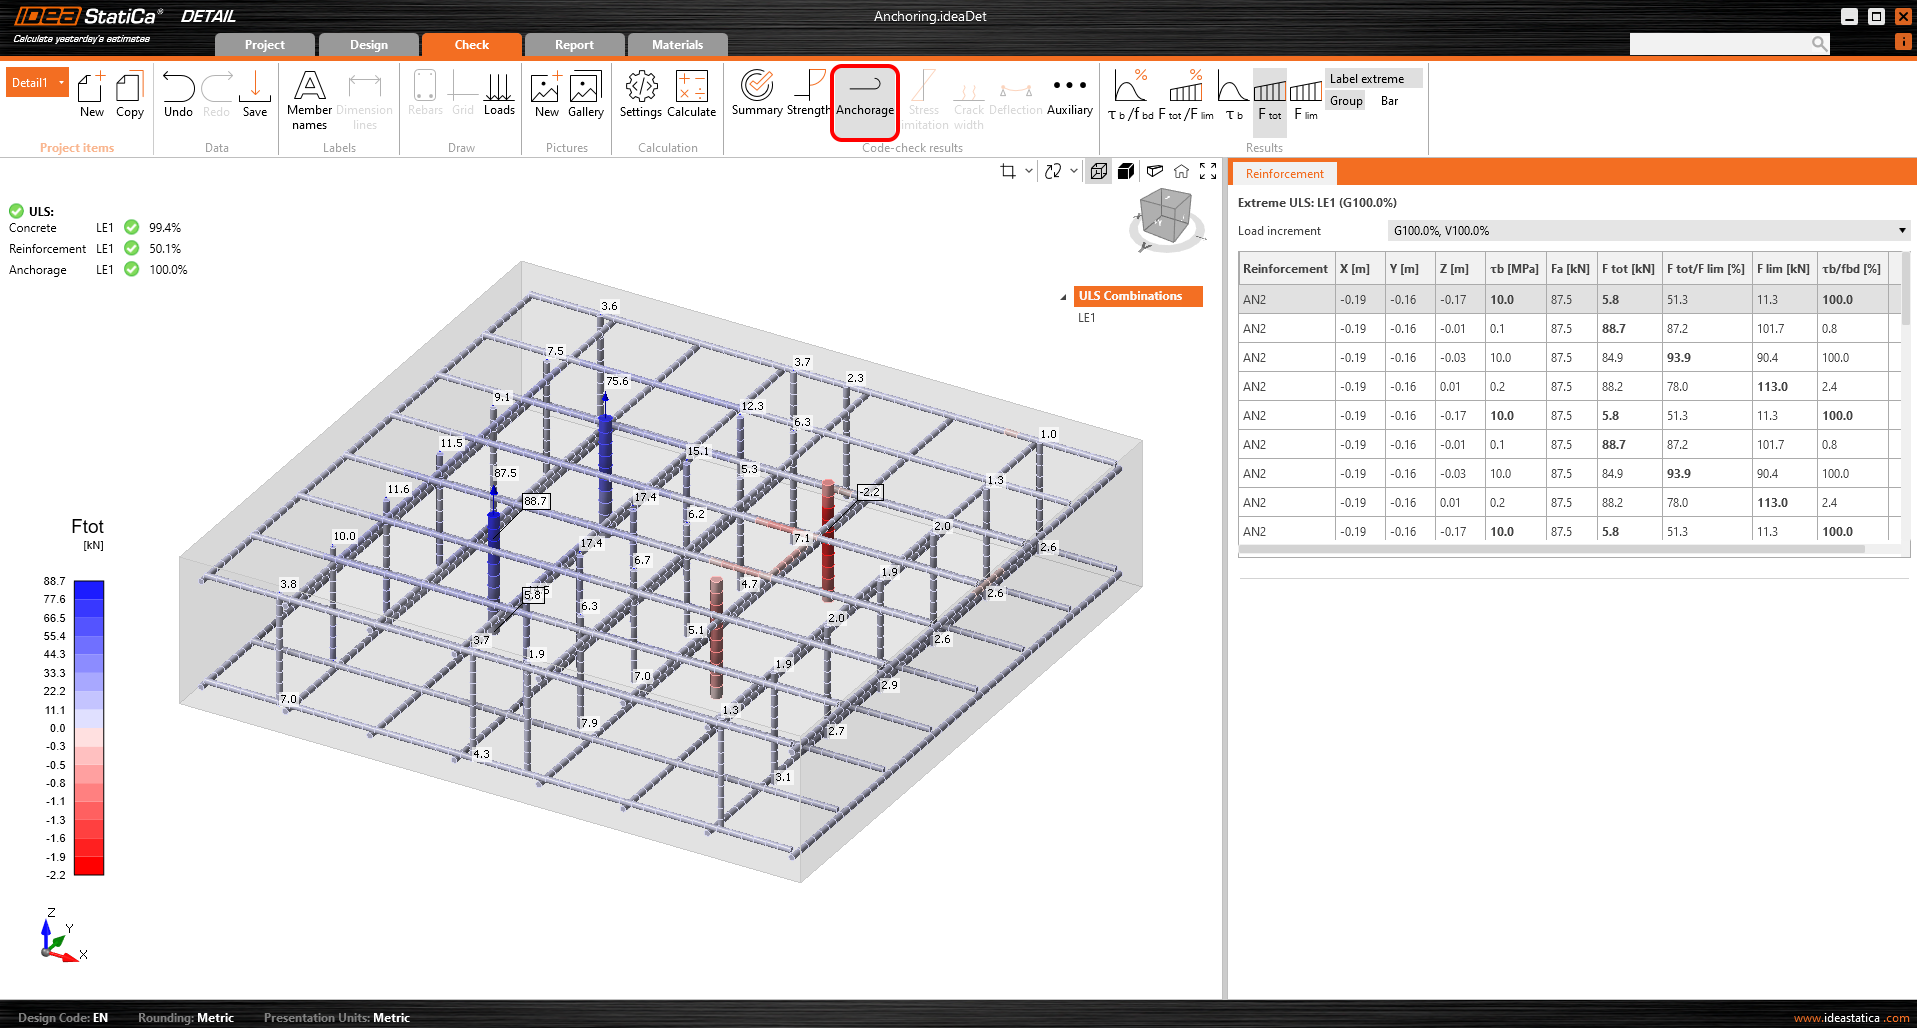
Anchorage check gives you information about bond stress and total force on the reinforcement and anchors.
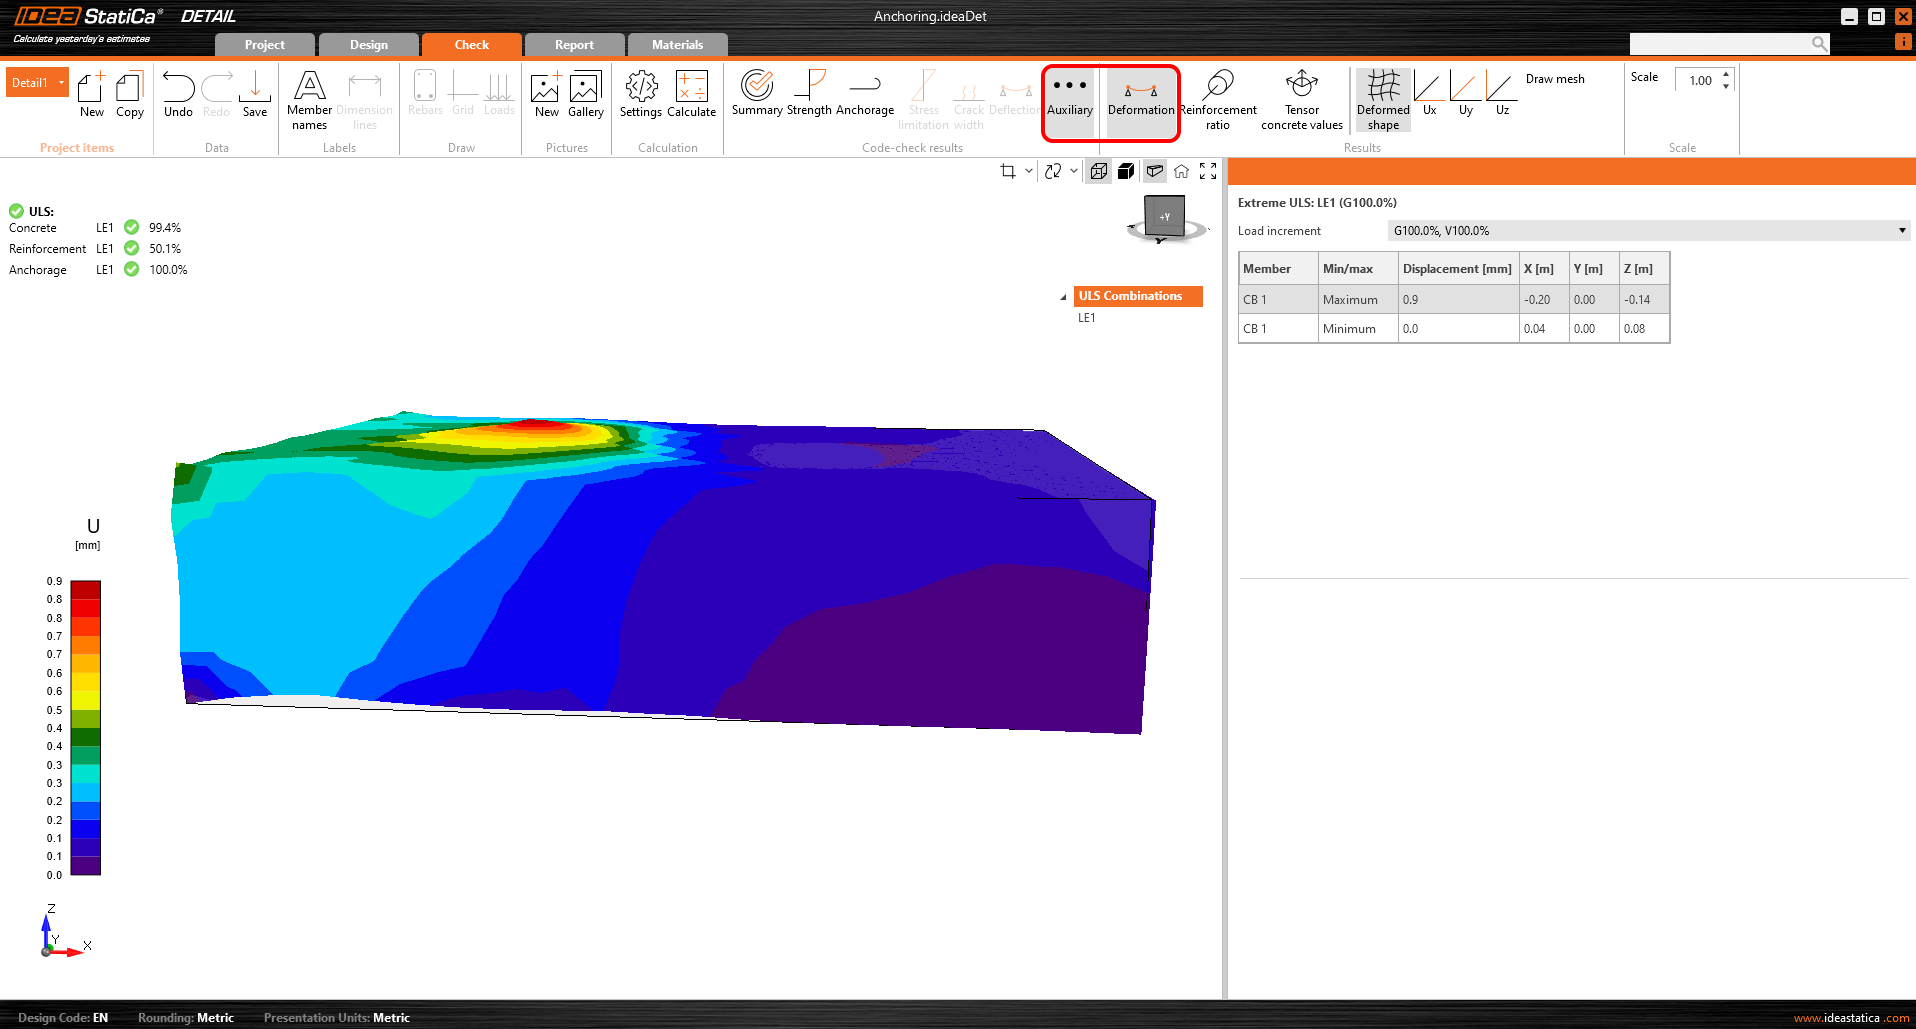
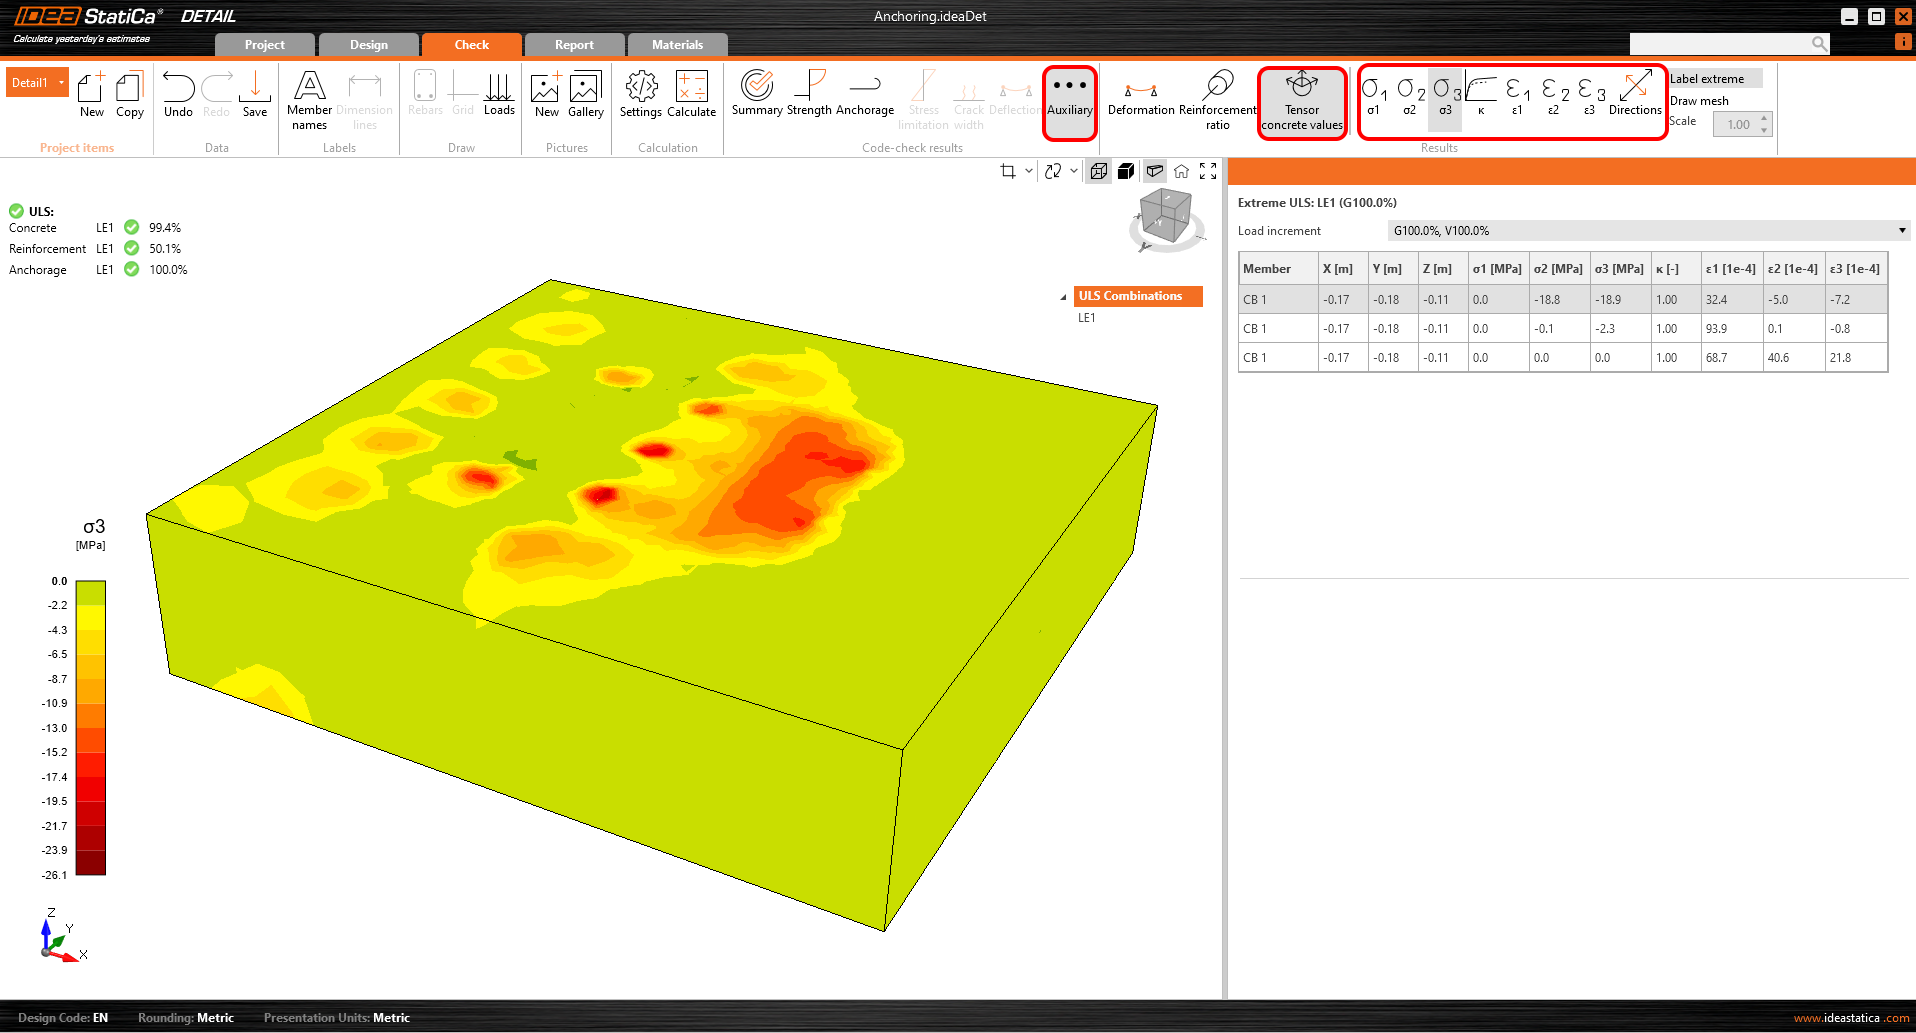
Last but not least, you can view the Auxiliary results in the application - Deformation, Reinforcement ratio, and Tensor concrete values. The first type, Deformation, can display scaled deformations of the ULS non-linear model.
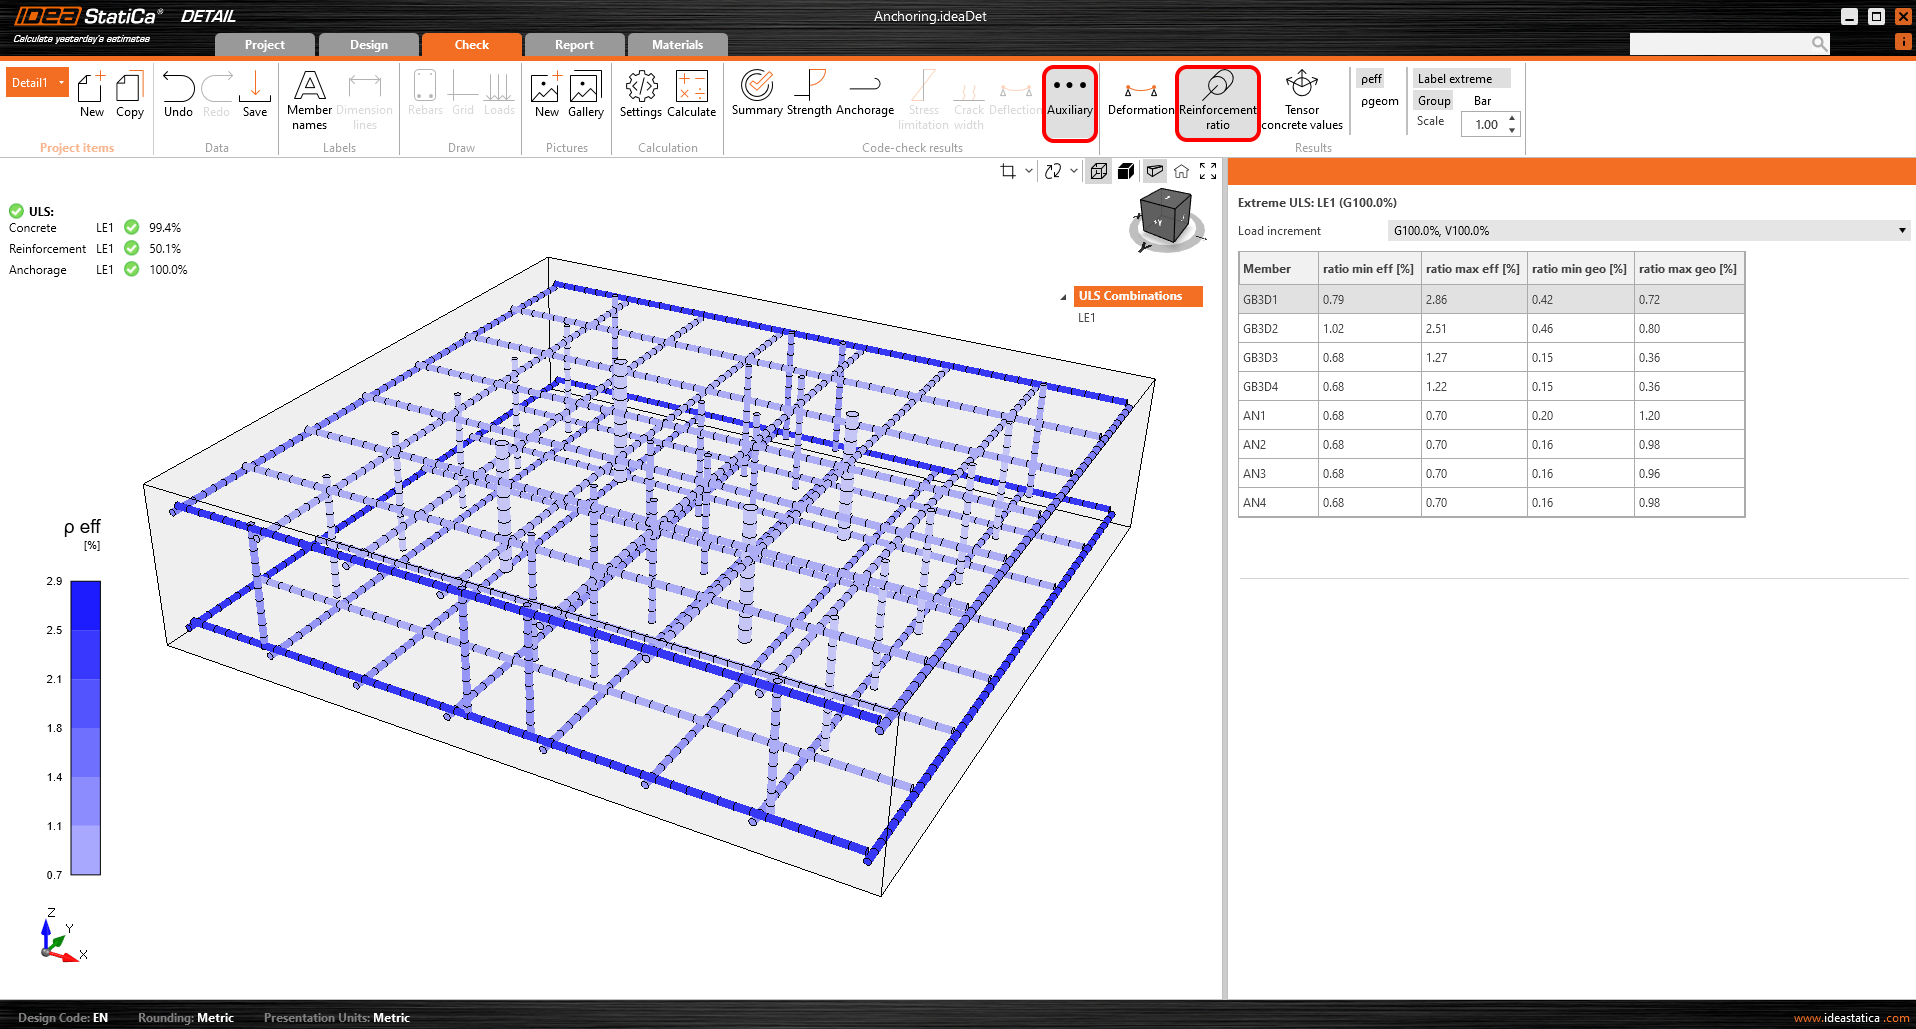
The Reinforcement ratio shows the values used to compute the Tension stiffening effect.
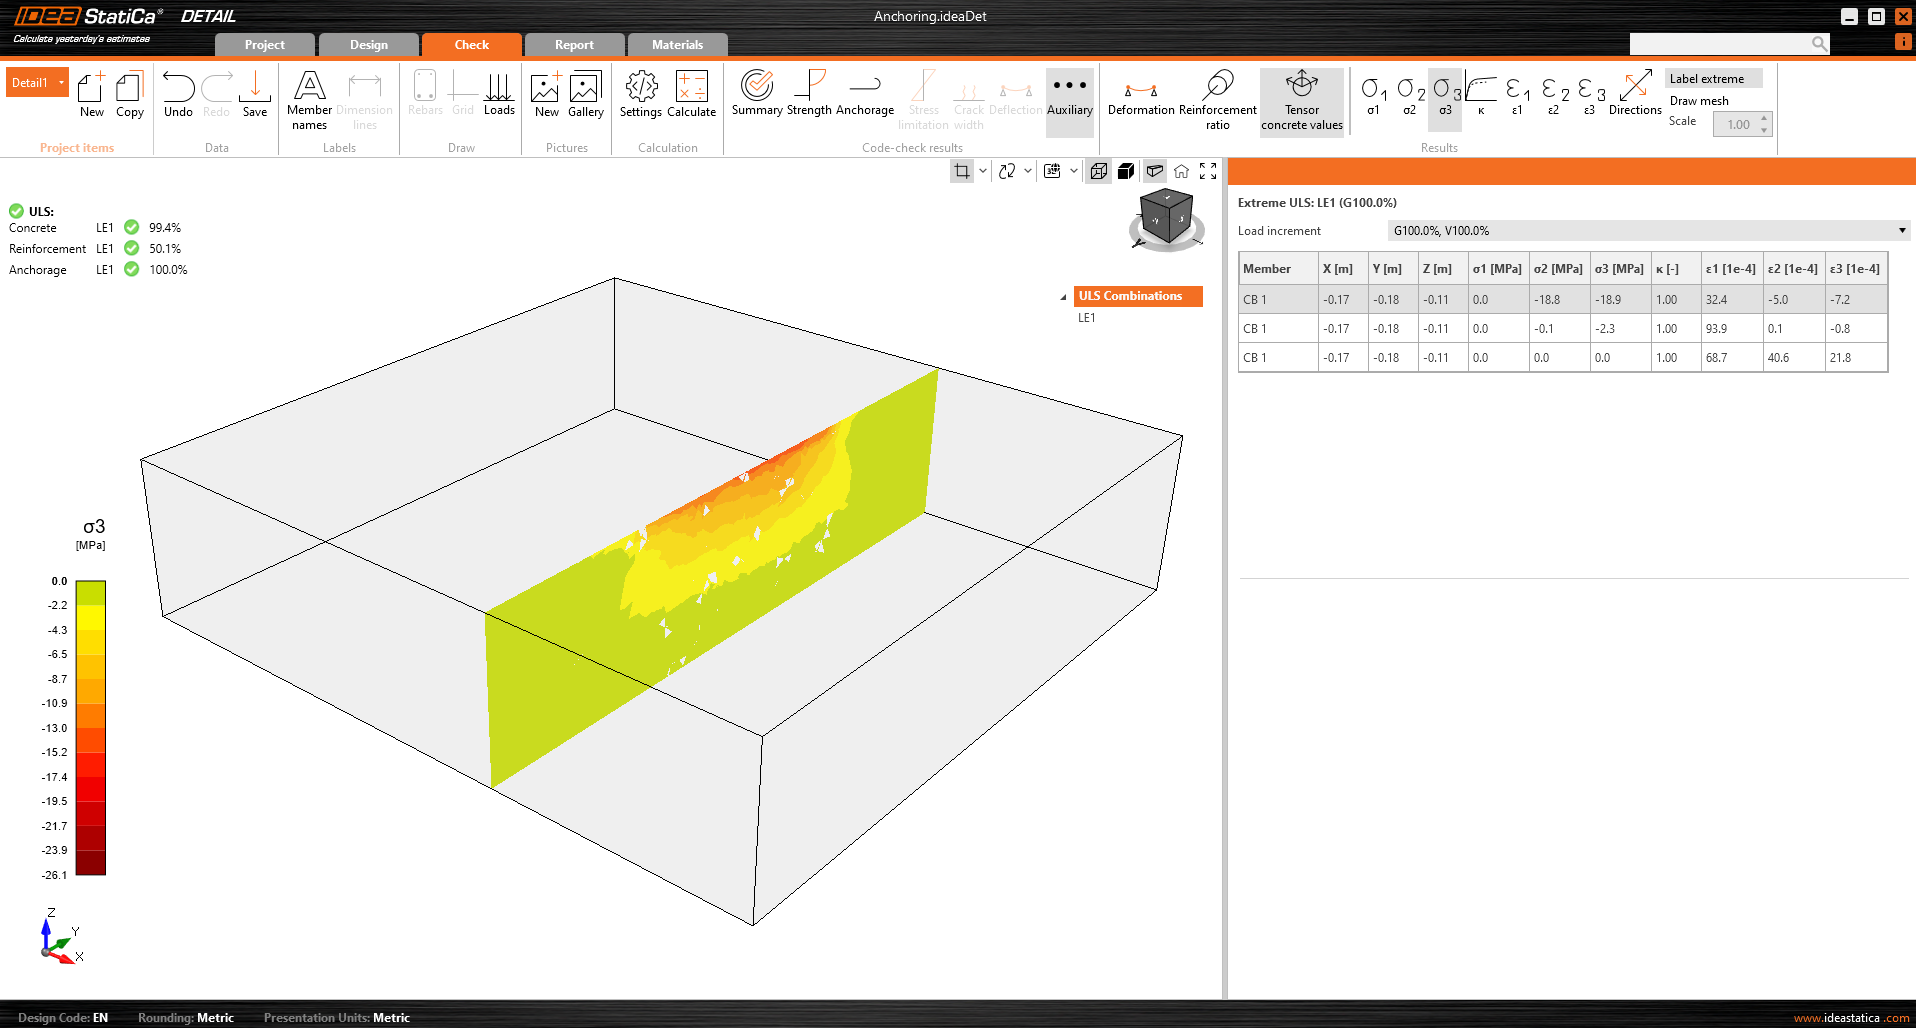
Tensor concrete values allow you to display the intensities of principal stresses in concrete and their direction.
The result sections can also be used.
Section results
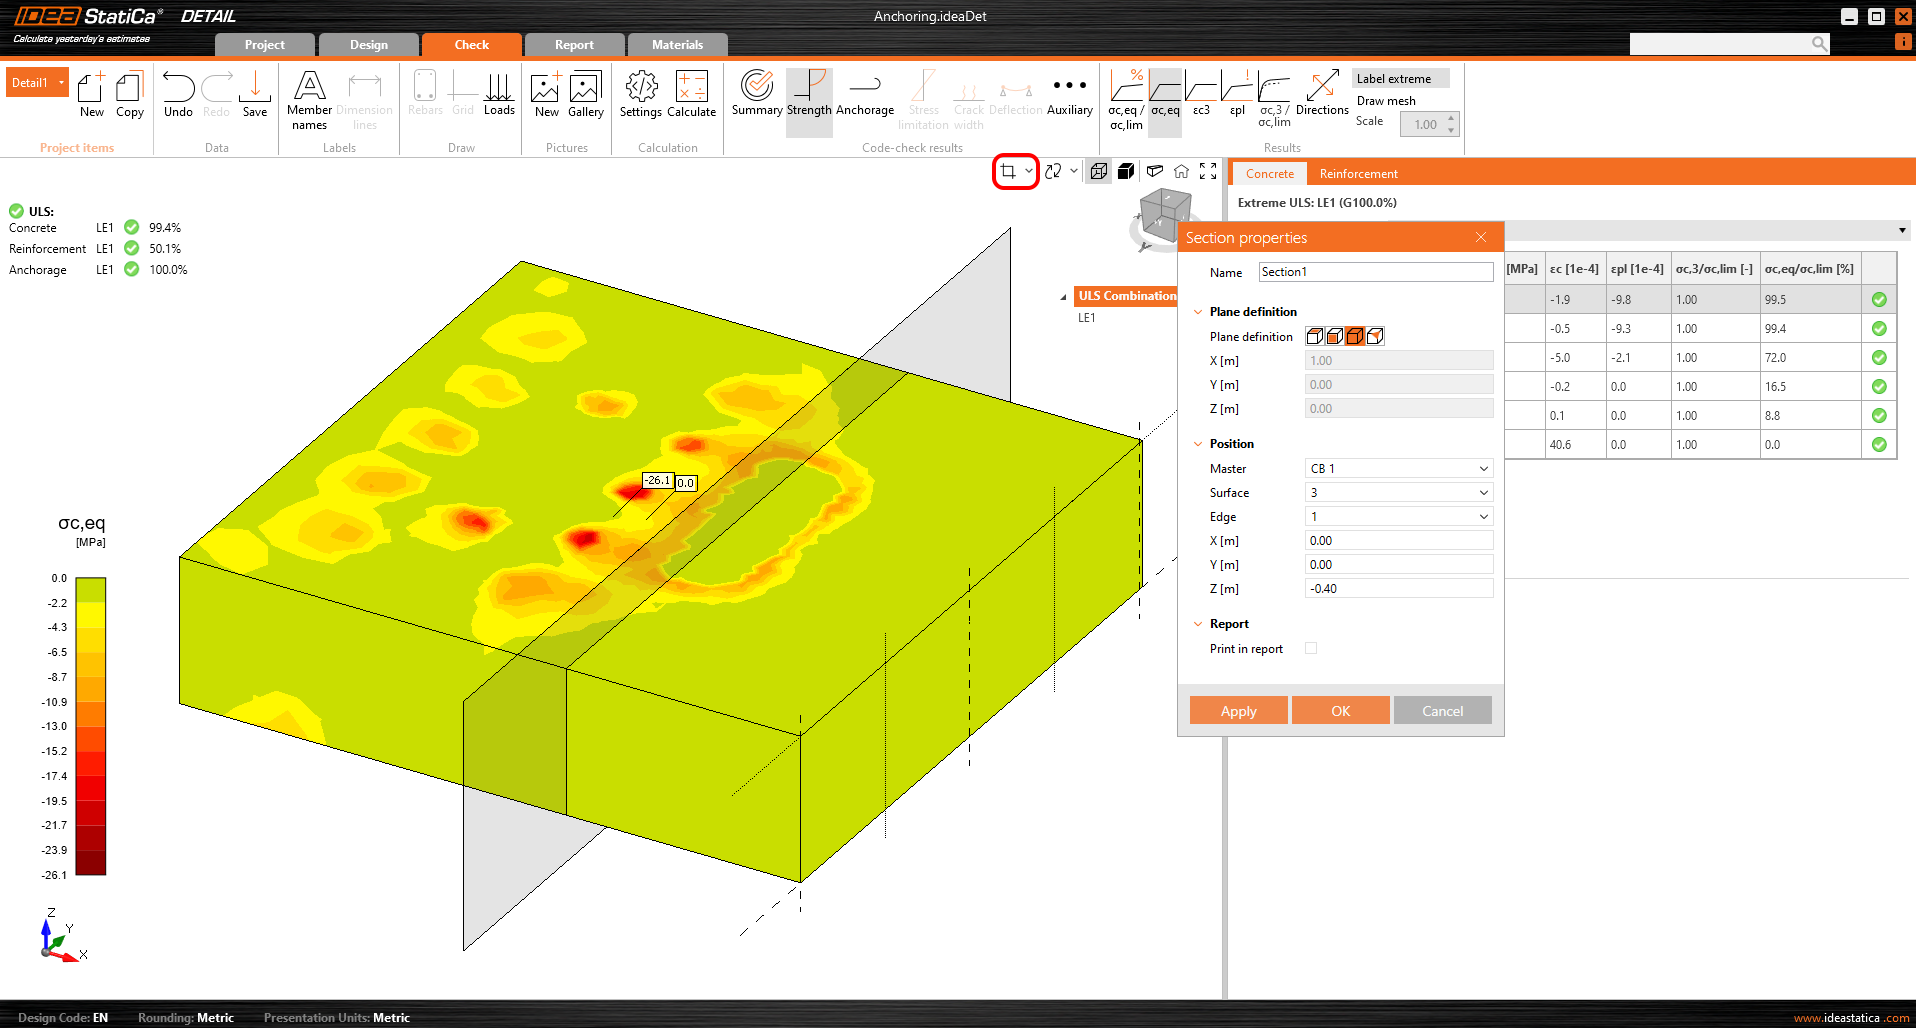
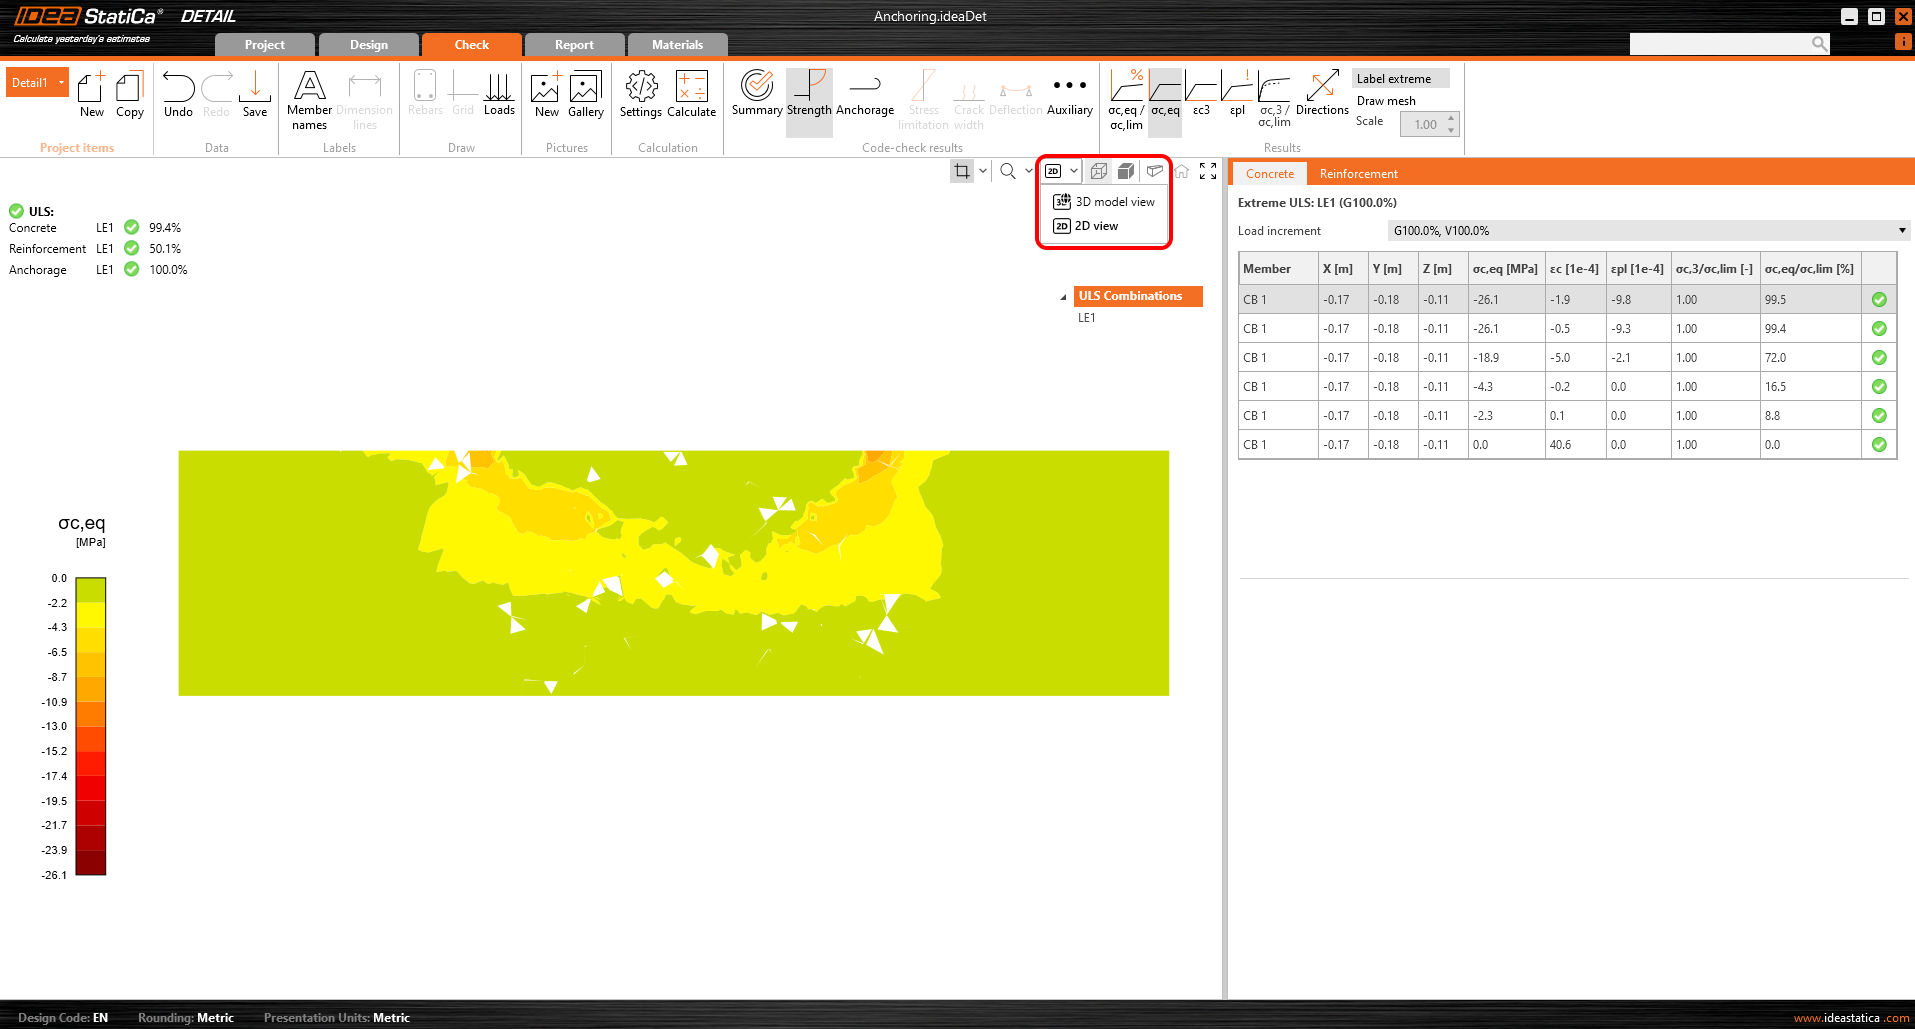
For 3D models, there is an option for displaying results for concrete - Section results. To define or modify the sections, you need to use the section button in the view control, which is in the top right corner of the scene.
Then you can simply turn on the section button and the results will be displayed via a specified section.
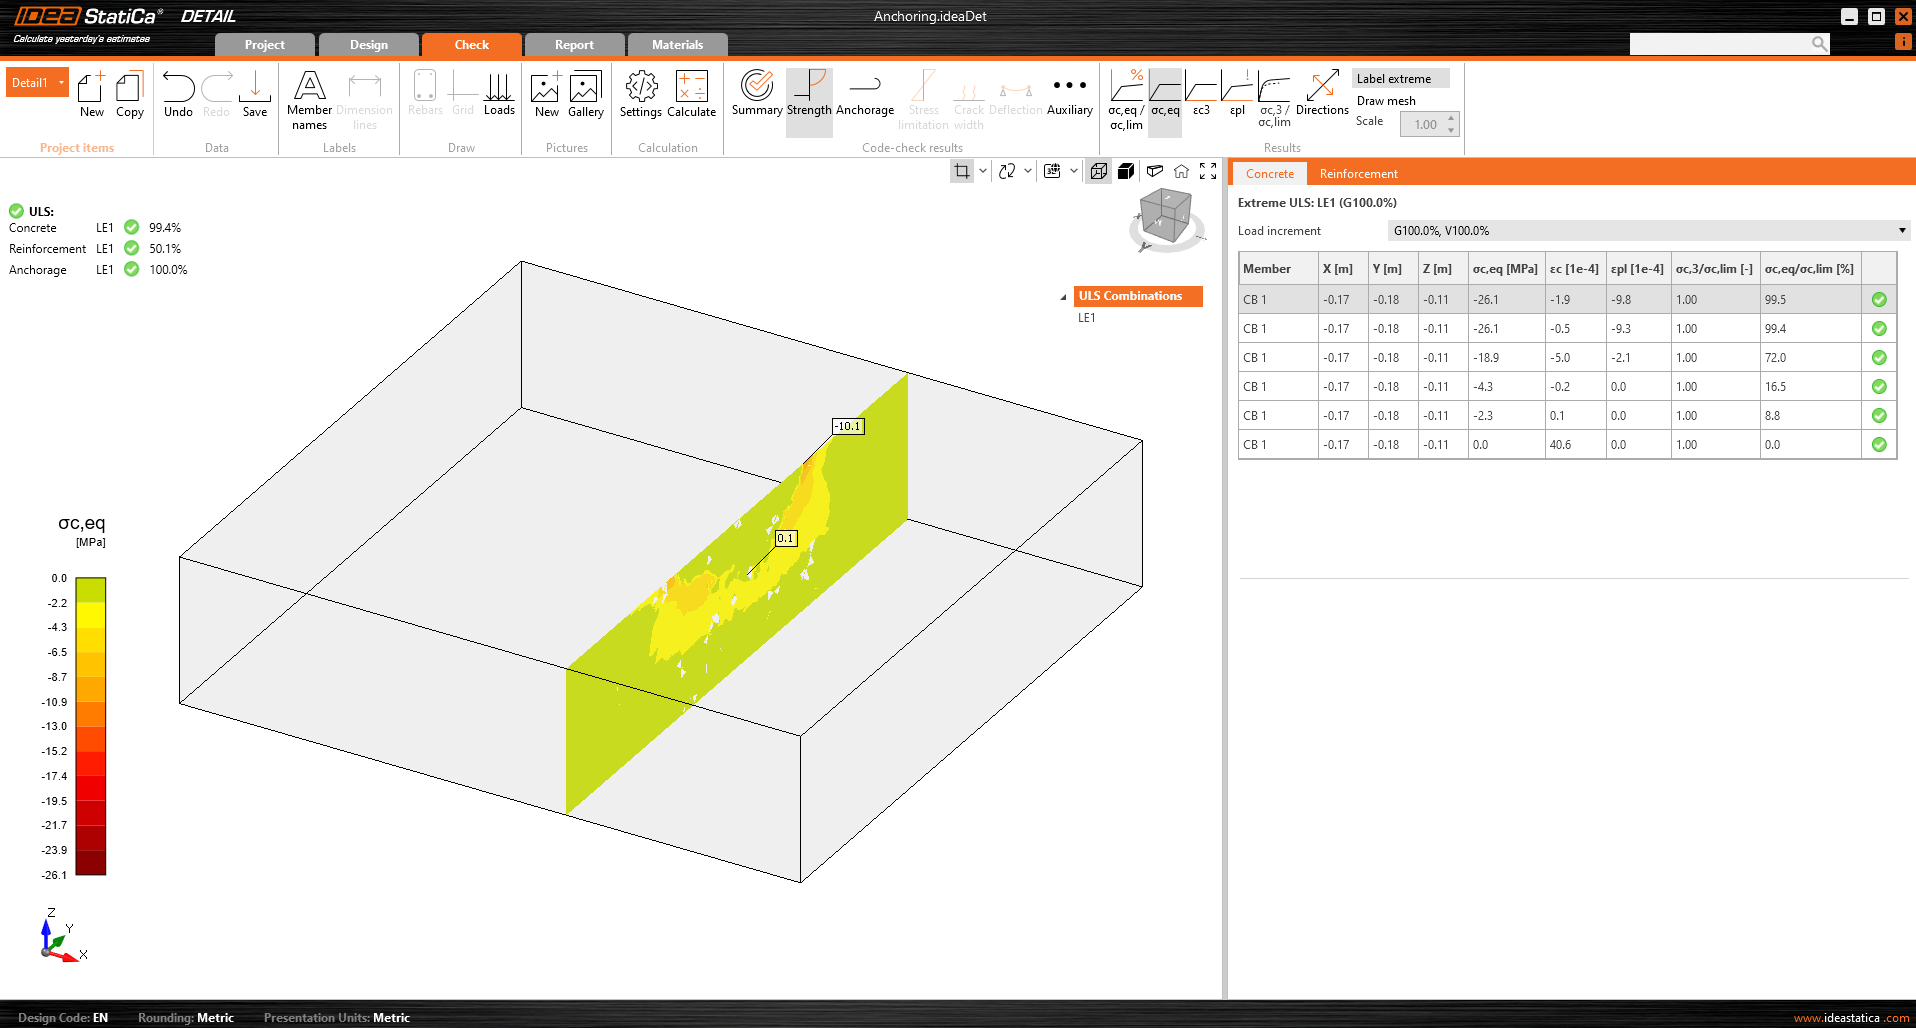
Or there is an option to switch the view from 3D to 2D and for better clarity display the selected section in 2D.
Report
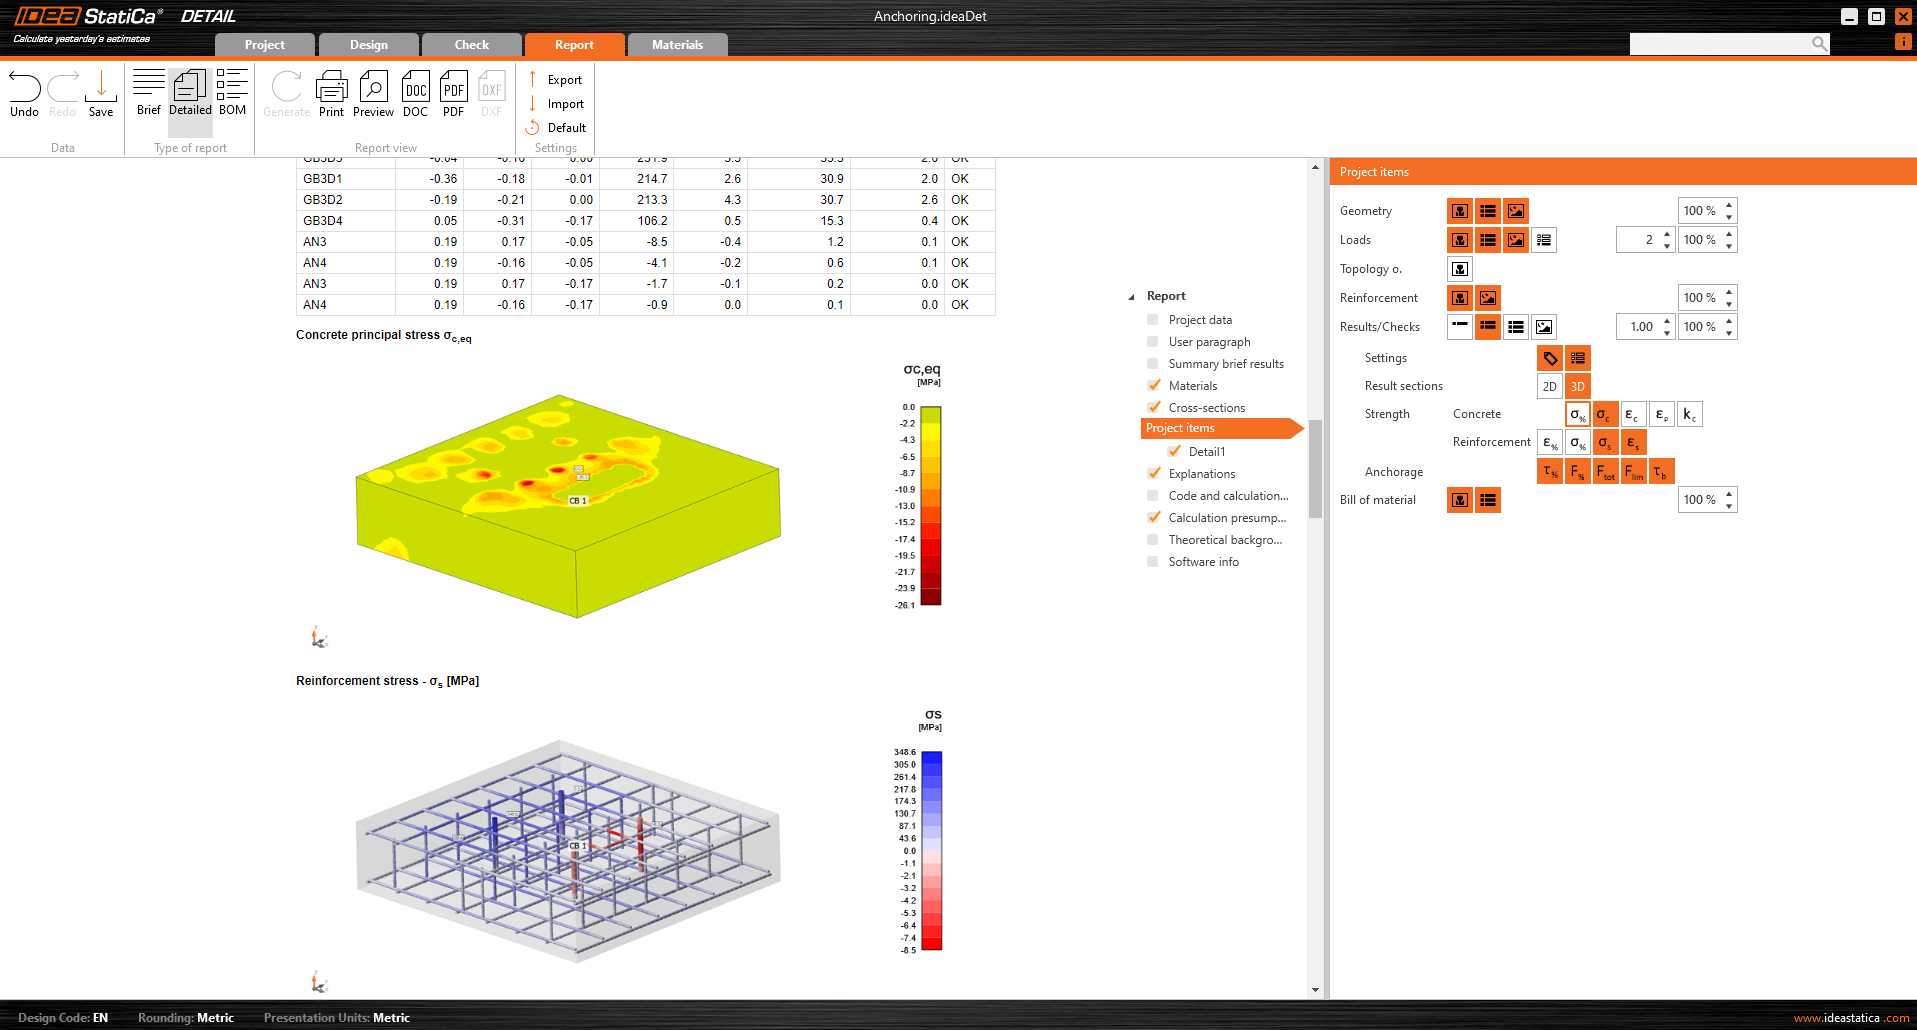
As is standard in our applications, all results can be printed to an automatically generated report including Theoretical background, user paragraphs, and many more.

