Axis BIM link for for the structural concrete beam design (EN)
1 How to activate the link
- Install the latest version of IDEA StatiCa, get it in the Downloads
- Make sure you are using a supported version of AxisVM – updates are published in the BIM section
After installation of both programs, run IDEA StatiCa and start with the item BIM. In the BIM wizard continues with the item Activate your BIM Link... During the process notification "Run as administrator" appears. Please confirm with the button Yes.
Select the software to integrate the IDEA StatiCa BIM link, click the Install button and check the installed status.
2 Import to BEAM
Open the attached project in AxisVM and run the linear analysis. Select the deep beam and use plugin IDEA StatiCa Beam.
Select Eurocode in the Checkbot
Save the project and continue on.
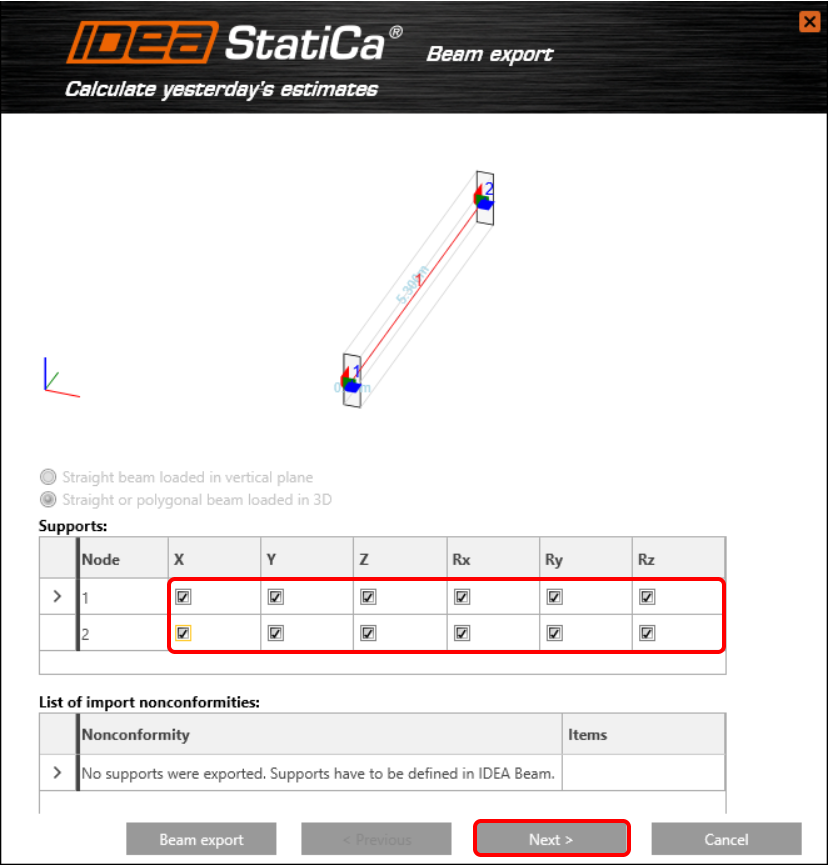
The beam is cut out from the monolithic structure, it means that boundary conditions are fixed on both sides. Restrain all degrees of freedom.
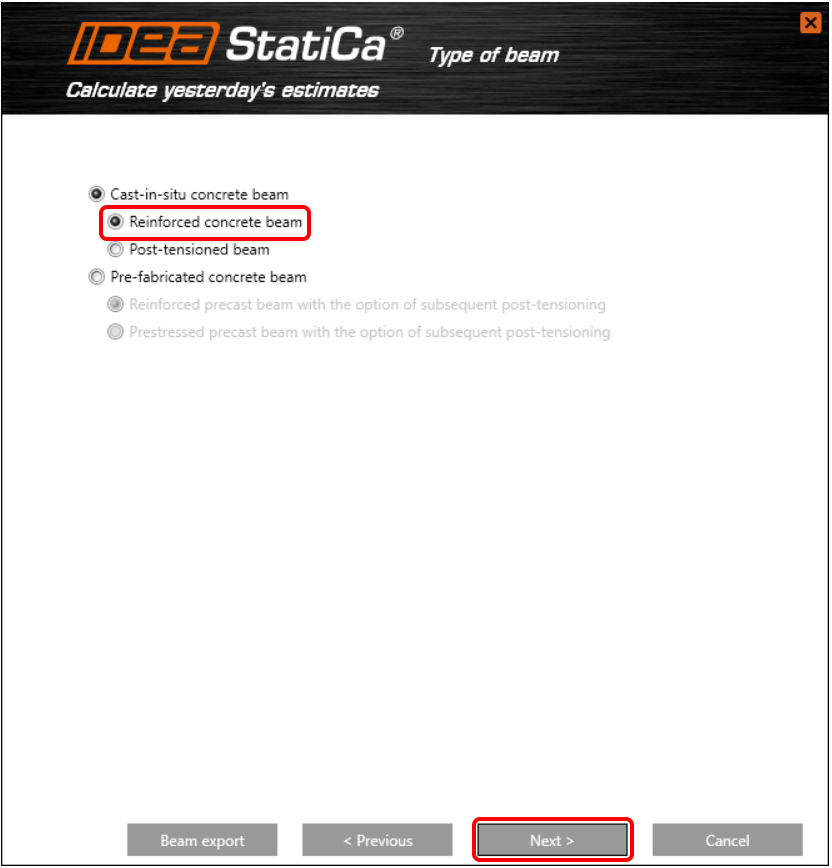
Select Reinforced concrete beam.
Define the general Eurocode as a national annex and let the software generate the self-weight According to a cross-section.
All variable load cases move to the second window. These load cases will be now exported to IDEA StatiCa Beam as user-defined forces.
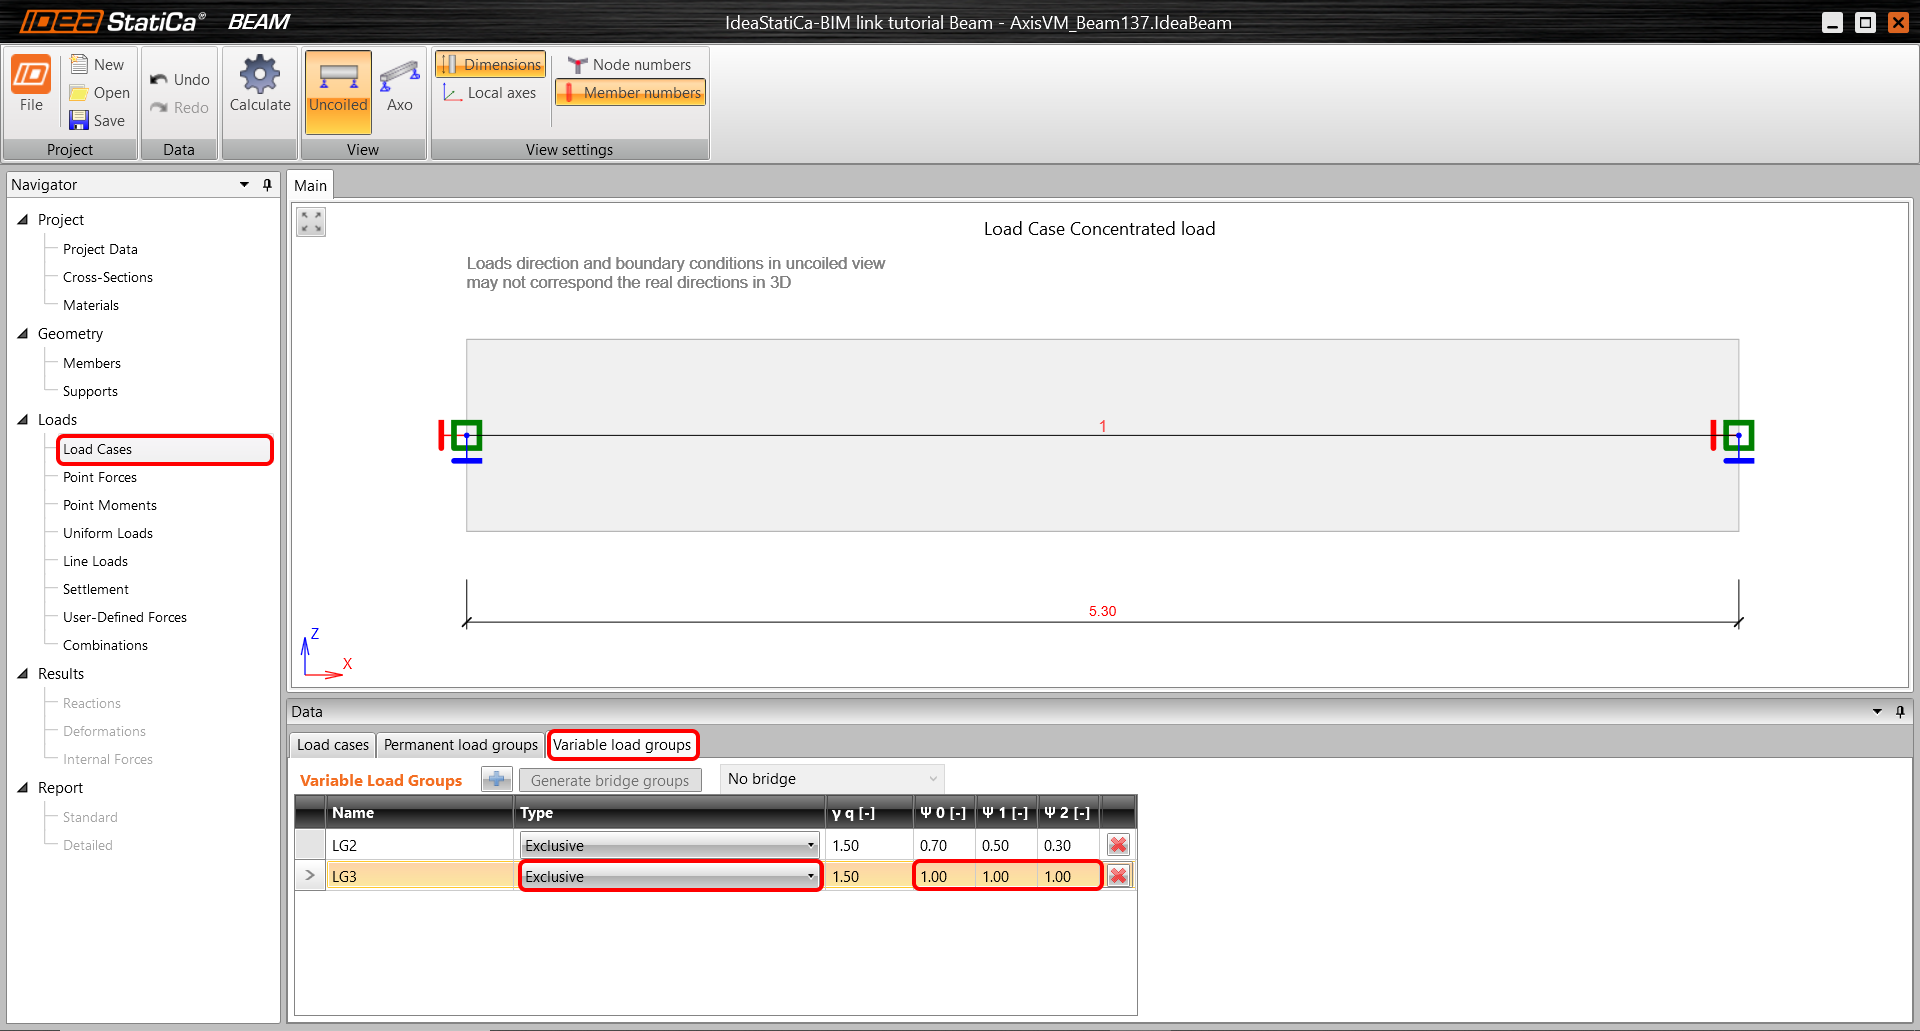
You are in the application IDEA StatiCa Beam. Change the default type standard on Exclusive and the partial factors on 1.
For load case Concentrated load change the type on the LG3.
How it was mentioned before. All variable load cases were exported as User-defined forces. All internal forces are equal to Axis's one. It's proven for the bending moment of the concentrated load.
Let's continue to the Combination tab. Entreat to combination wizard and transfer all variable loads to combinations for ULS and SLS. This process must be done manually for every combination (ULF, SLSC, SLF, SLSQ).
Run the linear analysis. You can display and control all internal forces created from combinations.
3 Import to Detail
Move to the Reinforcement tab in the navigator. Due to the fact that the beam includes openings and hanging, export all the beam to the Detail app. Use the Detail button in the ribbon for the desired export.
Select all beam for export.
There is an option to export only load cases or created load combinations. Choose highlighted combinations for code - check. One of them is ULS and the rest are for SLS. All selected combinations move to the second window using the Add button. End up the process by Finish button.
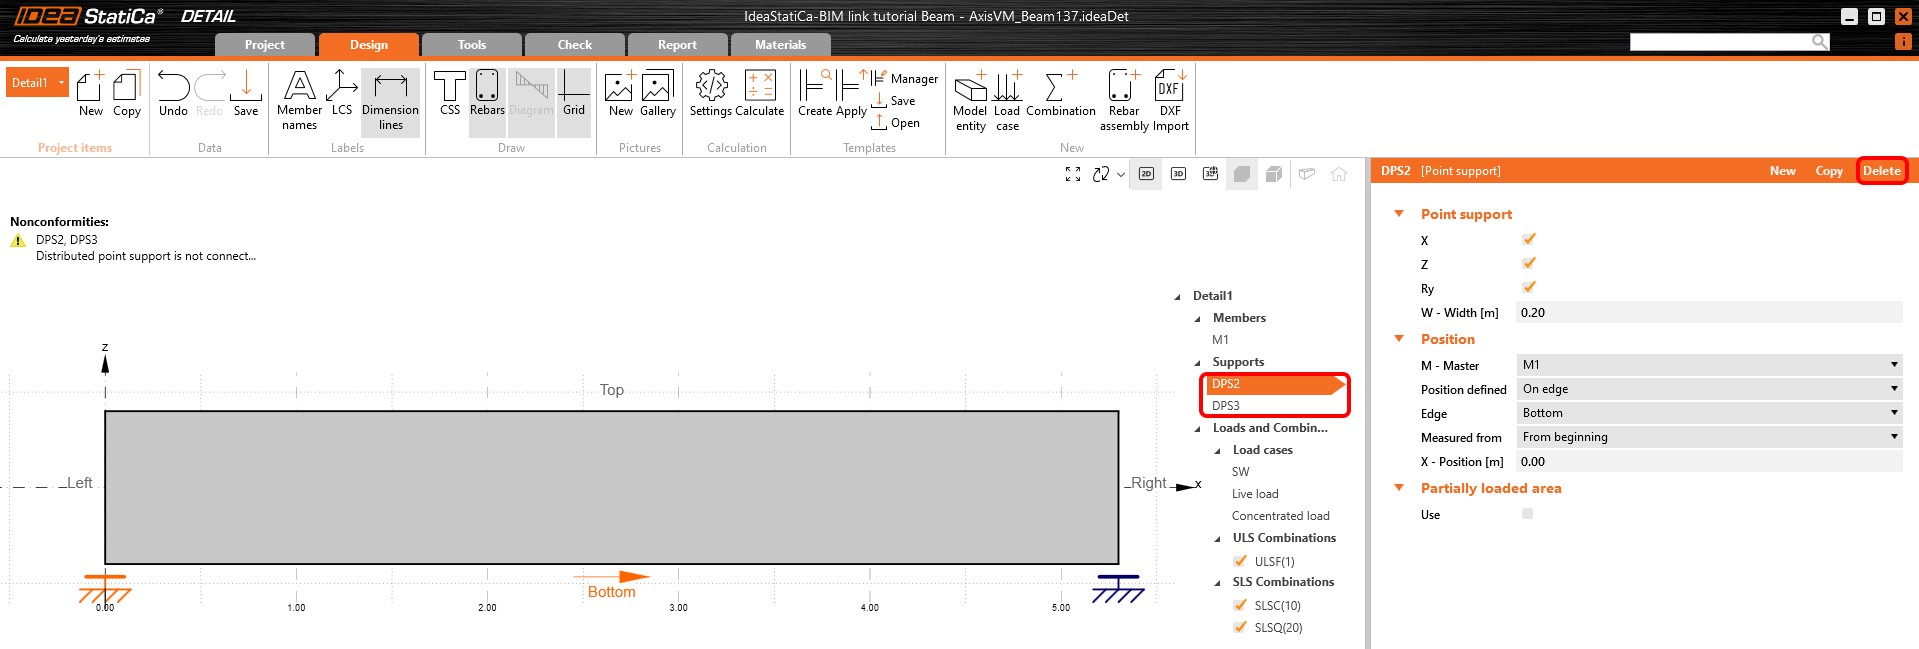
Here as you can see model is imported to Detail app with geometry and load combination, we can start analyzing discontinuity region. Please remove the distributed point support as it does not align with our specified boundary conditions.
Create new Line support. This support in a more realistic way respects the behavior of the beam cast to the column.
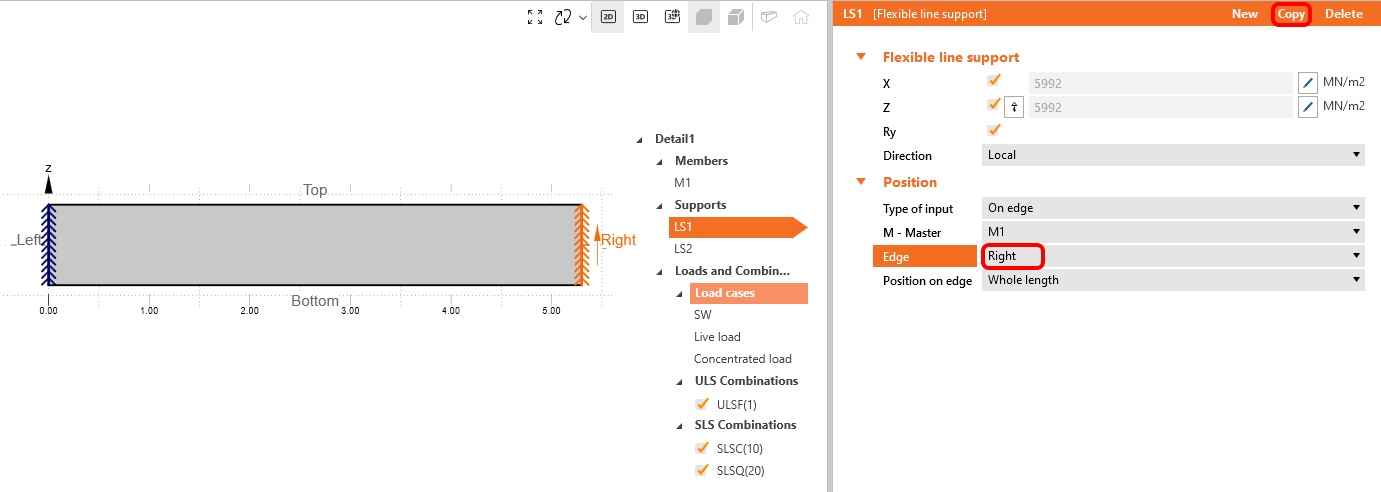
The support is related to the edge Left. All plane degrees of freedom X, Z, Ry are restrained. The support is typically configured as inactive in tension to account for the nonlinearity of the support in tension. For this project, please disable this setting.
Copy the operation LS1 and change the edge on the Right.
Using the Model entity button creates the hanging. Change the length L1, L2, L3 on the 0.5 m.
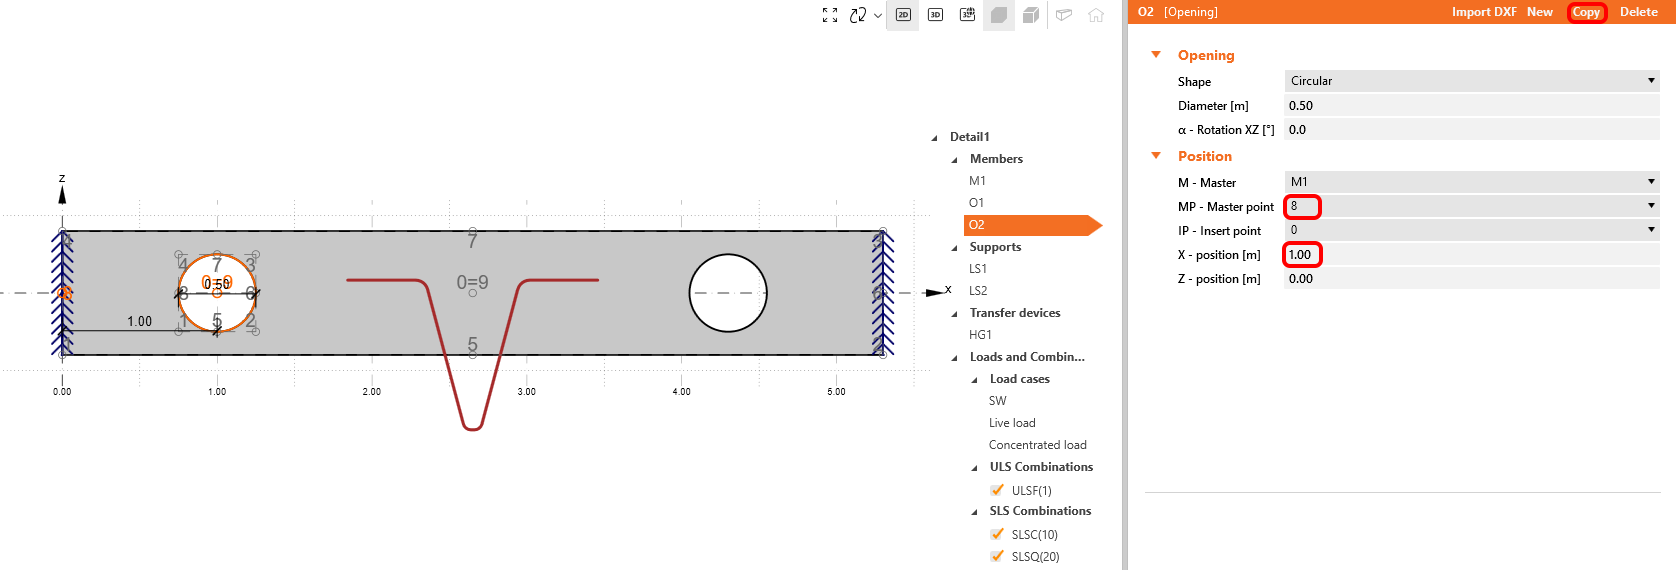
In the same way as for hanging create an opening and set up the parameters according to the picture. Change the shape on Circular with Diameter 0.5 m. Masterpoint set on position 6 and change the X-position about -1 m.
Copy the Opening and change Masterpoint on 8. The X-position shift about 1 m.
Assign the concentrated force to HG1. Since the force has been related to hanging the concrete is loaded through this device. You do not have to bother with creating the combinations. The prescription of the combinations is taken over from the IDEA StatiCa Beam app.
Move to the Tools tab on the ribbon. The static scheme, openings, and hanging create a topology for putting the reinforcement. How to reinforces it? Turn on the Topology optimization for displaying tension areas and compression fields.
Select the group of bar GB1 from the template. Set the 1 layer of reinforcement, Diameter 16 mm and 2 bars in the existing layer. Please set the anchorage type to continuous bar. This is crucial for accurately simulating the boundary conditions and ensuring correct analysis of the all structure.
Copy GB1 and change the edge to Top.
Copy GB2, distribute the reinforcement along with the height of the beam and change Diameter in 10 mm. Please increase the number of layers to 3 and set the distance between layers to 200 mm. Additionally, change the edge to the bottom and adjust the concrete cover to 200 mm.
Add using the plus button the template of the Stirrups. Change the Diameter on 8 mm and distribute the stirrups after 0.2 m distances.
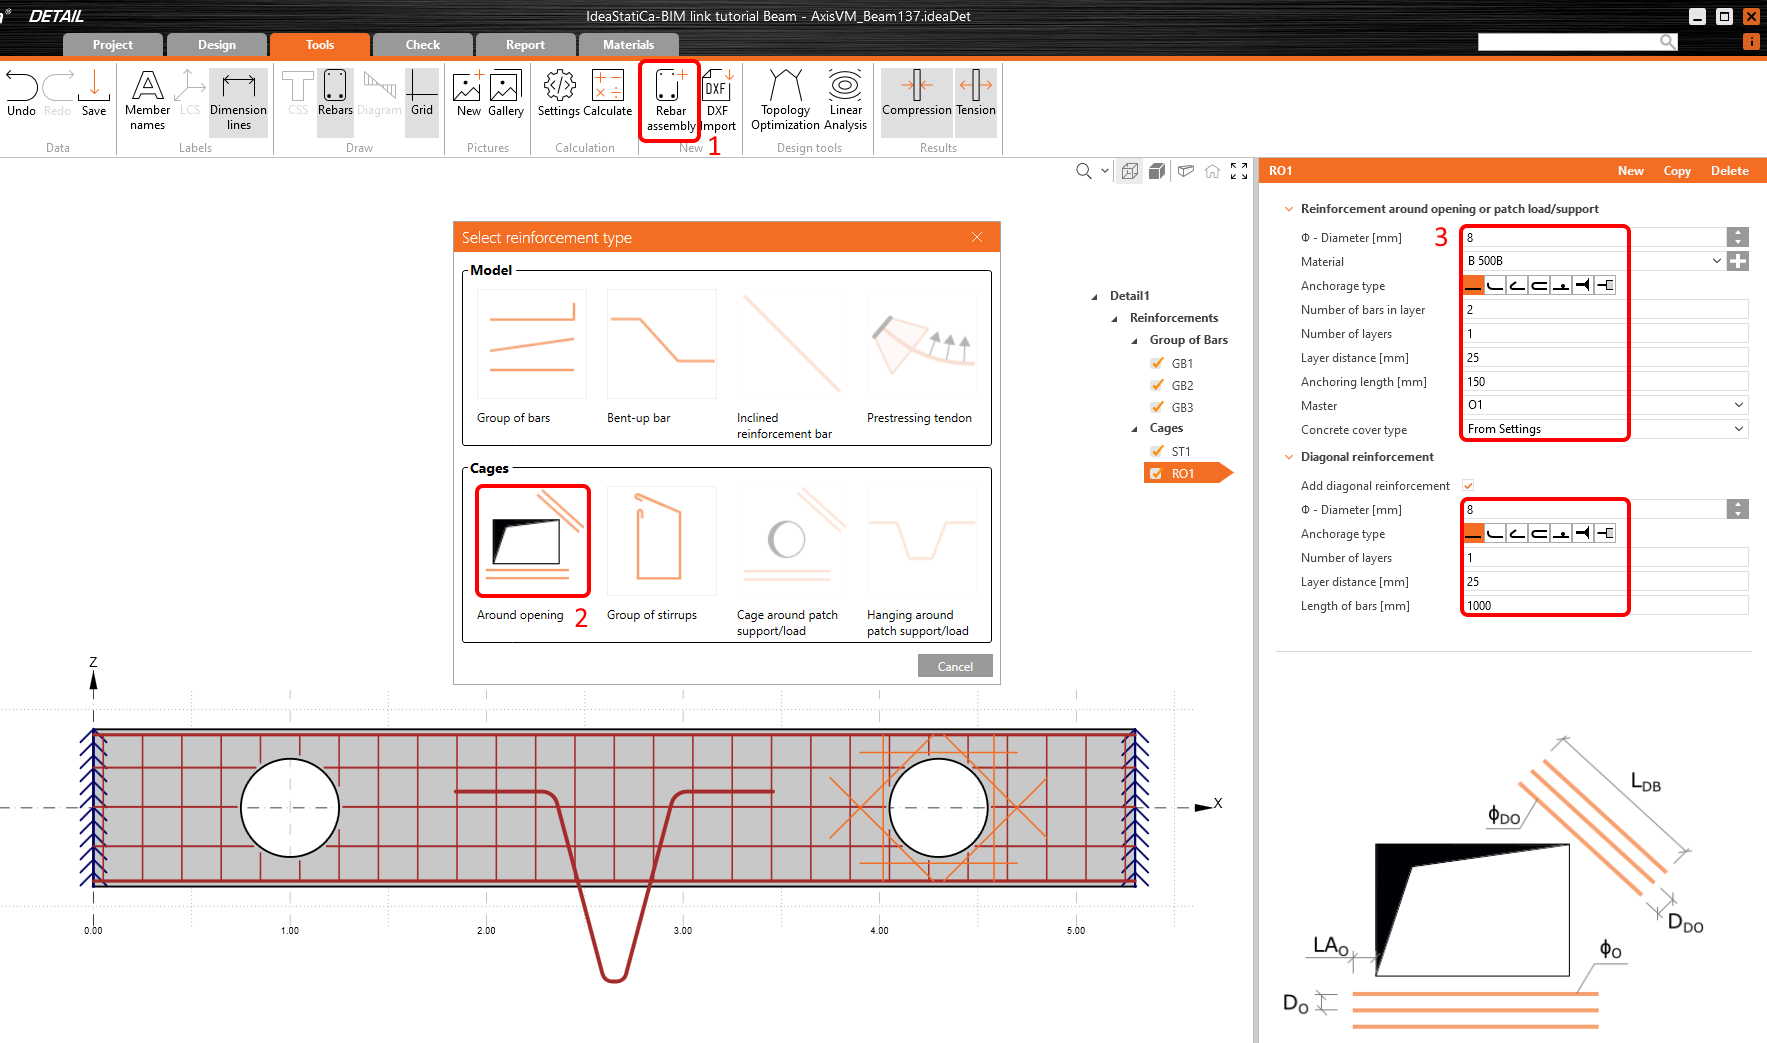
Additionally, please ensure that the openings are properly reinforced. Create the opening reinforcement and set the parameters according to the provided image. This step is critical for maintaining structural integrity.
Copy RO1 and change assignment to the O2.
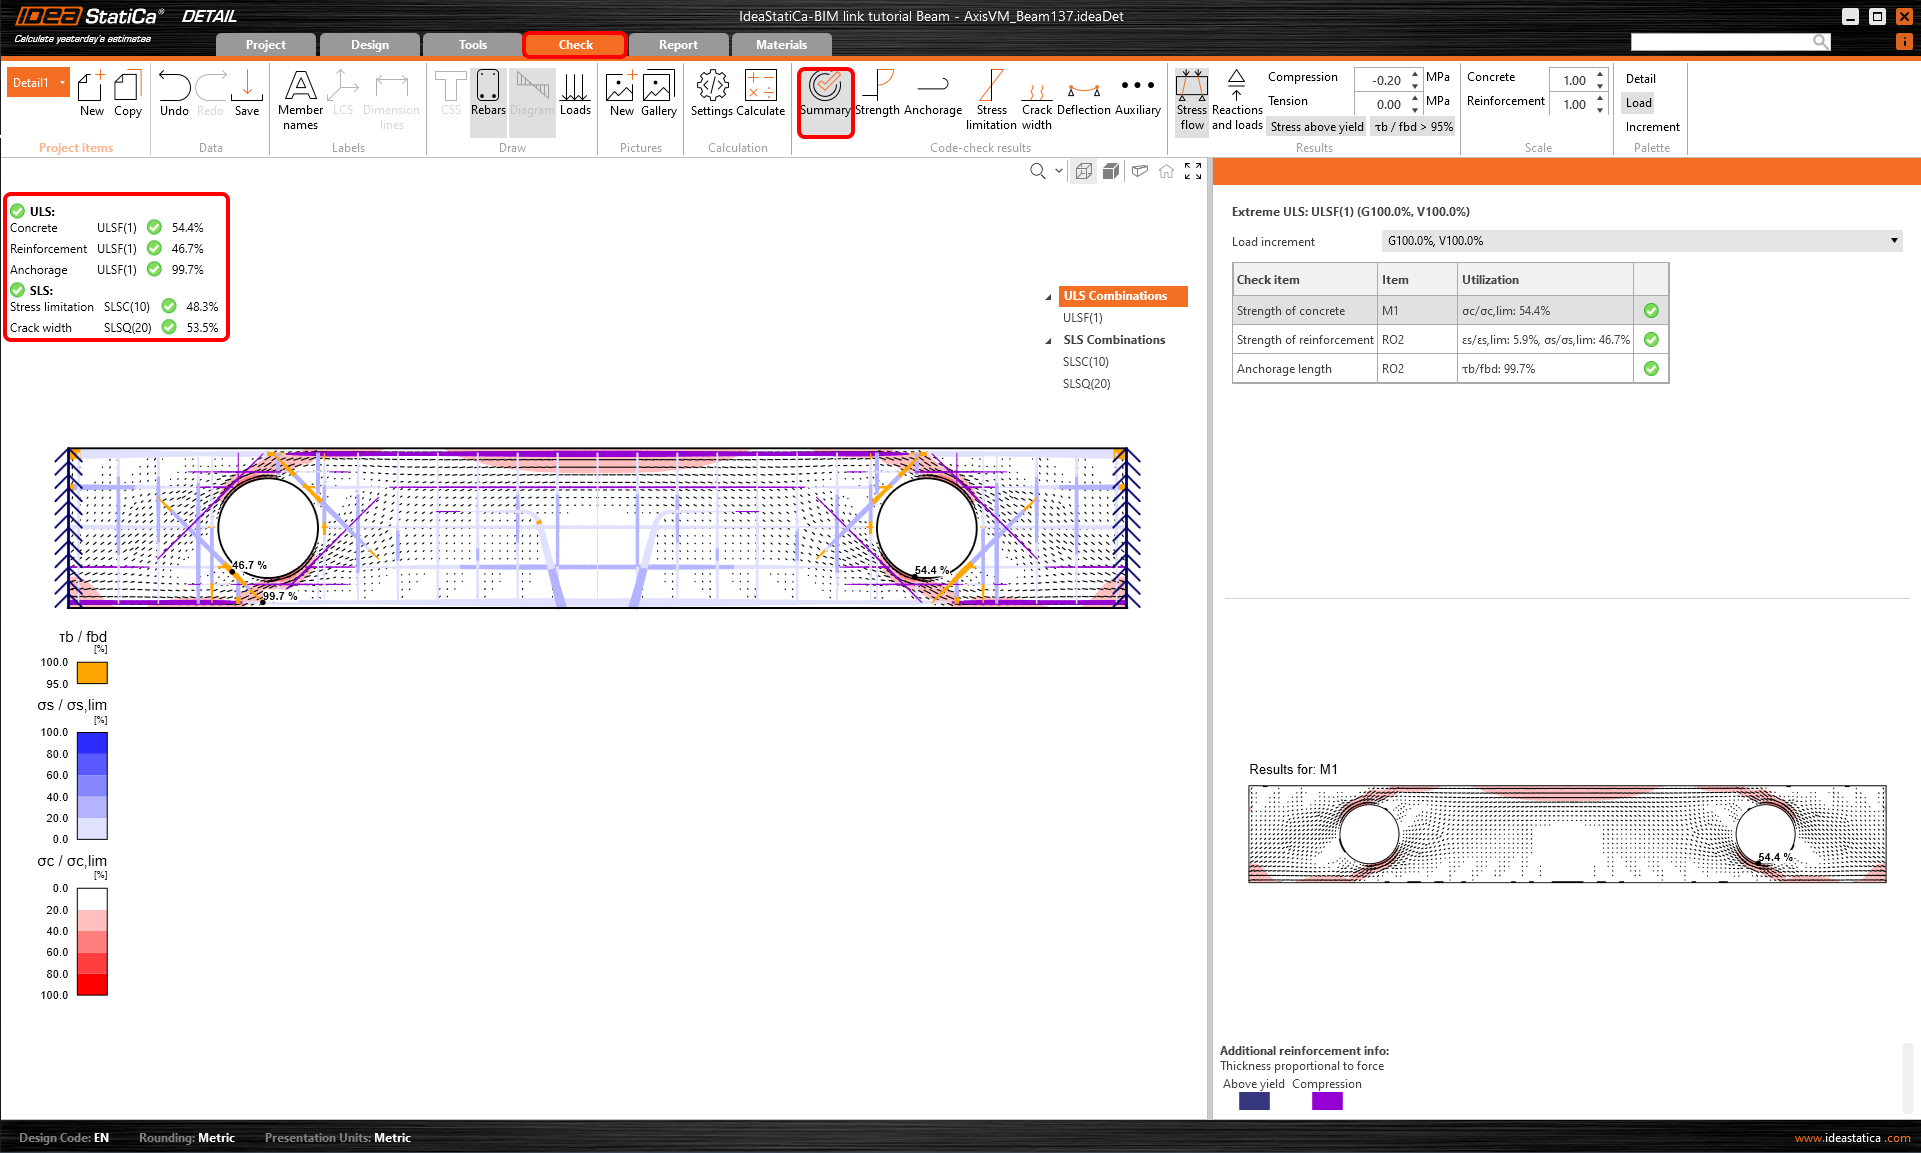
Run the nonlinear analysis. You receive a summary overview of the results with critical checks for ULS and SLS. In the 3D scene are displayed areas with maximal utilization of each entity.
The Strength tab critically outlines the maximum values of stress and strain for the concrete and reinforcement, along with their utilization. This information is essential for ensuring the structural integrity and capacity of the design.
The Crack Width tab provides essential information for the SLS check, ensuring compliance with design requirements. Additionally, it allows you to verify the maximum distance between cracks.
In the SLS check Deflection you can display the short-term and long-term nonlinear deflection.
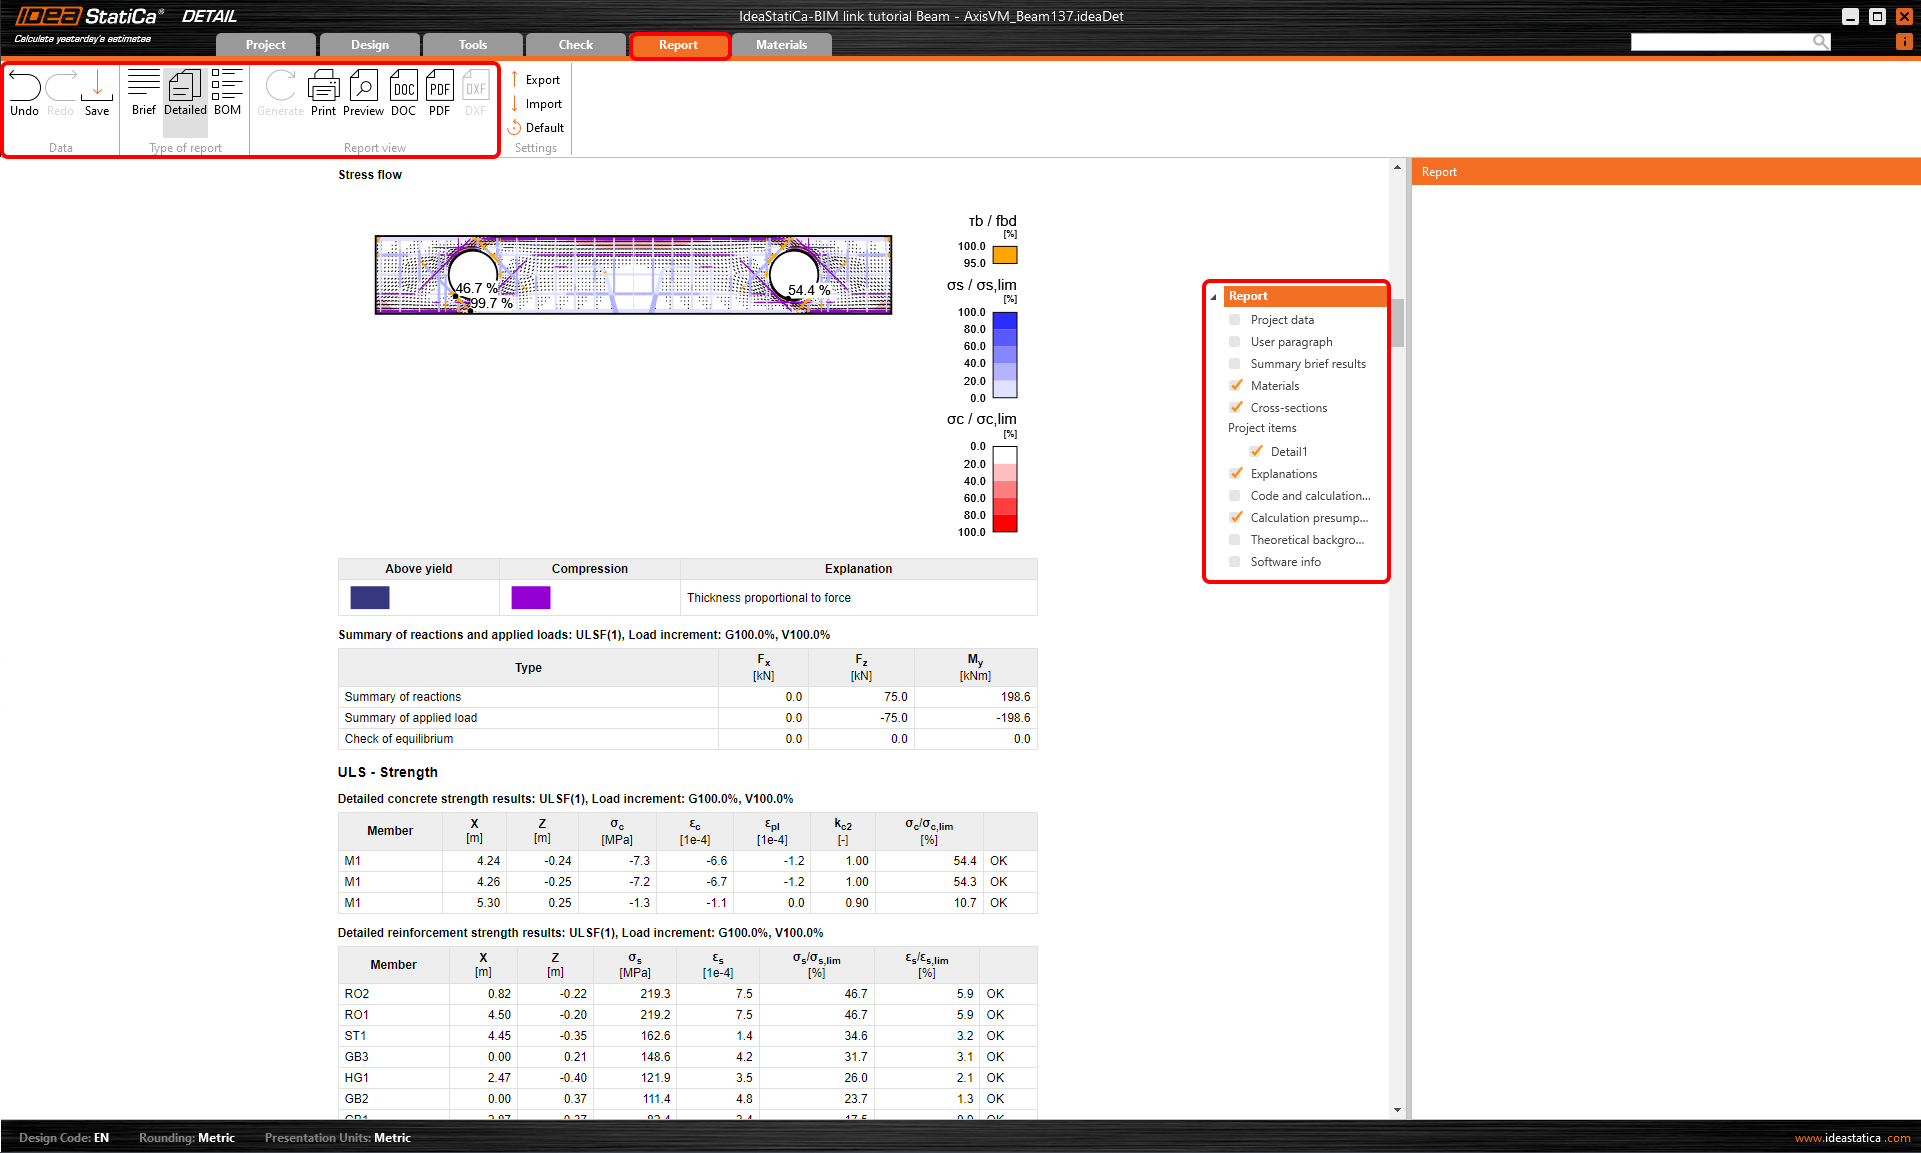
At last, go to the Report Preview/Print. IDEA StatiCa offers a fully customizable report to print out or save in an editable format.
You have designed, optimized, and code-checked a deep beam with openings and hanging according to Eurocode.


